
How to Make Easy, Spooky DIY Halloween Yard Signs from Wood Pallets
Are you looking for eco-friendly Halloween decorations? Are you interested in a quick and easy DIY pallet project? You’ll love these simple, spooky DIY Halloween yard signs!
Spooky season is back, and I’m once again here to defend my title as the craziest neighbor on your block.
Last year we were graciously gifted an animatronic witch who spent three weeks shrieking loudly and stirring her cauldron from the back of my husband’s truck. The year before, a neighbor came across the street to warn me that our 7-foot-tall inflatable black cat was scaring the bejeezus out of pets and pedestrians alike when it randomly would turn its head as they walked by.
Clearly, I have a reputation to uphold.
When it came to this year’s Halloween decorations, I wanted to go BIG, and I wanted to mix it up, which can be challenging as an environmentalist. I didn’t want to buy more cheap plastic decorations, which are often poorly constructed and wind up in the trash or a jumbled, gross pile at Goodwill within a couple of years.
So, I challenged myself to do better while defending my title as the reigning neighborhood Halloween Queen. After my massive wood pallet Christmas gift project, I wondered if it would be possible to make my own spooky yard signs from discarded wood pallets to accent this year’s Halloween decorations. Could sustainable Halloween decorations become a thing?
Spoiler alert: Yes, they can. And these spooky yard signs will take you next to no time to assemble.
What makes upcycling wood pallets a sustainable project?
I touched on this in my holiday pallet project, and according to the EPA, “Pallets are estimated to account for over 90 percent of total wood packaging,” and “In 2018, landfills received 12.2 million tons of wood.”
Circular Supply Chain adds, “Do you realize that we produce about 500 million pallets a year in the US alone to replace the worn pallets that we discard each year? The number of pallets out there is truly staggering. Nearly 2 billion wooden pallets are currently in circulation in the US, with a majority of them replaced each year.”
So, when you upcycle a wood pallet, you’re reducing waste by giving it new life. And when the result of your project keeps you from purchasing new, cheaply made plastic Halloween decorations, it’s a surefire win for the environment and your bank account.
Grab an old wood pallet (or two), and let’s get started on making this year a more sustainable Halloween!

Getting Started on Halloween Pallet Projects
Let’s start with the basics: Where can you get a discarded wood pallet?
While it may seem tempting to grab any wood pallet stacked up behind a commercial business, many of those wood pallets still belong to the store and will be reused. No one wants to get arrested for grand theft pallet, so check with the business before you load up your car.
You can also post an ask in your local Buy Nothing group on Facebook or peruse the free section of Facebook Marketplace, where I found the pallets for this year’s sustainable Halloween DIY adventure. Our local breweries are usually dying to get rid of some old pallets, and one has a free listing for pallets on Marketplace.
Is Facebook Marketplace not your thing? That’s fair, and some stores will sell them to you for just a few dollars. The Tractor Supply a few minutes from our home sells beat-up pallets for $3 each, and the newer pallets are $7 each.

How do you transport an old pallet?
While my husband’s truck bed is the preferred method of transporting old wood pallets, they also fit in the back of my compact SUV.
If neither of these options is for you, some Facebook Marketplace participants will deliver items to your house for an additional fee. Do remember that whenever you meet with strangers, it’s important to put your safety first.
Last but not least, take a moment to locate any rusty nails before moving old pallets. Wood pallets are also notorious for leaving a trail of splinters in their wake, so you may want to wear gloves and long sleeves while working with them.


Suggested Materials to Make Easy, Spooky DIY Halloween Yard Signs from Old Wood Pallets
- 1-2 weathered wood pallets (The weathering adds so much to the spooky factor!)
- A saw for breaking down pallets into smaller boards (Our boards were too weathered to use a hammer; it was shattering the wood.)
- ¾ inch wood screws (or screws that are long enough to go through two slats of wood without puncturing through to the decorative surface)
- Drill
- White and red acrylic paint
- Acrylic clearcoat (optional)
- Paint brushes


Instructions for Making Spooky DIY Halloween Yard Signs from Old Wood Pallets
Note: The beauty of this craft is that the imperfections just add to the rustic, spooky feel of the signs. Are you using old wood? Fantastic. Did the edges of your sign splinter? How eerie. Is your handwriting a hot mess? That sign was clearly made by a madman. Are none of your signs at right angles? Trespassers really should keep back, I see.
- Deconstruct your wood into slats. I used a miter saw for this quickly and successfully, but there’s absolutely a better tool. If your wood feels brittle, as mine did, you do not want to use a hammer because the wood will shatter. I sawed between the nails to form planks. No, I did not measure them. Ain’t nobody got time for that.
- Decide which planks you’ll be using as stakes. I picked the longer planks to give me more height to work with. Cut them down the middle, length-wise, to form two stakes.
- Then cut the end to form a point so it will go in the ground, planters, or hay bales more easily. No, I did not measure this part either. It’s literally going in the ground, so no one will look at that part.
- Attach your planks to your stakes using your wood screws. I highly recommend pre-drilling your holes and adding two screws per plank. If you don’t, the plank tends to tilt on the stake, and I wanted it to stay put. If you’re feeling frisky, like I was, consider intentionally attaching your planks at wonky angles. And, if you have a longer phrase you’d like to write, consider putting two planks on one stake.
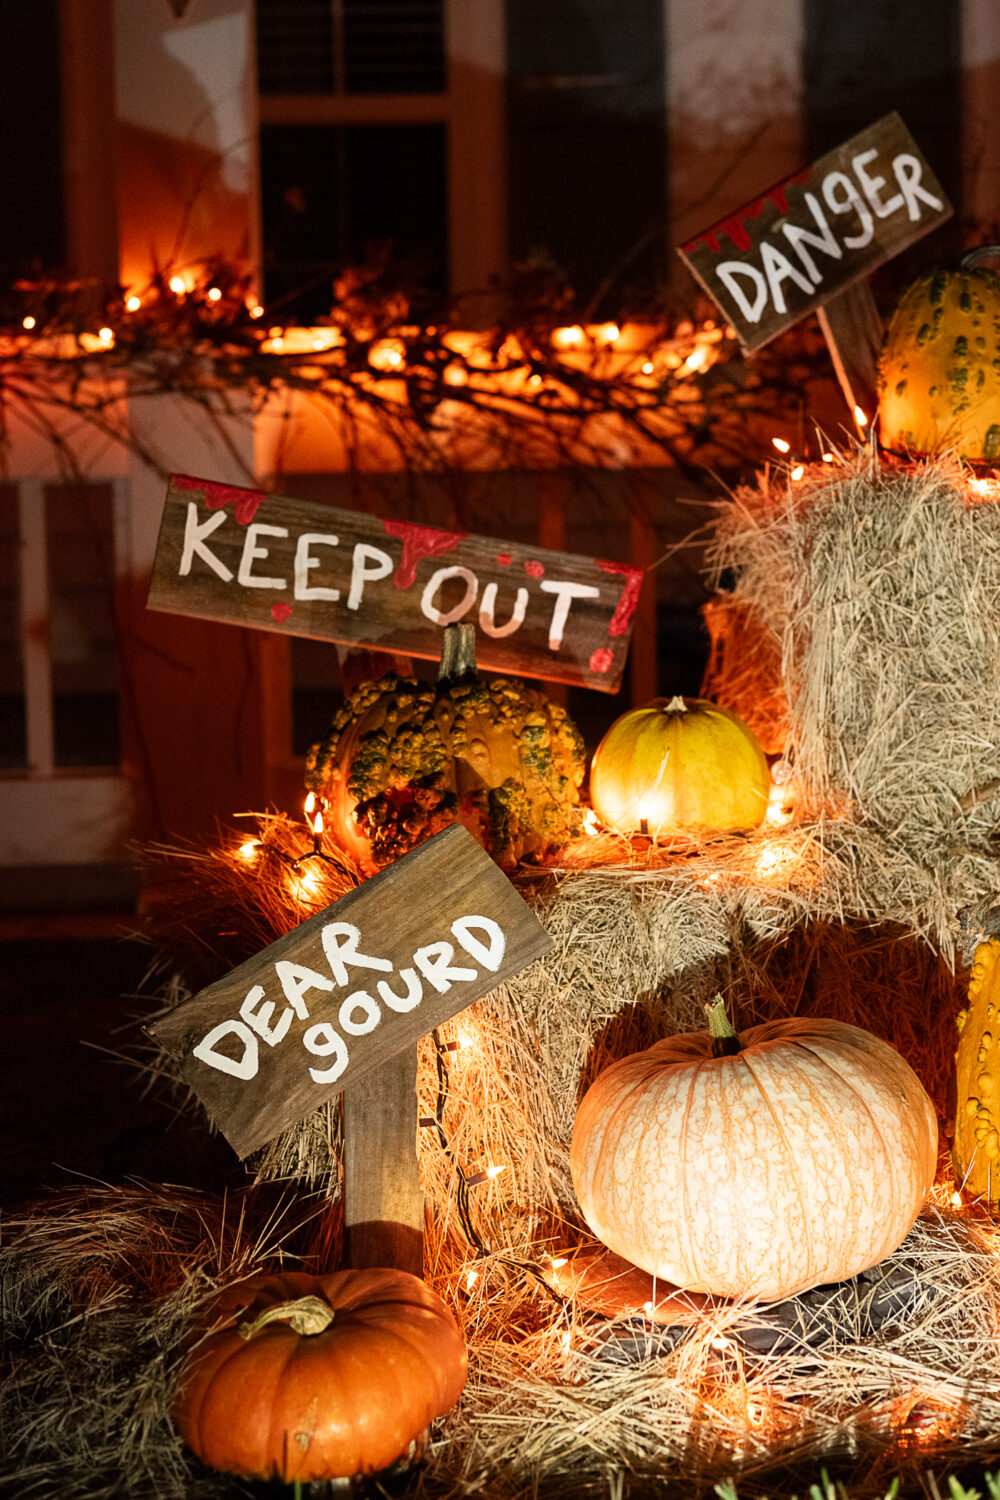
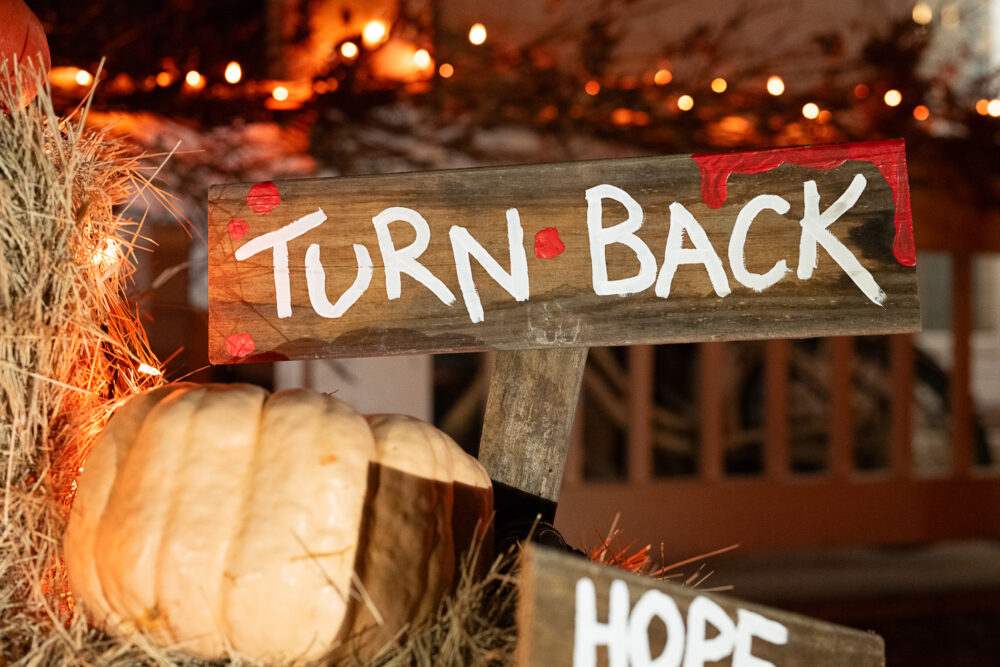
- Flip your planks over and paint your scary signs with ominous or festive messages. If you want to reuse these year after year, you should probably wash and let the signs dry first. (I skipped this step.)
- If desired, use the red paint to add “blood smears” and drips from the top of your signs. Let everything dry completely.
- Optionally, if you plan to reuse these signs year after year, you should add one or two clear coats to help weather-proof them and let them dry.
- Decorate your yard! These spooky signs are perfect for graveyards, pumpkin patches, zombie hoards, and so much more.


Disposing of Your Spooky DIY Halloween Yard Signs Responsibly
If you want to reuse your spooky DIY pallet wood signs as part of next year’s sustainable Halloween decorations, follow my notes above regarding cleaning them well before applying your paint and clear-coating your signs.
Take “recycle and reuse” to the next level by either painting over your signs or sanding them down and repainting them. They would make adorable “Tree Farm” or “Welcome Santa” signs for the holidays. You could also repurpose them for Easter with “Peter Rabbit’s Garden” or “Hide Eggs Here” verbiage.
Are you over it? That’s OK, too. Simply remove your screws, sand off the paint, and compost the wood.
All photos via Reese Moore Photography
If You Liked Halloween Pallet Ideas: Easy, Spooky DIY Yard Signs, You May Enjoy:
How to Host a Halloween Costume Swap
Cheap DIY Halloween Decorations: Haunted Orchard Tablescape
20 Zero Waste Halloween Decoration Ideas
About the Author

Reese Moore
Reese Moore is a photographer, content creator, and pickle connoisseur who divides time between Charleston and Lake Lure. When she’s not behind the lens shooting stunning images for Reese Moore Photography, Reese loves to spend her time wandering the woods with her dog Gatsby or adventuring with her husband Logan in their Airstream Basecamp.

DIY Halloween Yard Signs from Wood Pallets
Materials
- 1-2 weathered wood pallets (The weathering adds so much to the spooky factor!)
- ¾ inch wood screws (or screws that are long enough to go through two slats of wood without puncturing through to the decorative surface)
- White and red acrylic paint
- Acrylic clearcoat (optional)
Tools
- A saw for breaking down pallets into smaller boards (Our boards were too weathered to use a hammer; it was shattering the wood.)
- Drill
- Paint brushes
Instructions
- Deconstruct your wood into slats. I used a miter saw for this quickly and successfully, but there’s absolutely a better tool. If your wood feels brittle, as mine did, you do not want to use a hammer because the wood will shatter. I sawed between the nails to form planks. No, I did not measure them. Ain’t nobody got time for that.
- Decide which planks you’ll be using as stakes. I picked the longer planks to give me more height to work with. Cut them down the middle, length-wise, to form two stakes.
- Then cut the end to form a point so it will go in the ground, planters, or hay bales more easily. No, I did not measure this part either. It’s literally going in the ground, so no one will look at that part.
- Attach your planks to your stakes using your wood screws. I highly recommend pre-drilling your holes and adding two screws per plank. If you don’t, the plank tends to tilt on the stake, and I wanted it to stay put. If you’re feeling frisky, like I was, consider intentionally attaching your planks at wonky angles. And, if you have a longer phrase you’d like to write, consider putting two planks on one stake.
- Flip your planks over and paint your scary signs with ominous or festive messages. If you want to reuse these year after year, you should probably wash and let the signs dry first. (I skipped this step.)
- If desired, use the red paint to add “blood smears” and drips from the top of your signs. Let everything dry completely.
- Optionally, if you plan to reuse these signs year after year, you should add one or two clear coats to help weather-proof them and let them dry.
- Decorate your yard! These spooky signs are perfect for graveyards, pumpkin patches, zombie hoards, and so much more.


I just love the blood on the signs….and the more unusual saying on them….good job!
Thanks! Reese has such a creative gift.