
Cheap DIY Halloween Decorations: Haunted Orchard Tablescape
Are you looking to create a spooky Halloween tablescape on a budget? Are you looking for inspired eco-friendly Halloween decorations? Read on for details on how to make a spooky haunted orchard-inspired tablescape using everyday household items.
This post contains affiliate links.
If the scariest thing about Halloween is the amount of money you end up spending each year, you’ve landed on the right blog post. Halloween is, hands down, my favorite holiday, but decorating my house is a struggle as an environmentalist, and I often hide my purchases from my husband so he can’t tell how much I’ve spent. (The key is to smuggle things into the garage while he’s at the gym. I know I’m not alone on that one!) Did you know:
- Americans spent a whopping estimated $10.14 billion dollars on Halloween last year?
- The average person will spend $103 on Halloween this year?
- In the UK alone, 2,000 tonnes of plastic-based Halloween clothing is thrown out each year?
- An estimated 1.3 billion pumpkins are landfilled annually?
- Most Halloween decorations are made overseas from cheap, non-recyclable plastics?
That’s probably enough to give you nightmares, but don’t let it spook you so much that you can’t enjoy Halloween! There are tons of ways to get creative and still go all out for the best holiday ever. From eco-friendly costume ideas and more sustainable candy options to upcycled decorations, the world is your oyster when it comes to a festive, fun, and responsible Halloween.
So, let’s kick off the spooky season with cheap DIY Halloween decorations and a delightfully frightful haunted orchard-inspired tablescape.

Why This Haunted Orchard Halloween Tablescape is a Must-try:
- Most of the materials can be found in your yard, home, local thrift store, or grocery store.
- It reuses old packaging material.
- Half of the decor is edible!
- Your friends and family will love the scale of the decor.
What You’ll Need for the Haunted Orchard Halloween Tablescape
Materials for the Haunted Tree
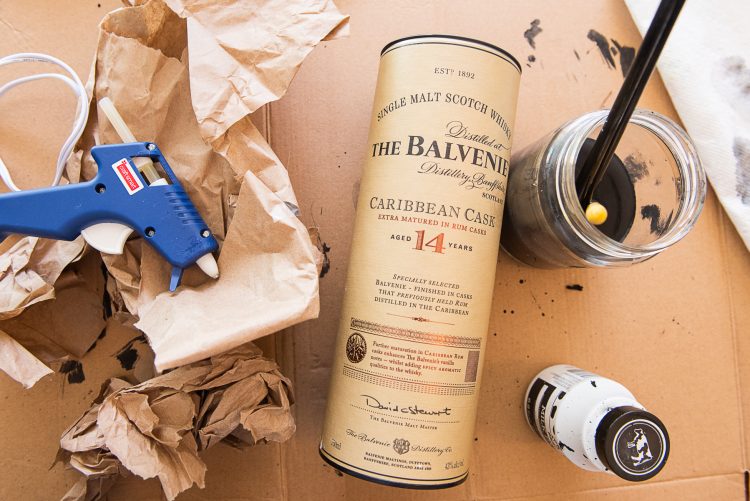
- Cylindrical packaging material, such as from a poster, craft liquor bottle, or gift canister
- Used wrapping paper or packing paper*
- Glue gun
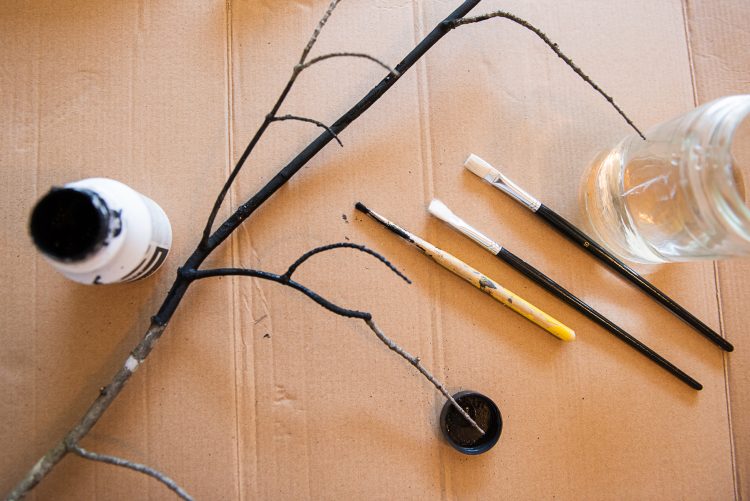
- Black milk paint**
- Black thread or thin wire
- Paintbrush and jar or can of water to clean your brush
- Twigs from your yard, with or without leaves, and brushed with your dry paintbrush to remove any debris
- Broken-down cardboard box to use as a protective surface
Notes: *It’s fine if there’s old tape on it. Mine was packing paper turned gift wrap, so it was ripped and wrinkled and had bits of tape everywhere.
**Milk paint is a natural, non-toxic, water-soluble, quick-drying, and easily spreadable paint made from milk protein, lime, and earth pigments. It’s better for you and better for the planet. You can buy it at some chain craft stores and also purchase milk paint online here.
Materials for the Halloween Tablescape
- Tablecloth and cloth napkins*
- 5-7 votive candles, preferably sox or beeswax
- Additional twigs reserved from making your tree
- Plates and/or chargers**
- Silverware and glassware
- 5-7 fresh apples*** (You’ll need additional apples for each “poisoned apple” place setting, so factor that in when buying.)
- Masking tape or painter’s tape
Notes: *This tablecloth and the napkins were rescued from an unwanted bin at an estate sale.
**I didn’t have chargers, so I layered two of our sets of plates that were different shapes. You can also regularly find these items at thrift stores or vintage shops.
***We picked a bunch of beautiful, fresh, unwaxed apples from a local u-pick orchard, which likely helped the chocolate to adhere easily.
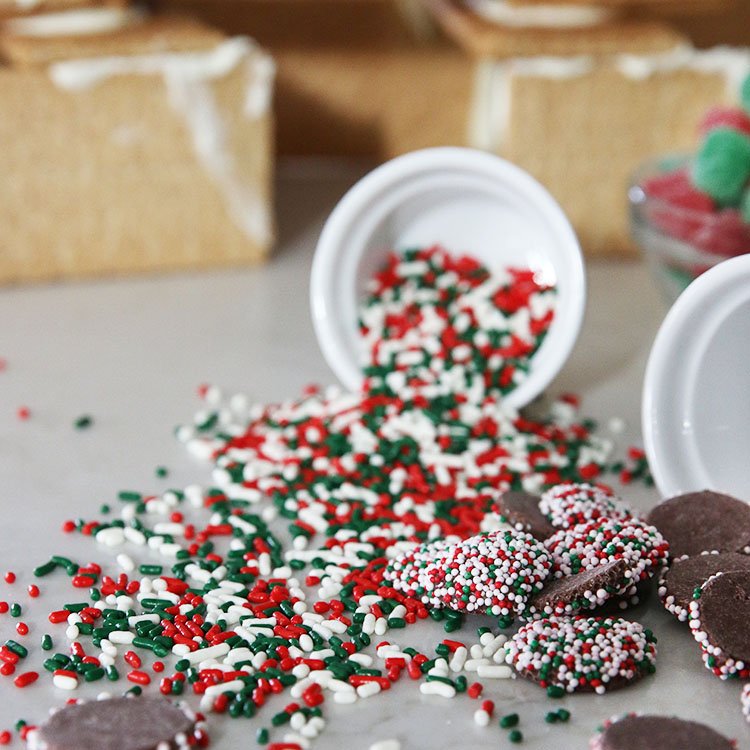
Materials for the Dark Chocolate “Poisoned” Apples
- Fresh apples equal to the number of place settings
- Toothpicks for each apple
- Baking sheet and parchment paper
- Cloth towel for drying and buffing apples
- A bag of dark chocolate morsels
- 1 teaspoon of vegetable oil
- Small saucepan
- Scrap paper, markers, and glue for leaves*
Notes: *I used packing paper that came with a set of plates my mom ordered and my hot glue.
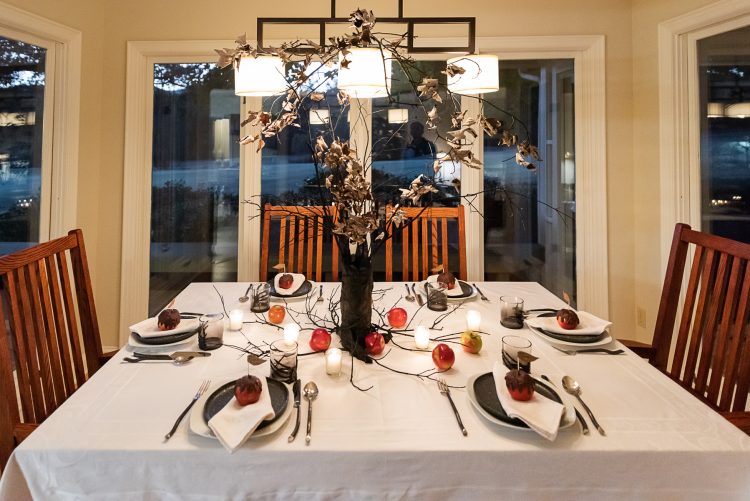
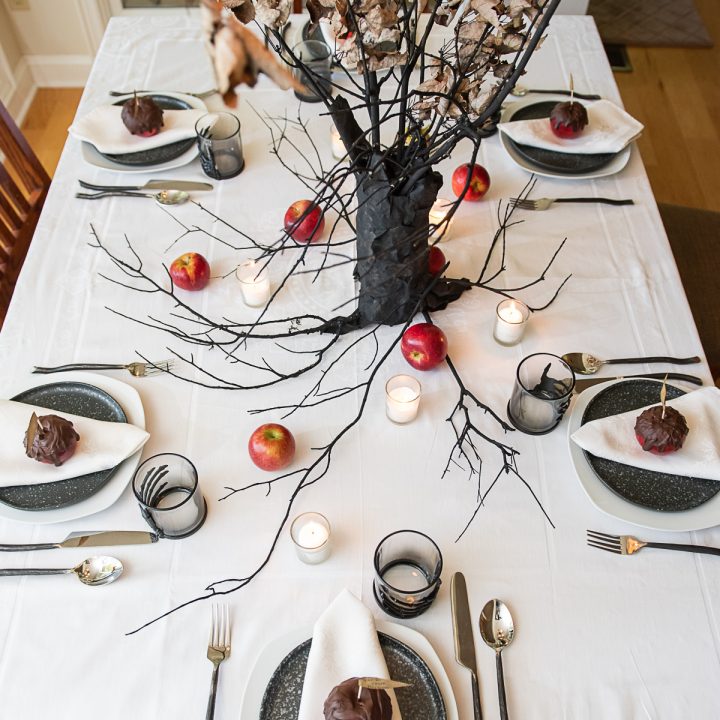
How to Make a Haunted Orchard Halloween Tablescape
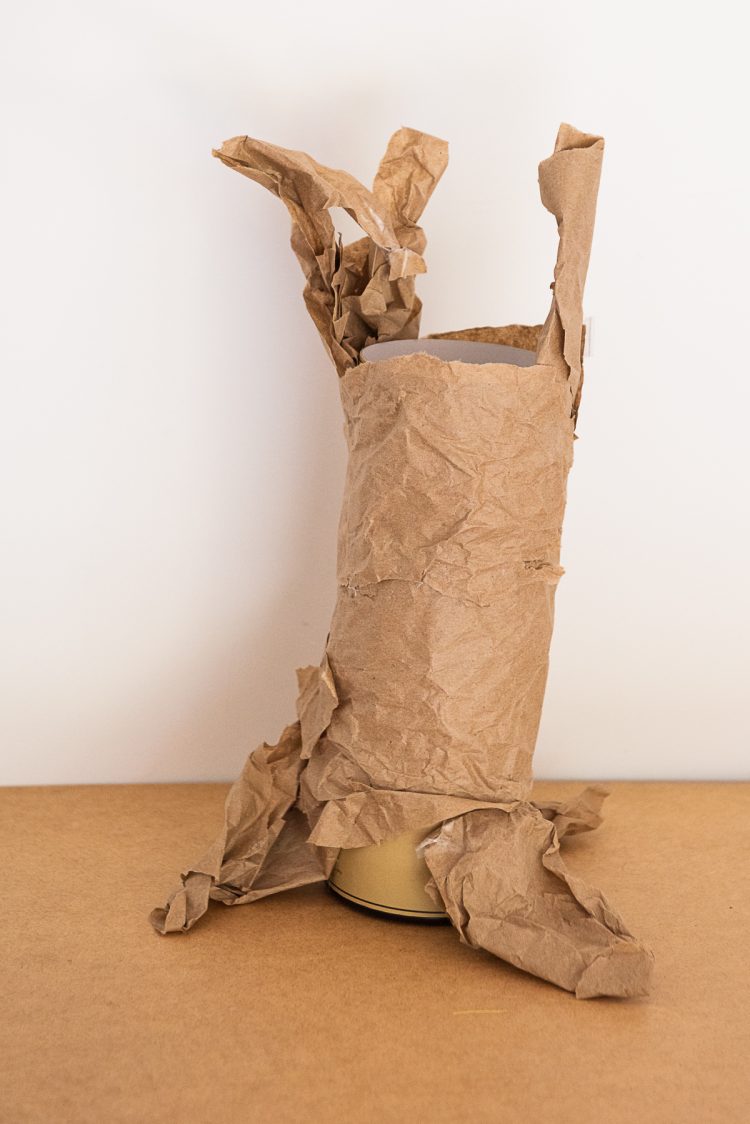
Make your tree.
Start by removing and discarding the lid to your cylindrical packaging and cutting off any handles. Then, add your “roots” by folding triangular sections of paper and attaching them to your cylinder with hot glue. It’s ok if they’re wrinkled and wadded up; it will just look like gnarled texture when you’re done, and your roots will look more natural if you attach them about an inch from the bottom and let them “slope” to the ground.
Repeat the process on the top (open end) of your cylinder for the thicker “branches”. I did three roots and two branches. Then add several irregular or curved pieces of paper to the top of your cylinder to camouflage the straight line of the lip.
Paint your tree.
Hot glue dries pretty much immediately, so it’s time to paint your tree, roots, branches, and the twigs for both your tree and centerpiece. Lay down your cardboard and start slapping paint on that tree. Seriously, this is not a precious process.
Milk paint is thin, easily spreadable, provides excellent coverage, and dries ridiculously quickly. Once you’ve covered the outside of your tree, check to see if you need to paint any of the inside lip that may be visible from other angles. (I did two inches.)
Paint the twigs.
Now, paint your twigs. I left my leaves alone because they were beautiful as they were, and I wasn’t trying to make this craft any harder than it has to be. Cover the twigs in their entirety, and let them dry. Remember, this paint goes on ridiculously quickly and easily, and it dries super fast. If you need it to dry even faster, put your tree trunk and branches in the sun or in front of a fan.
Wash the apples.
While your paint is drying, wash all of your apples. Pat them dry and buff them with a cloth towel. Separate your place card apples from your centerpiece apples, and place them on a baking sheet lined with parchment paper.
Melt the chocolate.
Add the bag of chocolate chips to a small saucepan, add the teaspoon of vegetable oil, and heat over low heat until everything is melted and blended. Stir frequently the entire time the chocolate is over the heat to prevent scorching or clumps.
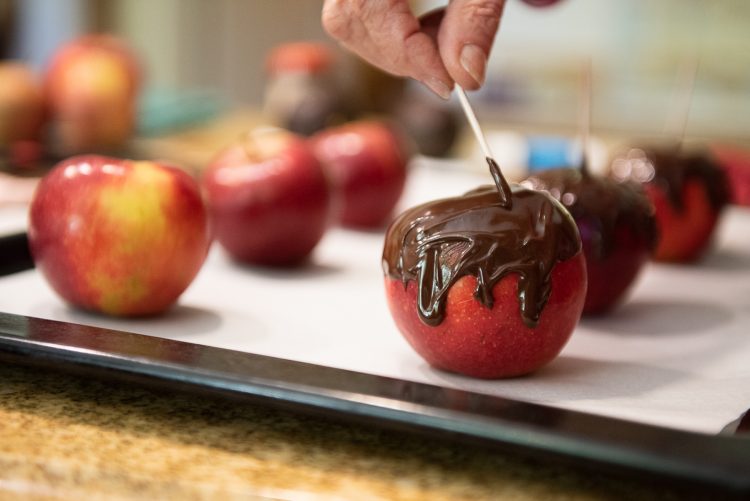
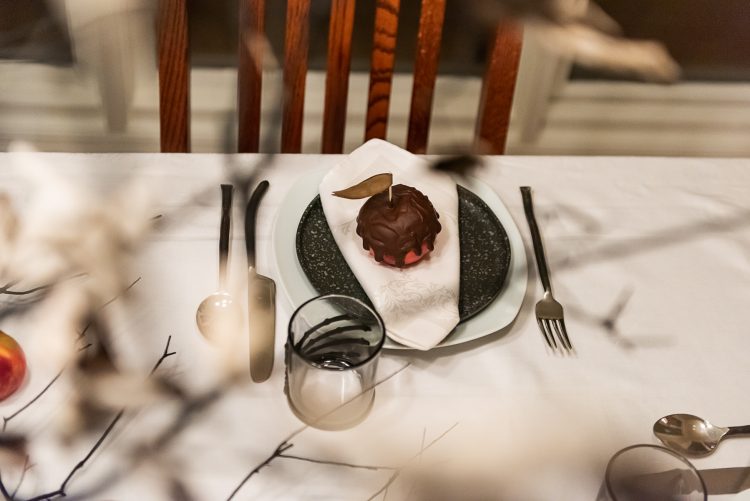
Dip apples in melted chocolate.
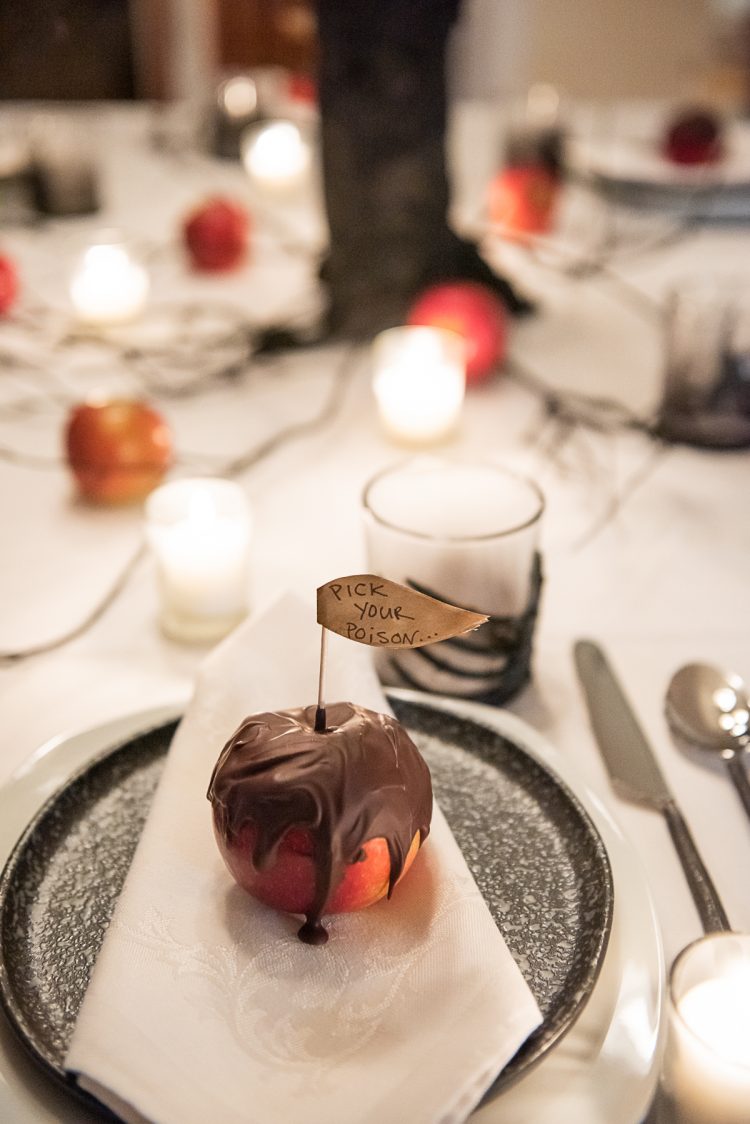
When the chocolate is fully melted, pick your apples up one by one and dunk them into the chocolate to fully cover the top half of each apple. Sit the apples chocolate-side-up on the parchment paper, and use a toothpick to push some of the chocolate down as “drips”. Once the desired number of drips has been achieved, push the toothpick into the top of the apple, chocolate side down. Repeat for each apple.
Once your apples are done, pop them into the fridge for 5-7 to help the chocolate harden. Set a timer so that you don’t forget them. If your apples get too cold, they’ll condensate when you pull them out, and your chocolate may loosen.
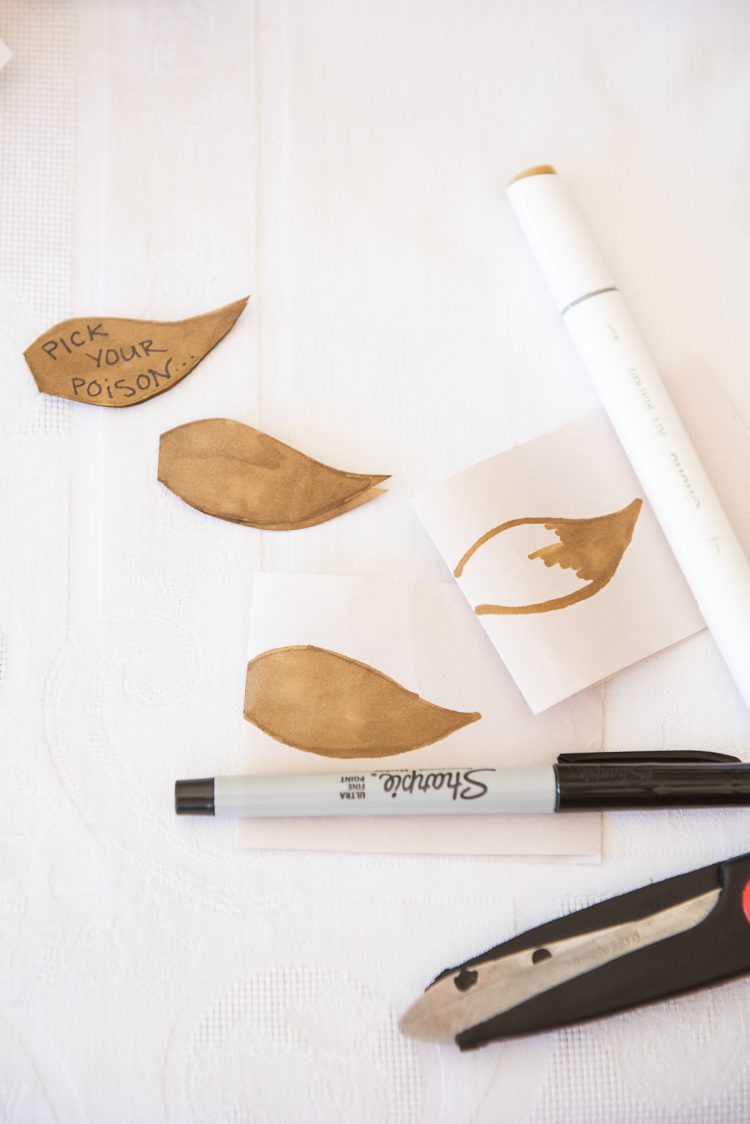
Make leaves for apples.
While the apples are cooling, fold your scrap paper length-wise and trace the outline of your “leaves” along the fold so that one end overlaps the crease so you can easily glue them around the toothpick. Cut along your lines, color the front and back of your leaves, and add playful Halloween sayings or your friends’ names.
Remove your apples from the refrigerator, add a small dab of glue to the “hinge” crease and one outside tip of each leaf, and then smoosh them around the top of each toothpick. Trim away any excess glue or weird spots with scissors.
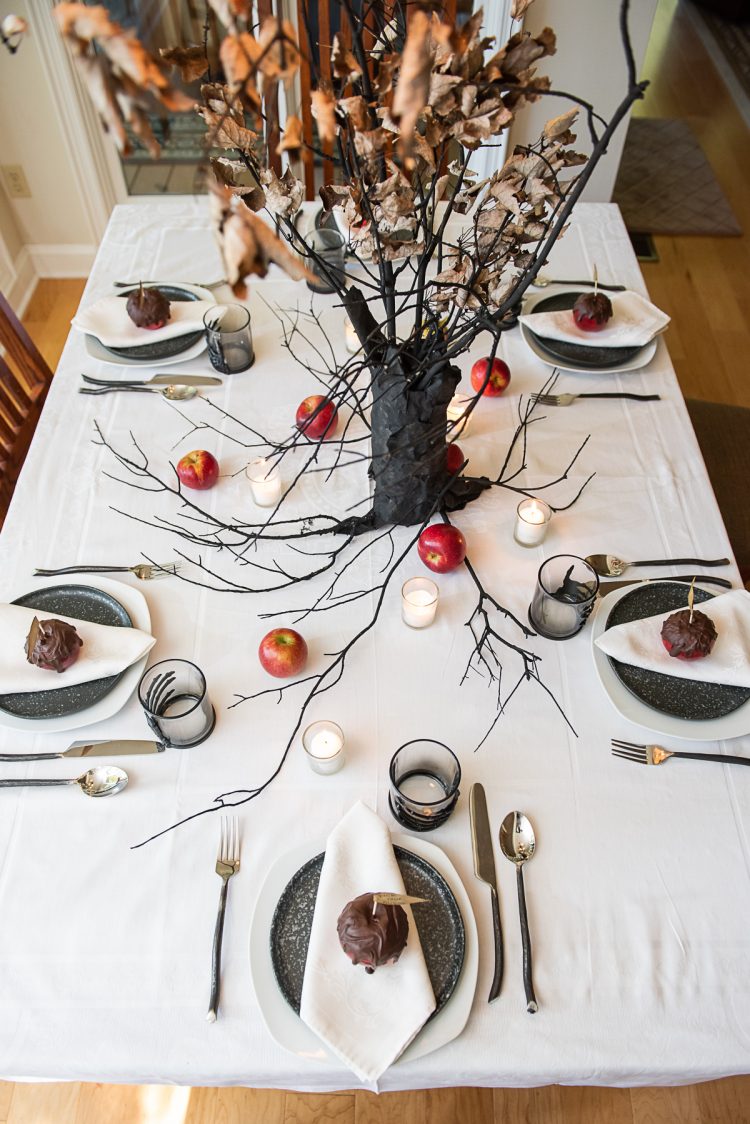
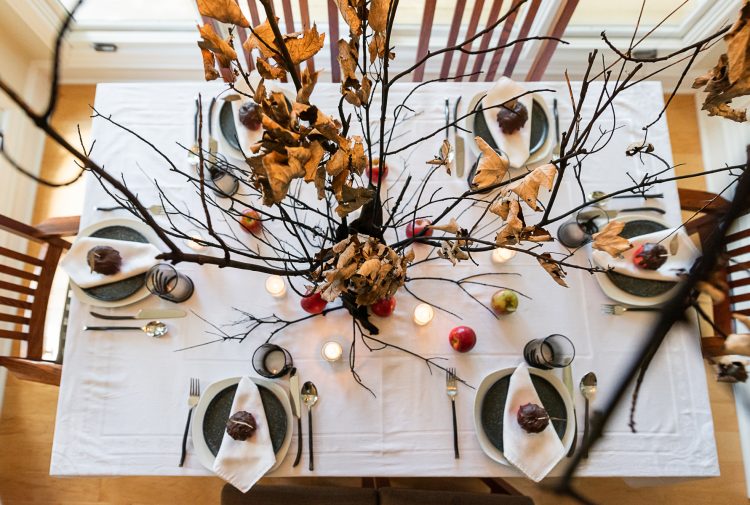
Build the tree canopy.
Build your “tree canopy” by tying it to your chandelier or light fixture. I used two pieces per branch to secure them. Once the first several are up, you can sort of build a web on itself, and you may not need to tie all of them.
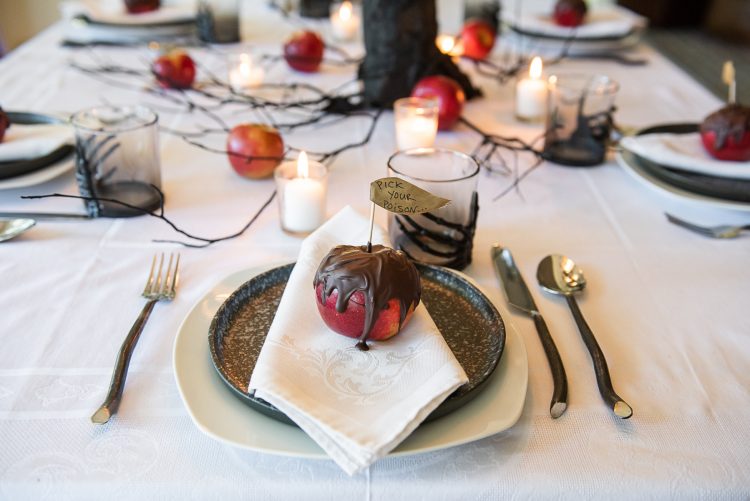
Set the table.
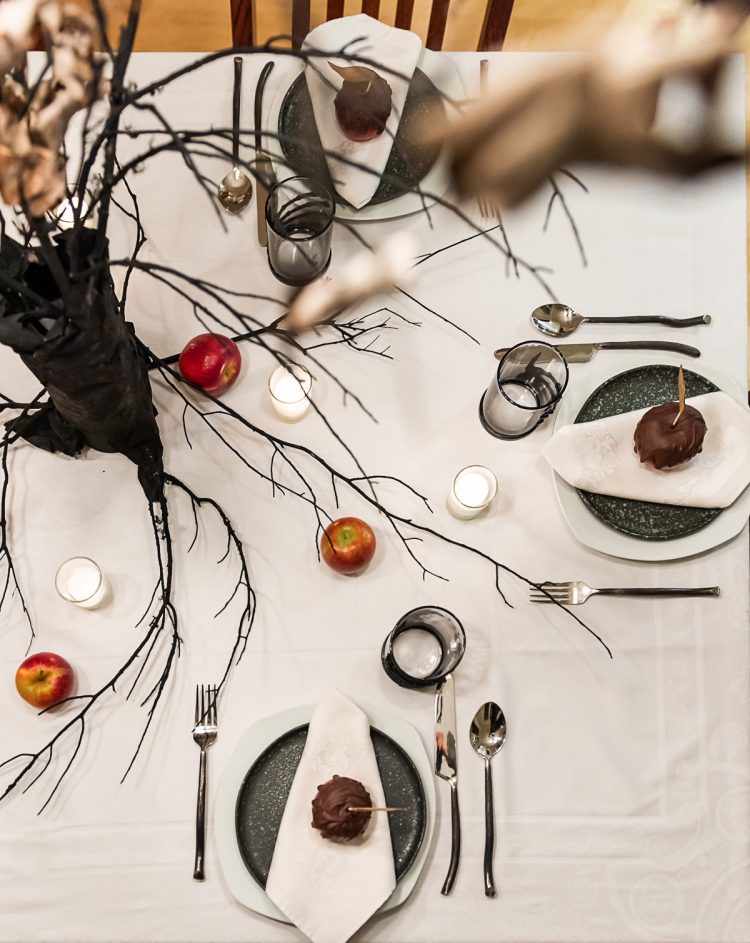
Then put your tablecloth on (if you do this before the canopy, you’ll get flakes of black paint over everything.) and center the trunk of your tree. Add your branches, hot gluing the more substantial twigs to the paper branches you made earlier.
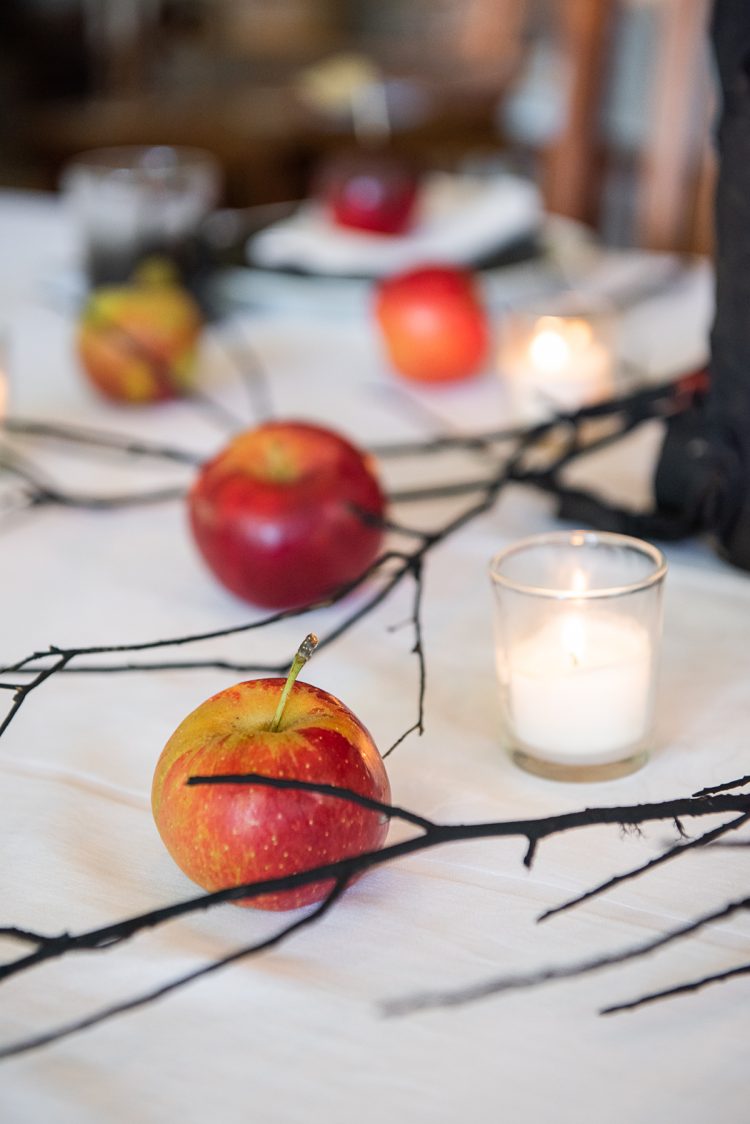
Finish your tree by placing more branches to “descend” from the trunk of your tree like additional roots, letting them run out across the tablescape. Use masking tape or painter’s tape to pick up any paint flecks.
Then add your chargers, plates, silverware, napkins, and glasses.
Once you’ve set the table, tuck the reserved apples in among your branches and add the votives, keeping in mind that you do NOT want any twigs to overhang your candles and burn your house down. (Listen, I love firemen as much as the next gal, but it’s safety first when crafting, y’all.)
Finish your tablescape by placing a “poisoned” apple on each place setting. Happy Halloween!
How to Reuse or Dispose of Your Haunted Orchard Halloween Tablescape
This table setting is so beautiful, you’re likely going to have a hard time taking it apart. Here’s how to do so responsibly, when you’re ready!
Poisoned apples and decorative apples: Just eat them, or make this apple pie recipe, and then eat them. Compost the cores.
Toothpicks and paper leaves: Compost them, or you can recycle the leaves.
Plates: Mine were my usual china, but if you got yours from the thrift store, resell them on Facebook Marketplace, take them back to Goodwill, or save them for next year.
Napkins and tablecloth: See above; same as the plates.
Votives: Remember that you can clean and reuse votive holders or clean and donate them.
Twigs and paper tree: You can save these DIY Halloween decorations for next year and reuse the twigs in floral arrangements or your next craft. The tree trunk is likely land-fill bound, but my wrapping paper and canister always were, anyway. This just gave them an extra life first.
Can you compost the twigs? “Old Fashioned” milk paint is supposedly biodegradable and compostable, but I honestly want to confirm that this is true for all commercially produced casein paints. Mother Earth News also seems to indicate that it’s compostable, but that may only apply to the homemade recipe included in that post. If you have any light to shed on the matter, drop it in the comments below!
All photos via Reese Moore Photography
DIY Halloween Haunted Orchard Tablescape
Materials
- Cylindrical packaging material, such as from a poster, craft liquor bottle, or gift canister
- Used wrapping paper or packing paper*
- Black milk paint**
- Black thread or thin wire
- Twigs from your yard, with or without leaves, and brushed with your dry paintbrush to remove any debris
- Tablecloth and cloth napkins*
- 5-7 votive candles, preferably sox or beeswax
- Additional twigs reserved from making your tree
- Plates and/or chargers**
- Silverware and glassware
- 5-7 fresh apples*** (You’ll need additional apples for each “poisoned apple” place setting, so factor that in when buying.)
- Fresh apples equal to the number of place settings
- Toothpicks for each apple
- A bag of dark chocolate morsels
- 1 teaspoon of vegetable oil
Tools
- Hot glue gun
- Paintbrush and jar or can of water to clean your brush
- Broken-down cardboard box to use as a protective surface
- Masking tape or painter’s tape
- Baking sheet and parchment paper
- Cloth towel for drying and buffing apples
- Small saucepan
- Scrap paper, markers, and glue for leaves*
Instructions
- Make your tree. Start by removing and discarding the lid to your cylindrical packaging and cutting off any handles. Then, add your “roots” by folding triangular sections of paper and attaching them to your cylinder with hot glue. It’s ok if they’re wrinkled and wadded up; it will just look like gnarled texture when you’re done, and your roots will look more natural if you attach them about an inch from the bottom and let them “slope” to the ground. Repeat the process on the top (open end) of your cylinder for the thicker “branches”. I did three roots and two branches. Then add several irregular or curved pieces of paper to the top of your cylinder to camouflage the straight line of the lip.
- Hot glue dries pretty much immediately, so it’s time to paint your tree, roots, branches, and the twigs for both your tree and centerpiece. Lay down your cardboard and start slapping paint on that tree. Seriously, this is not a precious process. Milk paint is thin, easily spreadable, provides excellent coverage, and dries ridiculously quickly. Once you’ve covered the outside of your tree, check to see if you need to paint any of the inside lip that may be visible from other angles. (I did two inches.)
- Now, paint your twigs. I left my leaves alone because they were beautiful as they were, and I wasn’t trying to make this craft any harder than it has to be. Cover the twigs in their entirety, and let them dry. Remember, this paint goes on ridiculously quickly and easily, and it dries super fast. If you need it to dry even faster, put your tree trunk and branches in the sun or in front of a fan.
- While your paint is drying, wash all of your apples. Pat them dry and buff them with a cloth towel. Separate your place card apples from your centerpiece apples, and place them on a baking sheet lined with parchment paper.
- Add the bag of chocolate chips to a small saucepan, add the teaspoon of vegetable oil, and heat over low heat until everything is melted and blended. Stir frequently the entire time the chocolate is over the heat to prevent scorching or clumps.
- When the chocolate is fully melted, pick your apples up one by one and dunk them into the chocolate to fully cover the top half of each apple. Sit the apples chocolate-side-up on the parchment paper, and use a toothpick to push some of the chocolate down as “drips”. Once the desired number of drips has been achieved, push the toothpick into the top of the apple, chocolate side down. Repeat for each apple.
- Once your apples are done, pop them into the fridge for 5-7 to help the chocolate harden. Set a timer so that you don’t forget them. If your apples get too cold, they’ll condensate when you pull them out, and your chocolate may loosen.
- While the apples are cooling, fold your scrap paper length-wise and trace the outline of your “leaves” along the fold so that one end overlaps the crease so you can easily glue them around the toothpick. Cut along your lines, color the front and back of your leaves, and add playful Halloween sayings or your friends’ names.
- Remove your apples from the refrigerator, add a small dab of glue to the “hinge” crease and one outside tip of each leaf, and then smoosh them around the top of each toothpick. Trim away any excess glue or weird spots with scissors.
- Build your “tree canopy” by tying it to your chandelier or light fixture. I used two pieces per branch to secure them. Once the first several are up, you can sort of build a web on itself, and you may not need to tie all of them.
- Then put your tablecloth on (if you do this before the canopy, you’ll get flakes of black paint over everything.) and center the trunk of your tree. Add your branches, hot gluing the more substantial twigs to the paper branches you made earlier.
- Finish your tree by placing more branches to “descend” from the trunk of your tree like additional roots, letting them run out across the tablescape. Use the masking tape or painter’s tape to pick up any paint flecks.
- Then add your chargers, plates, silverware, napkins, and glasses.
- Once you’ve set the table, tuck the reserved apples in among your branches and add the votives, keeping in mind that you do NOT want any twigs to overhang your candles and burn your house down. (Listen, I love firemen as much as the next gal, but it’s safety first when crafting, y’all.)
- Finish your tablescape by placing a “poisoned” apple on each place setting. Happy Halloween!
Notes
See several notes related to the materials throughout the post.
Recommended Products
As an Amazon Associate and member of other affiliate programs, Honestly Modern earns from qualifying purchases.
If You Liked Cheap DIY Halloween Decorations: Haunted Orchard Tablescape, You May Enjoy:
20 Zero Waste Halloween Decoration Ideas
Fun & Low Waste Halloween Trick-or-Treating
2 Simple DIYs for (Almost) Zero-Waste Halloween Costumes
About the Author

Reese Moore
Reese Moore is a photographer, content creator, and pickle connoisseur who divides time between Charleston and Lake Lure. When she’s not behind the lens shooting stunning images for Reese Moore Photography, Reese loves to spend her time wandering the woods with her dog Gatsby or adventuring with her husband Logan in their Airstream Basecamp.


I have really enjoyed this series. So often sustainable living blogs focus on items to buy but I love how you all are tackling other areas that may be harder to be sustainable such as decorating. Keep up the good work and I hope you make posts for Thanksgiving and Christmas decorating and tables capes.
Thanks for the note! I agree that Reese designs some beautiful tablescapes. 🙂 Here are a few others she has done for us. https://www.honestlymodern.com/tag/tablescape/ — One is Christmas-themed from last year. Hopefully we can convince her to do some more for the upcoming holidays! — Jen