Fun & Low-Waste DIY Candy Table “Bait Bar” for an Eco-Friendly Birthday Party Treat
Are you hosting a sustainable birthday party and looking for an eco-friendly birthday party treat? We’ve got a fun, zero-waste, sustainable DIY idea. This low-waste DIY candy table “bait bar” is eco-friendly, adorable, and quick to assemble!
Everyone loves a party, but no one loves all the waste generated by celebratory gatherings. While things like paper plates, cheap “ready-made” decor, and plastic favors may save you a little time and possibly money, they take an enormous toll on the planet, and the host or hostess is often left with several overflowing black trash bags.
So, when I found myself party planning for my mother-in-law’s “Under the Sea 70th” birthday weekend, I challenged myself to create a sustainable DIY that doubled as both a playful decor item and a favor bar.
Presenting food as a playful and imaginative decoration is one of my go-to low-waste ideas. It adds excitement and whimsy to a normal sensory experience, and it encourages kids (and adults) to view something ordinary in a new light. And, finally, consumable party favors in responsible packaging are a zero-waste way to let your guests take some of the party home with them… and they’re way more fun than cheap plastic junk.
This sustainable DIY is so incredibly easy, I’ll probably adapt it for Halloween or the holidays!
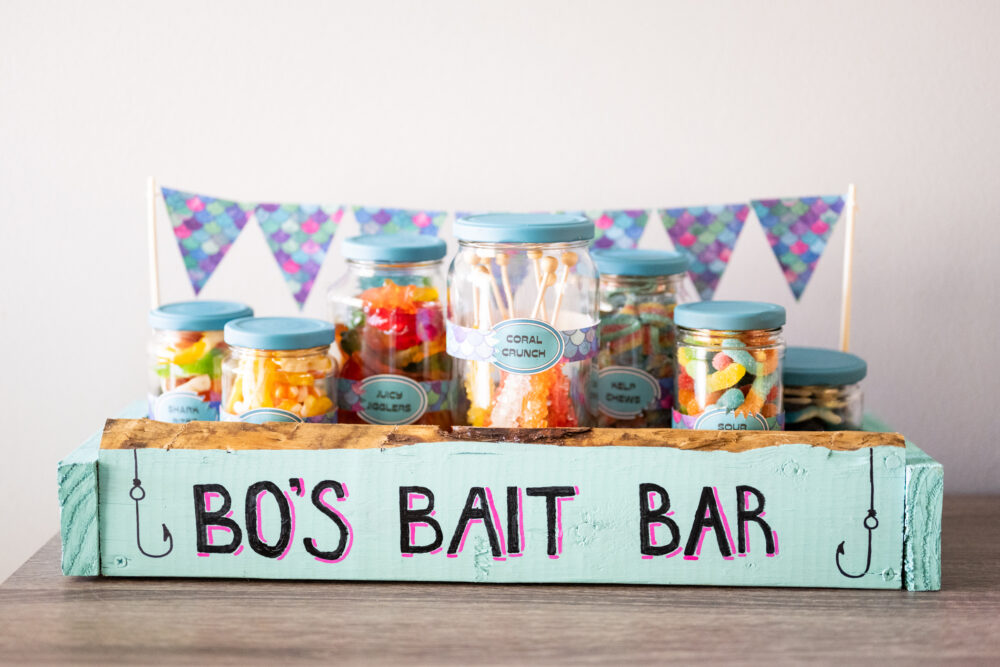
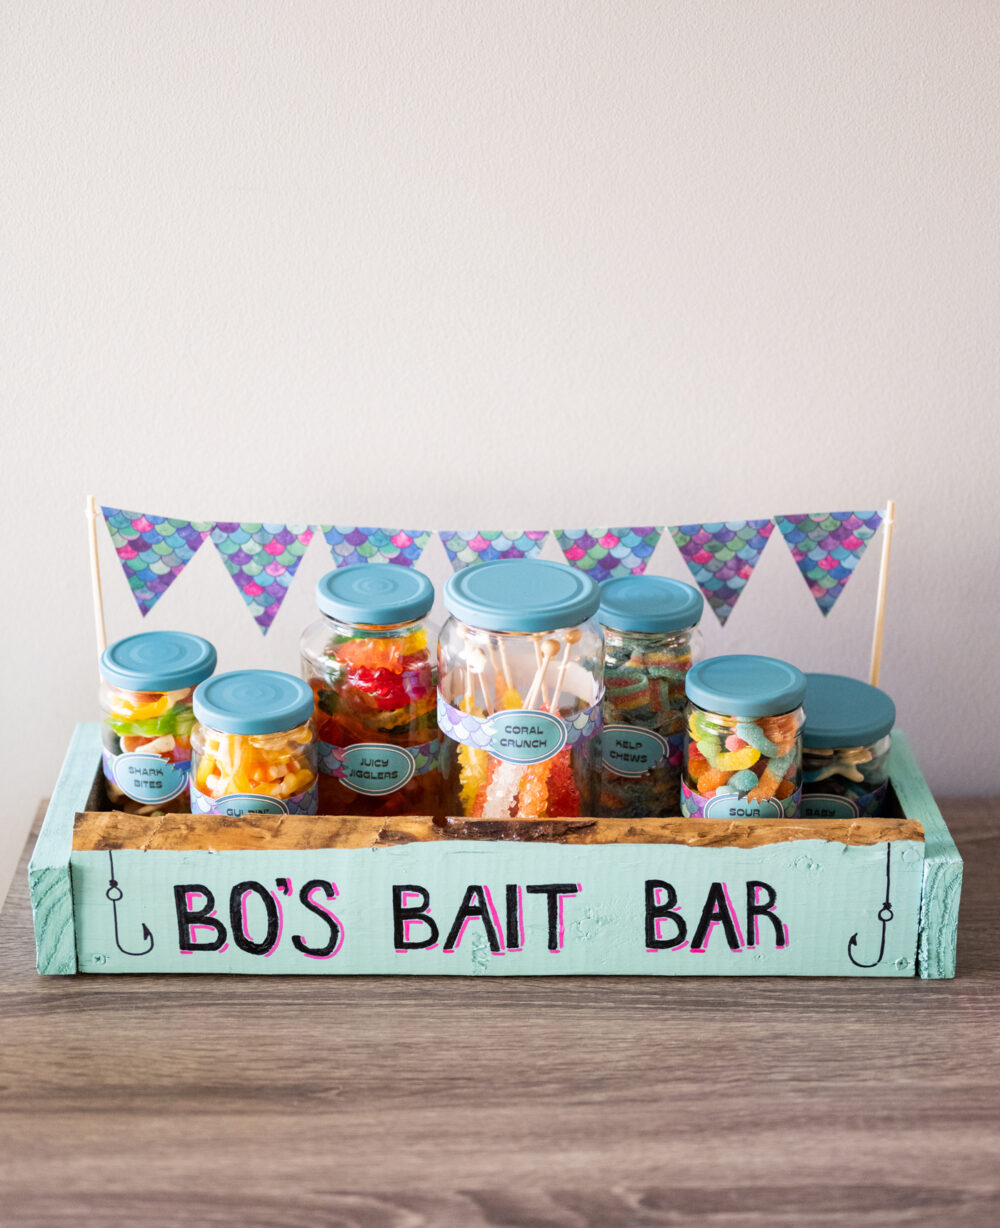
Sustainable DIY “Bait Bar”: Upcycled Candy Bar for Kids’ Party
Note: I love this sustainable DIY because you can make it as quick and simple or as “extra” as you want. As we move through the materials list and instructions, I’ll offer lots of adaptation ideas and shortcuts to save you time.
Suggested Materials for Low-Waste DIY Candy Table
For the Bait Bar Jars:
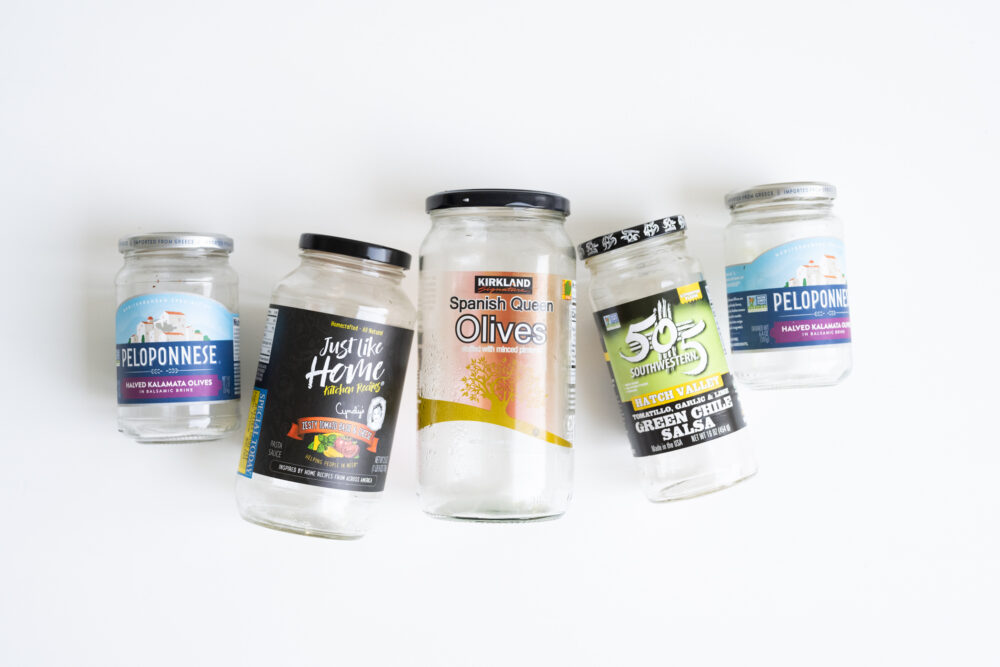
- 5-7 various-sized empty glass jars with lids (such as from pasta sauce or olives)
- Scouring pad
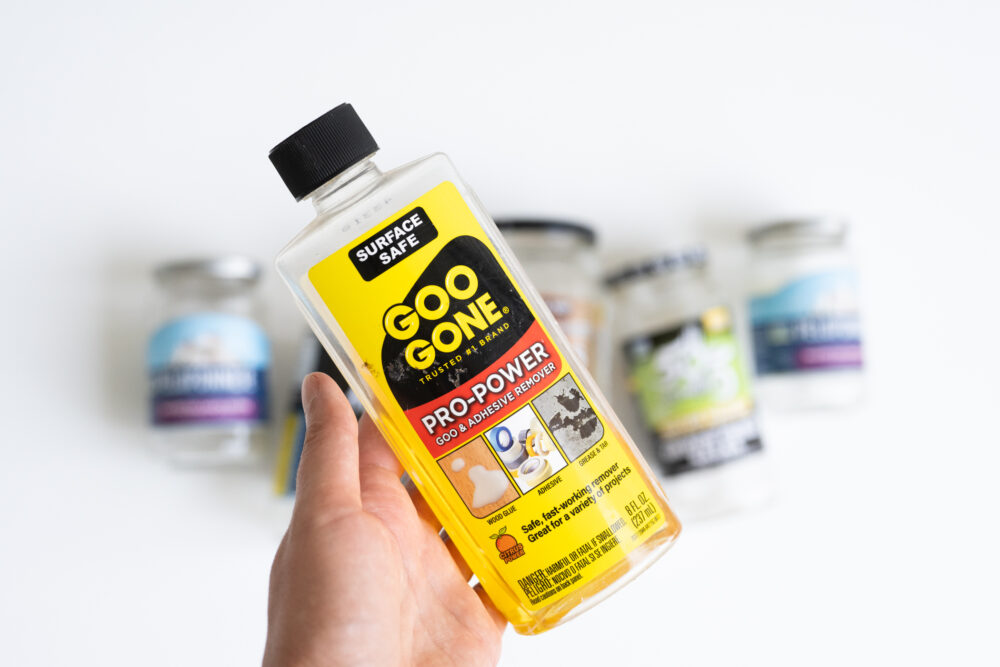
- Goo Gone (optional but recommended)
- Blue or aqua spray paint and protective cardboard, paper, or plastic (such as a broken-down shipping box)
- Compostable or reusable bags for purchasing bulk candy and take-away favors
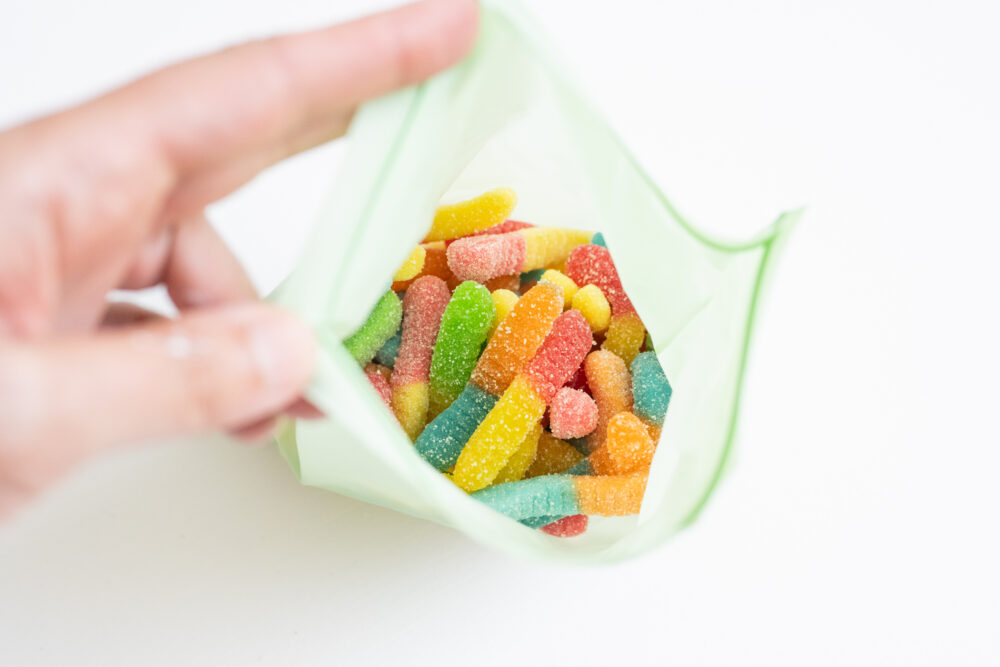
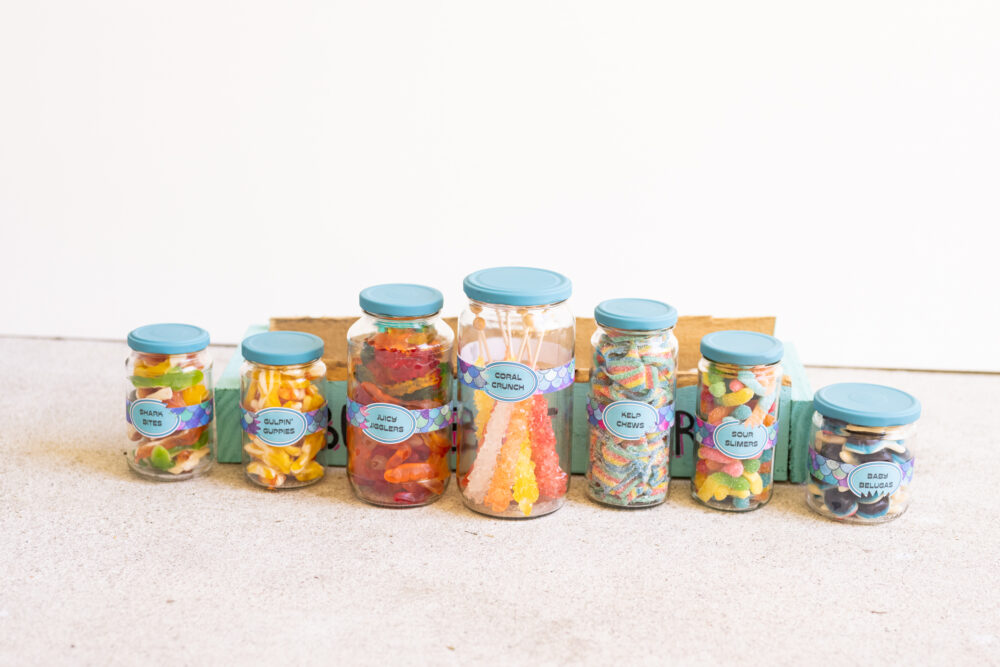
- 5-7 types of on-theme bulk gummy candy (such as Swedish fish, gummy worms, gummy sharks, candy turtles or whales, etc.)
- Fork, small tongs, or fondue fork
For the Bait Bar Jar Labels:
- Decorative paper with a fish or ocean motif
- Ruler
- Pencil
- Scissors
- Hot glue gun and/or double-sided tape
- Inkjet printer (optional)
- Starburst shaped hole punch (optional)
For the Bait Bar Box*:
- Wood pallet or scrap wood (optional)
- Drill and screws (optional)
- Blue or aqua paint and clear polyurethane (optional)
- Paint pens or Sharpies
*Are you uncomfortable with power tools? You can also use Liquid Nails to assemble your wooden box, or alternately, you could cover the top of a small cardboard box with decorative paper.
For the Paper Banner:
- Pencil
- Ruler
- Decorative paper (you likely will have enough leftover scrap from your paper bands)
- String, twine, ribbon, or yarn
- A pair of takeout chopsticks (or cleaned sticks from the yard)
- Glue gun
Instructions for Low-Waste, Upcycled Candy “Bait Bar”
- Buy your candy. I went to a bulk candy store that allowed me to use my own bags to reduce waste. Bulk candy stores usually sell by weight, so they didn’t care that I brought my own compostable bags. Select candy that fits the “Bait Bar” theme, such as those shaped like worms, centipedes, whales, sharks, fish, or turtles.
- Wash your jars and lids, remove any labels, and dry them thoroughly. (You may find this post on cleaning glass jars useful.) If your labels are plastic or firmly attached, you may find it easier to remove them using Goo Gone and a designated scrubber for cleaning chemicals. Goo Gone will also remove expiration dates or batch numbers printed on the glass.
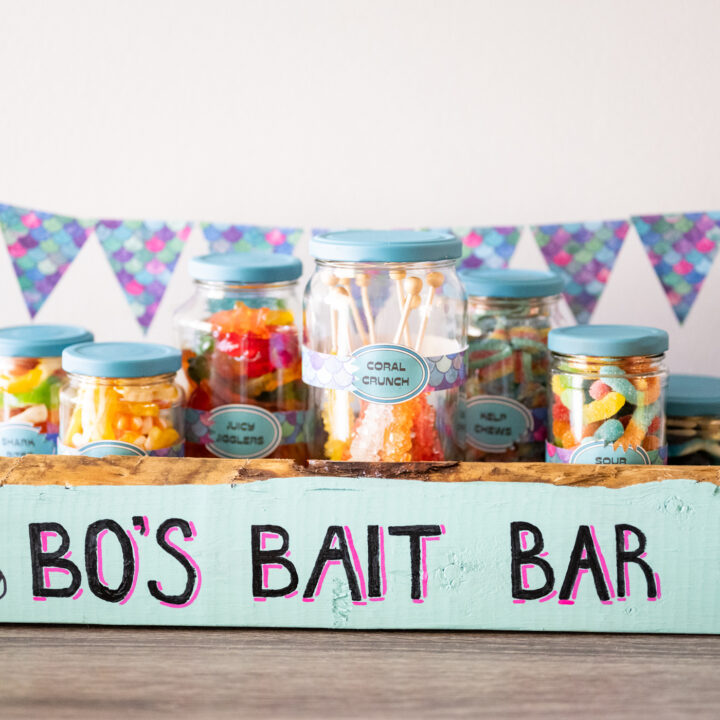
- Arrange your dried lids on your protective surface and spray paint them in a well-ventilated area according to the instructions and safety precautions included on your paint. Let the lids dry thoroughly before handling them.
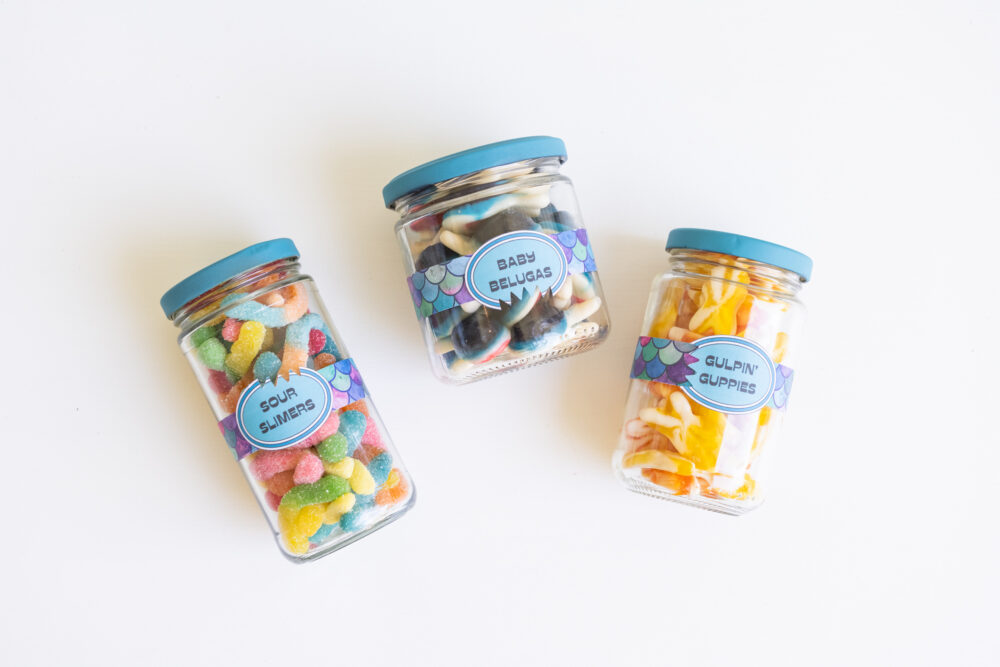
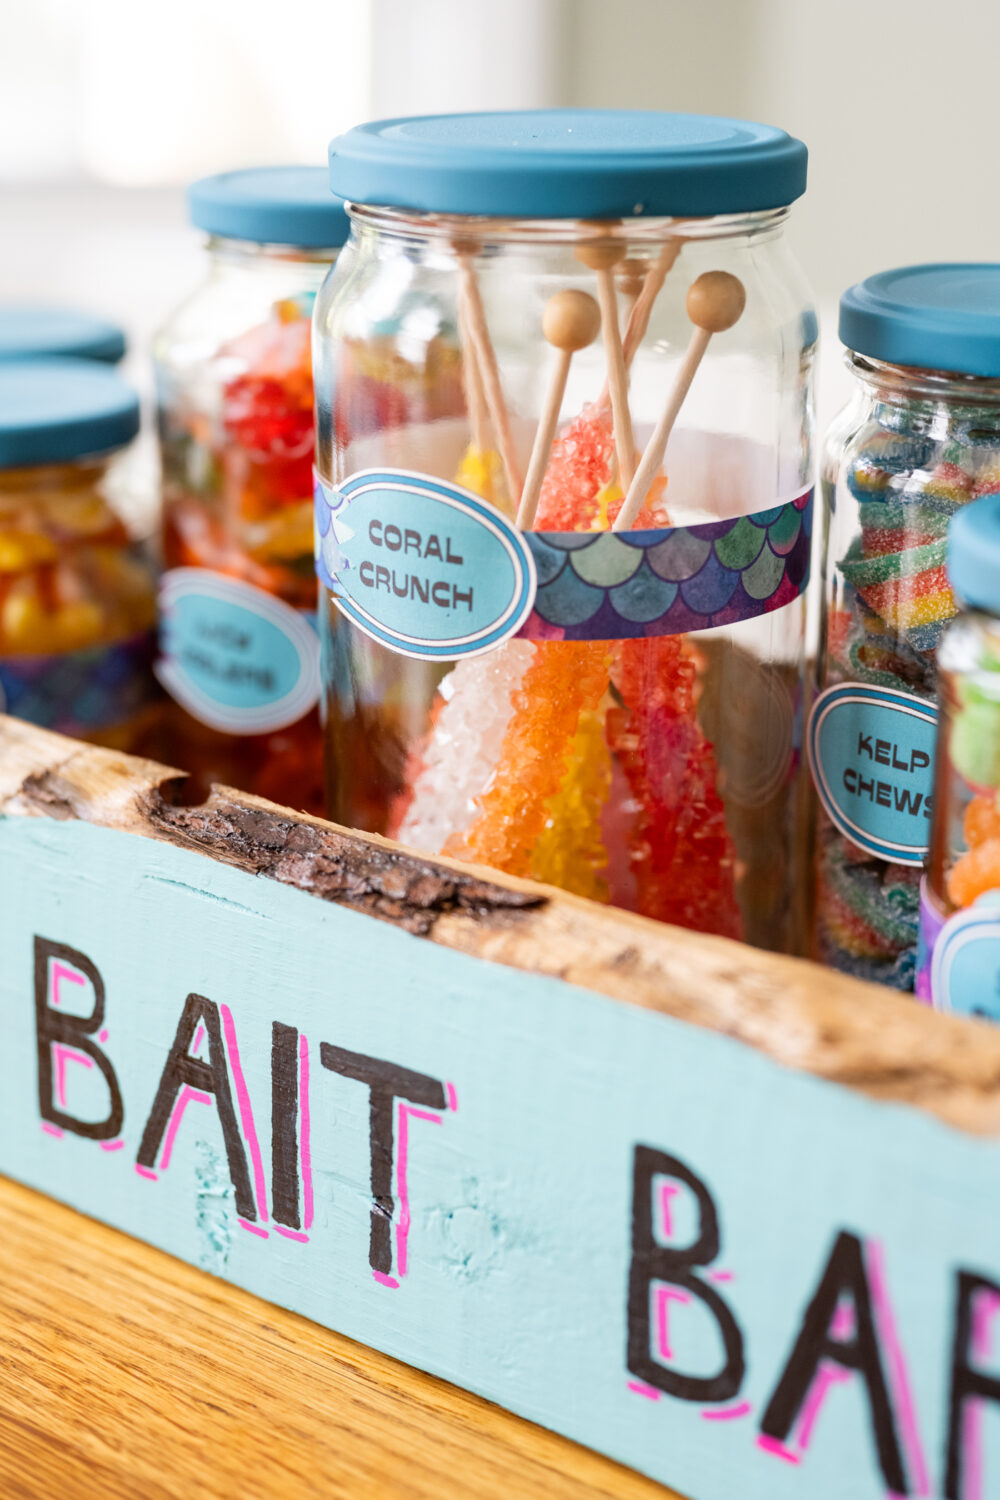
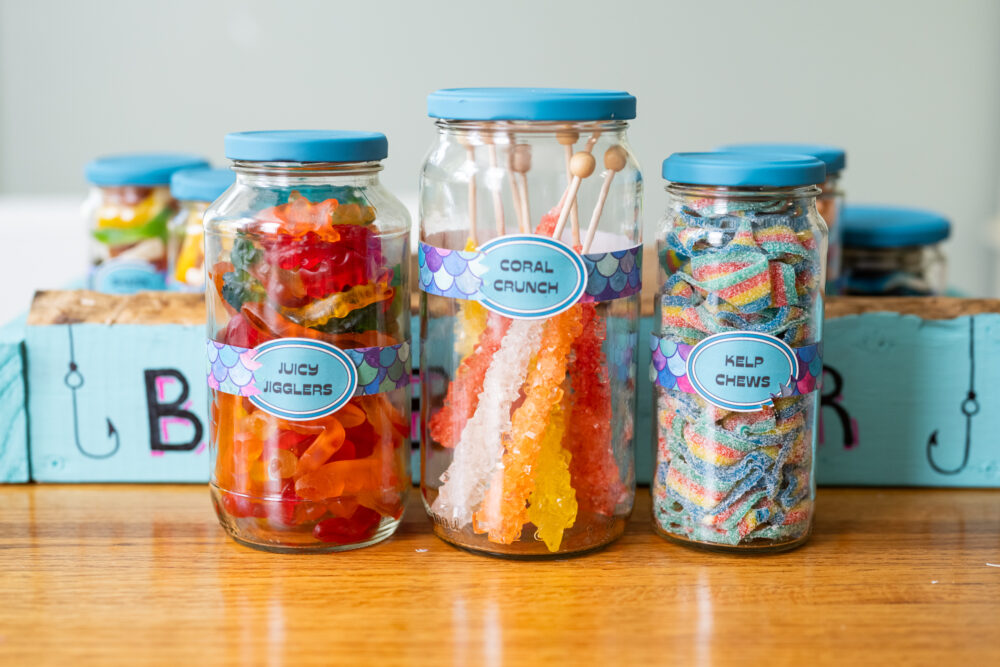
- While your lids are drying, cut your strips of decorative paper. I cut mine to ¾ inch wide and positioned them at approximately the halfway point of each jar. Secure the paper bands with small dots of hot glue at each end.
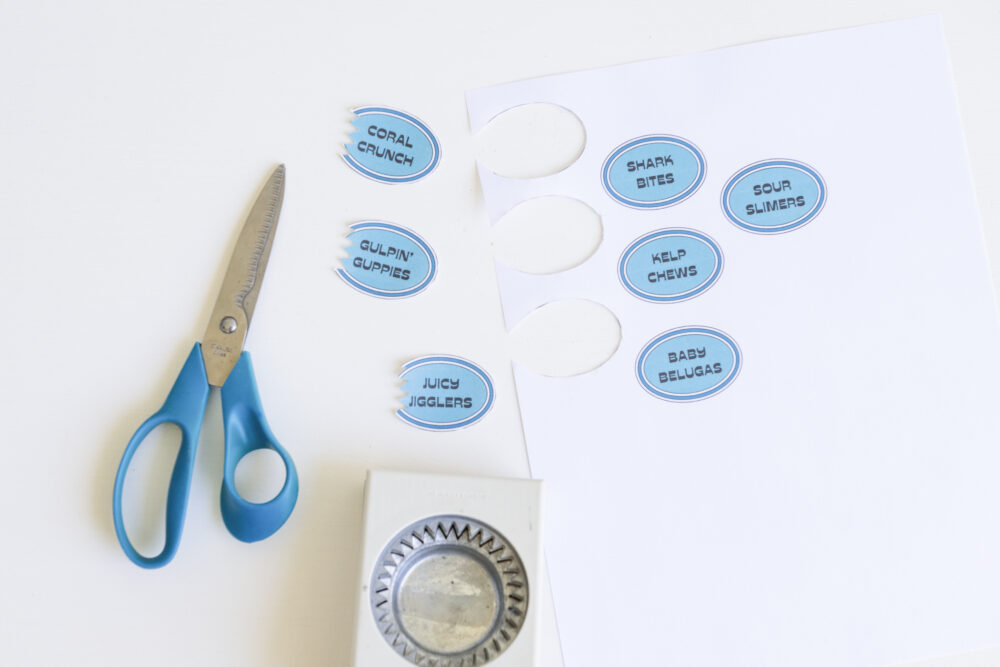
- Make your labels – or don’t! If you’re short on time, you can use your Sharpies or paint pens to write on the lids of the jars instead. I designed my labels for free in Canva, but if you’re in a hurry, you can just trace circles from a smaller jar lid.
- Label your candy with playful names to up the fun factor and spark some make-believe. As an English major, I love some alliteration, but whatever you choose to do is fun.
- Before you attach your labels, use your starburst hole punch to take little “shark bites” out of the corners or edges of your labels. Then attach the labels to the decorative paper bands using double-sided tape if your paper is particularly thin (mine was) or hot glue. Note: You can strategically place your labels to camouflage any imperfections in your decorative paper bands.
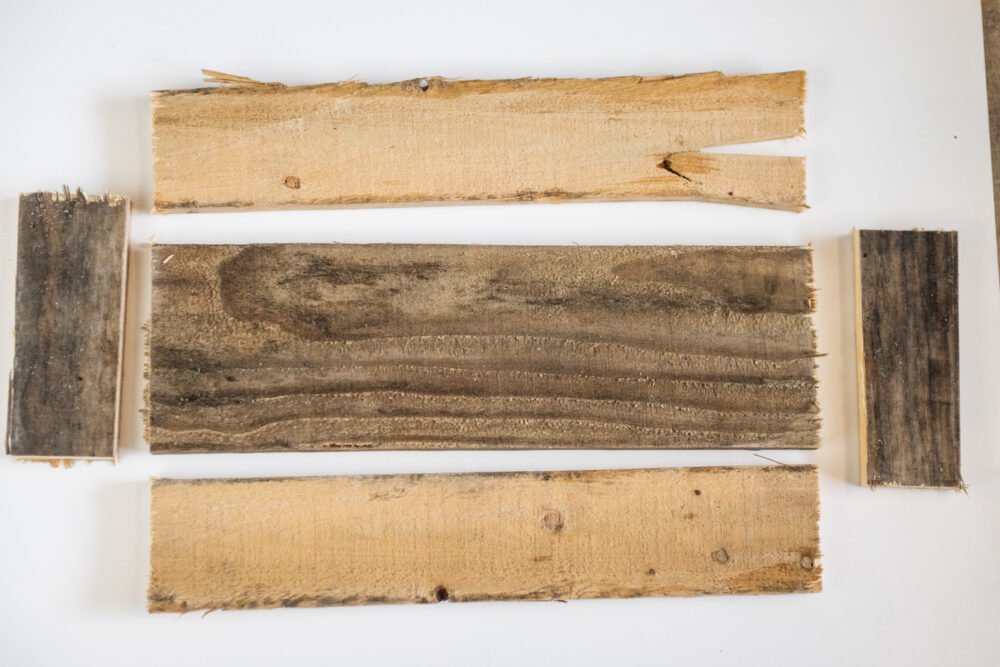
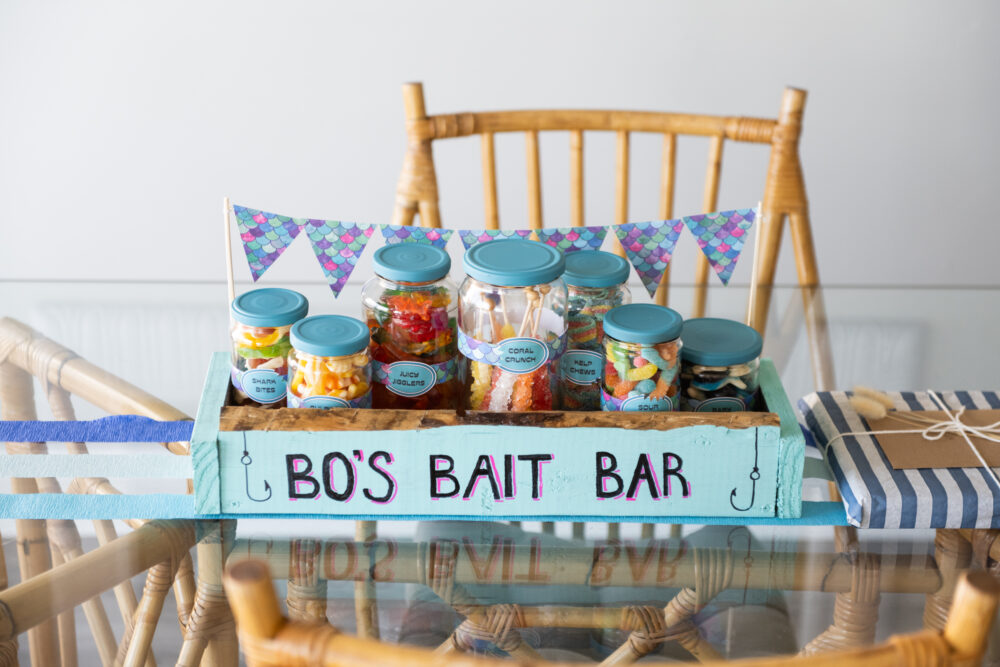
- Note: You can absolutely call it a day here, and your birthday treats will still be adorable, the envy of Pinterest, and delicious. If you have more time, let’s make a wooden box! I used a miter saw to cut two 7.5-inch sections from the wide “front” slats running horizontally across the pallet and two 7.5-inch sections from the narrow “back” slats running horizontally. (You may want to line your jars up along the wood to make sure your supplies will fit inside, but 7.5 inches was quite spacious for my jars.) Whenever you work with a wood pallet, be very aware of whether or not there are rusty nails that you’ll be working around.
- Allocate one of your wider pieces as the bottom of your box. The two narrower pieces of the same length will be the long sides of your box. Position your first side and attach it to the bottom of your box using the drill and two wood screws. You may find it helpful to pre-drill your holes. Repeat this step with the other side.
- Then measure the width of your box from the outside edges of each side and cut your remaining 7.5-inch slat into two end pieces. Attach the short ends to your box with wood screws, taking care to pick screw locations that will not intersect with the previously placed screws.
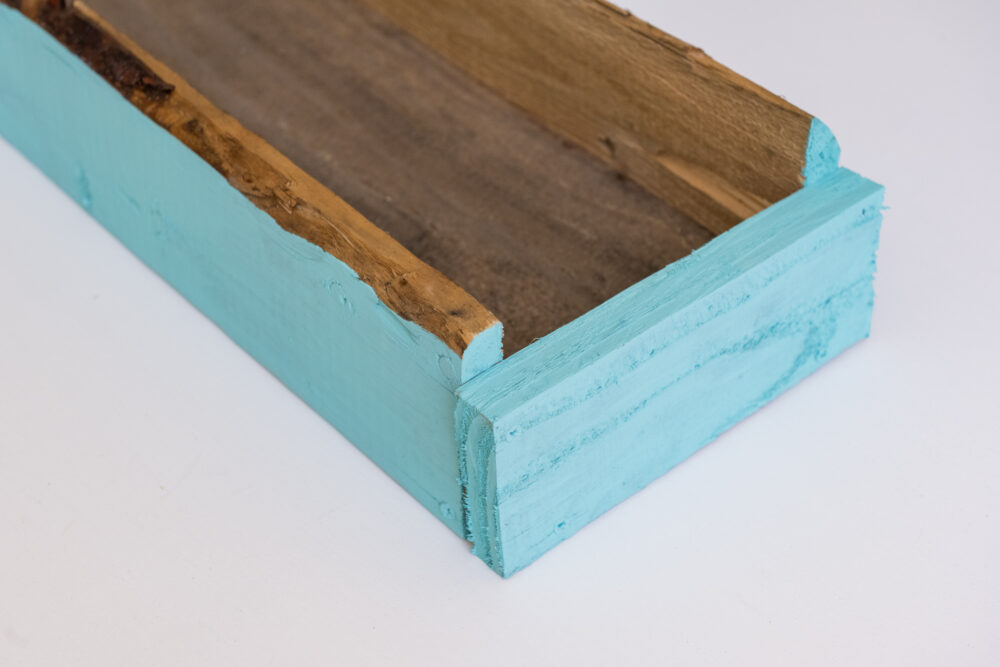
- Note: Voila! You now have a rustic box! You can stop here if you’d like! If you’d like to refine your box, you may want to lightly sand down any splintered parts. Then paint the front, back, and sides of your box. If you have a fun “live edge” to your wooden slats, you may want to leave that part unpainted, as I did. You can also stop here. If you’d like a more finished feel that further eliminates the risk of any splinters, add a coat of clear polyurethane to the insides and live edges of your box. Let everything dry completely before decorating the front of your box.
- Decorate your box with the paint pens and Sharpies! Have fun with it! Consider personalizing the box with your loved one’s name, adding fish hook motifs, or drawing fish or worms.
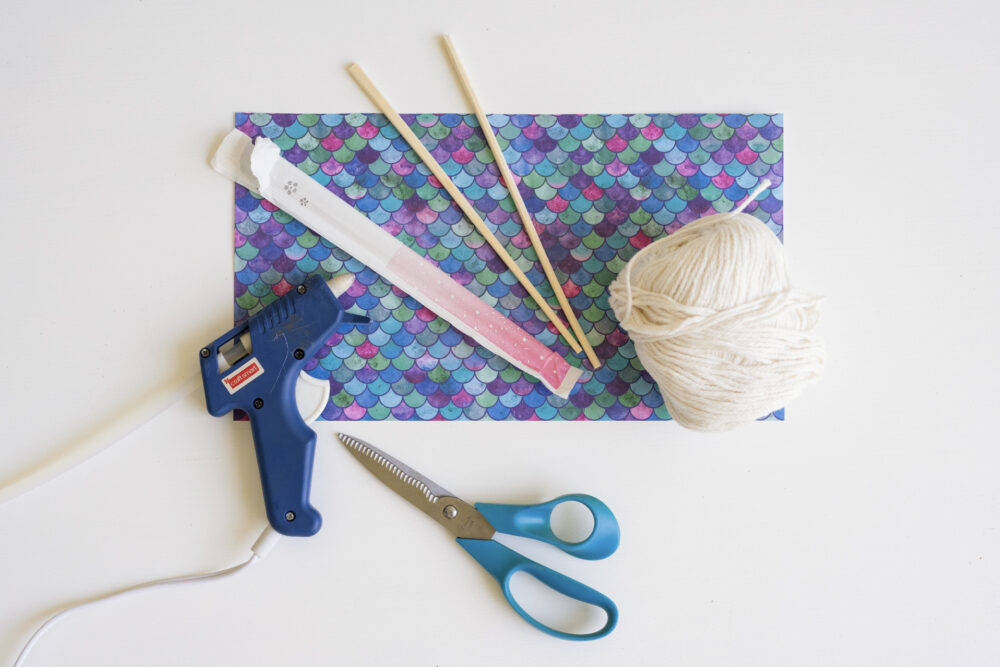
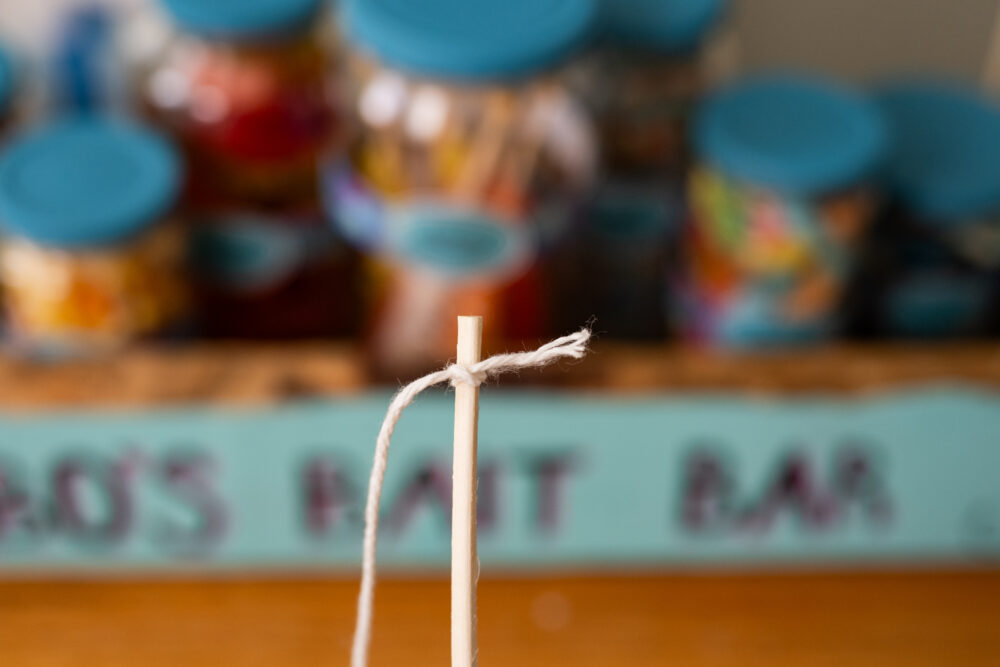
- Note: Again, you can also stop here. If you’re feeling next-level extra festive, welcome to the club. Let’s make a paper banner. Cut matching triangles from the leftover decorative paper and set them aside. Tie your twine around the narrow end of one of your chopsticks and secure it with a dot of hot glue. Measure out your twine to the desired tautness along the back of your box, allowing a little extra to tie your second knot. Secure your twine to the second chopstick with hot glue. Then stretch your length of twine out into a straight line.
- Position your paper flags along the line, trimming any of them as needed for an even fit. Run a line of hot glue along the top of your flags and attach them to your twine. I found it easiest to slide the flag with the glue underneath the twine so that I could see what I was doing.
- Arrange your chopsticks in either corner along the backside of your box and secure them with a generous dollop of hot glue.
- Display your bait bar with the fondue fork or tongs to keep tiny, dirty hands from plunging directly into the jars. If you’re sharing your candy as take-away favors, tuck a stack of compostable or recyclable bags into the box behind the jars. Enjoy!
How to Dispose of Your Low-Waste Bulk Candy “Bait Bar”
I hope your loved one has a wonderful celebration! When the party is over, you may find the following tips helpful in disposing of your bait bar responsibly:
- Recycle your glass jars or reuse them for crafting materials, hardware pieces, or office supplies.
- Compost any leftover candy.
- Remove any adhesives and recycle or compost your paper strips and labels.
- Remove any adhesives, recycle the paper from your banner, and compost the wooden chopsticks.
- Enjoy your wooden box as a coastal-themed organizer for your office, kids’ room, craft room, or garage. You can also fill it with potted plants and display your container garden on the porch or patio. Finally, paint over the design if a “bait bar” doesn’t match your decor!
All photos via Reese Moore Photography
If you enjoyed Low-Waste Kids’ Candy “Bait Bar” for an Eco-Friendly Birthday Party Treat, you may enjoy:
11 DIY Candy Buffet Table Ideas
20 Low-Waste Birthday Snacks for School, Teams, & Clubs
70+ Creative Sustainable Birthday Party Themes for Kids
10 Thoughts on Simplifying Kids’ Birthday Parties
About the Author

Reese Moore
Reese Moore is a photographer, content creator, and pickle connoisseur who divides time between Charleston and Lake Lure. When she’s not behind the lens shooting stunning images for Reese Moore Photography, Reese loves to spend her time wandering the woods with her dog Gatsby or adventuring with her husband Logan in their Airstream Basecamp.
Eco-Friendly "Bait Bar" Candy Bar Treat
Materials
- 5-7 various-sized empty glass jars with lids (such as from pasta sauce or olives)
- Scouring pad
- Goo Gone (optional but recommended)
- Blue or aqua spray paint and protective cardboard, paper, or plastic (such as a broken-down shipping box)
- Compostable or reusable bags for purchasing bulk candy and take-away favors
- 5-7 types of on-theme bulk gummy candy (such as Swedish fish, gummy worms, gummy sharks, candy turtles or whales, etc.)
- Fork, small tongs, or fondue fork
- Decorative paper with a fish or ocean motif
- Wood pallet or scrap wood (optional)
- Blue or aqua paint and clear polyurethane (optional)
- Paint pens or Sharpies
- Decorative paper (you likely will have enough leftover scrap from your paper bands)
- String, twine, ribbon, or yarn
Tools
- Ruler
- Pencil
- Scissors
- Hot glue gun and/or double-sided tape
- Inkjet printer (optional)
- Starburst shaped hole punch (optional)
- Drill and screws (optional)
- A pair of takeout chopsticks (or cleaned sticks from the yard)
- Glue gun
Instructions
- Buy your candy. I went to a bulk candy store that allowed me to use my own bags to reduce waste. Bulk candy stores usually sell by weight, so they didn’t care that I brought my own compostable bags. Select candy that fits the “Bait Bar” theme, such as those shaped like worms, centipedes, whales, sharks, fish, or turtles.
- Wash your jars and lids, remove any labels, and dry them thoroughly. (You may find this post on cleaning glass jars useful.) If your labels are plastic or firmly attached, you may find it easier to remove them using Goo Gone and a designated scrubber for cleaning chemicals. Goo Gone will also remove expiration dates or batch numbers printed on the glass.
- Arrange your dried lids on your protective surface and spray paint them in a well-ventilated area according to the instructions and safety precautions included on your paint. Let the lids dry thoroughly before handling them.
- While your lids are drying, cut your strips of decorative paper. I cut mine to ¾ inch wide and positioned them at approximately the halfway point of each jar. Secure the paper bands with small dots of hot glue at each end.
- Make your labels - or don’t! If you’re short on time, you can use your Sharpies or paint pens to write on the lids of the jars instead. I designed my labels for free in Canva, but if you’re in a hurry, you can just trace circles from a smaller jar lid.
- Label your candy with playful names to up the fun factor and spark some make-believe. As an English major, I love some alliteration, but whatever you choose to do is fun.
- Before you attach your labels, use your starburst hole punch to take little “shark bites” out of the corners or edges of your labels. Then attach the labels to the decorative paper bands using double-sided tape if your paper is particularly thin (mine was) or hot glue. Note: You can strategically place your labels to camouflage any imperfections in your decorative paper bands.
- Note: You can absolutely call it a day here, and your birthday treats will still be adorable, the envy of Pinterest, and delicious. If you have more time, let’s make a wooden box! I used a miter saw to cut two 7.5-inch sections from the wide “front” slats running horizontally across the pallet and two 7.5-inch sections from the narrow “back” slats running horizontally. (You may want to line your jars up along the wood to make sure your supplies will fit inside, but 7.5 inches was quite spacious for my jars.) Whenever you work with a wood pallet, be very aware of whether or not there are rusty nails that you’ll be working around.
- Allocate one of your wider pieces as the bottom of your box. The two narrower pieces of the same length will be the long sides of your box. Position your first side and attach it to the bottom of your box using the drill and two wood screws. You may find it helpful to pre-drill your holes. Repeat this step with the other side.
- Then measure the width of your box from the outside edges of each side and cut your remaining 7.5-inch slat into two end pieces. Attach the short ends to your box with wood screws, taking care to pick screw locations that will not intersect with the previously placed screws.
- Note: Voila! You now have a rustic box! You can stop here if you’d like! If you’d like to refine your box, you may want to lightly sand down any splintered parts. Then paint the front, back, and sides of your box. If you have a fun “live edge” to your wooden slats, you may want to leave that part unpainted, as I did. You can also stop here. If you’d like a more finished feel that further eliminates the risk of any splinters, add a coat of clear polyurethane to the insides and live edges of your box. Let everything dry completely before decorating the front of your box.
- Decorate your box with the paint pens and Sharpies! Have fun with it! Consider personalizing the box with your loved one’s name, adding fish hook motifs, or drawing fish or worms.
- Note: Again, you can also stop here. If you’re feeling next-level extra festive, welcome to the club. Let’s make a paper banner. Cut matching triangles from the leftover decorative paper and set them aside. Tie your twine around the narrow end of one of your chopsticks and secure it with a dot of hot glue. Measure out your twine to the desired tautness along the back of your box, allowing a little extra to tie your second knot. Secure your twine to the second chopstick with hot glue. Then stretch your length of twine out into a straight line.
- Position your paper flags along the line, trimming any of them as needed for an even fit. Run a line of hot glue along the top of your flags and attach them to your twine. I found it easiest to slide the flag with the glue underneath the twine so that I could see what I was doing.
- Arrange your chopsticks in either corner along the backside of your box and secure them with a generous dollop of hot glue.
- Display your bait bar with the fondue fork or tongs to keep tiny, dirty hands from plunging directly into the jars. If you’re sharing your candy as take-away favors, tuck a stack of compostable or recyclable bags into the box behind the jars. Enjoy!