
Sustainable Craft: Uncle Sam-inspired 4th of July Tablescape
Are you looking for a DIY 4th of July tablescape idea? Are you looking for a sustainable craft to make patriotic centerpieces? Read on for how to easily use items from your home or recycling bin to build a festive, eco-friendly 4th of July tablescape!
This 4th of July, declare your independence from cheap, mass-produced patriotic table decorations.
While a run to the dollar store or seasonal section of a big box shop may seem harmless in the moment, most of those decorations are cheaply produced from low-quality plastic materials and will quickly wind up in the landfill.
And, even if you are committed to keeping and reusing your Independence Day decorations next year, do you really want to store them in your attic for a full 365 days?
I personally hate going into our attic for any sort of holiday decorations. I’m convinced I’m going to take a raccoon to the face while groping for the light switch, which is why I’m a huge fan of DIY holiday decor that you easily recycle, gift, or reuse.
Fortunately, with a quick dive into the recycling bin, a few basic crafting supplies, decorative paper, and some creativity, you’ll be partying like a patriot in no time.
Did I just say “dive into the recycling bin”? Sure did! This sustainable 4th of July tablescape features:
- To-go soup or cylindrical take-out containers.
- Toilet paper and/or paper towel rolls.
- Pieces of lightweight cardboard or cardstock (like a cereal box).
- Old books from the thrift store.
- Reusable cloth napkins.
- A reusable tablecloth.
- An easy way to restyle your existing votive candles.
- Dried flowers, which have a much longer shelf life than fresh flowers.
Leave that raccoon in the attic alone, y’all. It’s sustainable crafting time.
Note: Though there are many steps in this DIY upcycled tablescape, the use of a hot glue gun allows you to work very quickly.

Suggested Materials for an Uncle Sam-inspired 4th of July Tablescape
For the table:
- Red, white, blue, or patriotic tablecloth (I borrowed my mom’s.)
- Solid red napkins
- An iron
- White plates
- Knives, forks, and spoons
- Glasses
- Thrift store books with red, white, or blue covers or presidential titles
- Small white or clear vases or repurpose Oui yogurt jars
- Dried or fresh baby’s breath. (I highly recommend drying some baby’s breath and tucking it away for upcoming tablescapes so you can reuse it over and over again.)
For the toilet paper roll napkin rings:
- Empty toilet paper rolls or paper towel rolls
- Sharp scissors
- 2-3 8×10 sheets of decorative paper with stripes or stars*
- Ruler
- Glue gun
- Pencil
For the Uncle Sam hats:
- 3 To-go soup or cylindrical take-out containers. (Something like a large yogurt container could work as well.)
- 3 12” x 12” sheets of decorative paper with stripes or stars*
- 1-2 sheets of decorative paper with stripes or stars* for the hat band, brim, and top
- Pencil
- Glue gun
- Heavy cardstock or light cardboard (such as an old cereal box)
- Salad bowl to use as a template

For the votives:
- Glass votive holders and votives
- Double stick tape
- Scissors
- Ruler
*Note: The amount of paper you need depends on how many napkin rings and hats you’ll be making, but you can also supplement your craft paper by decorating your own printer or scrap paper.
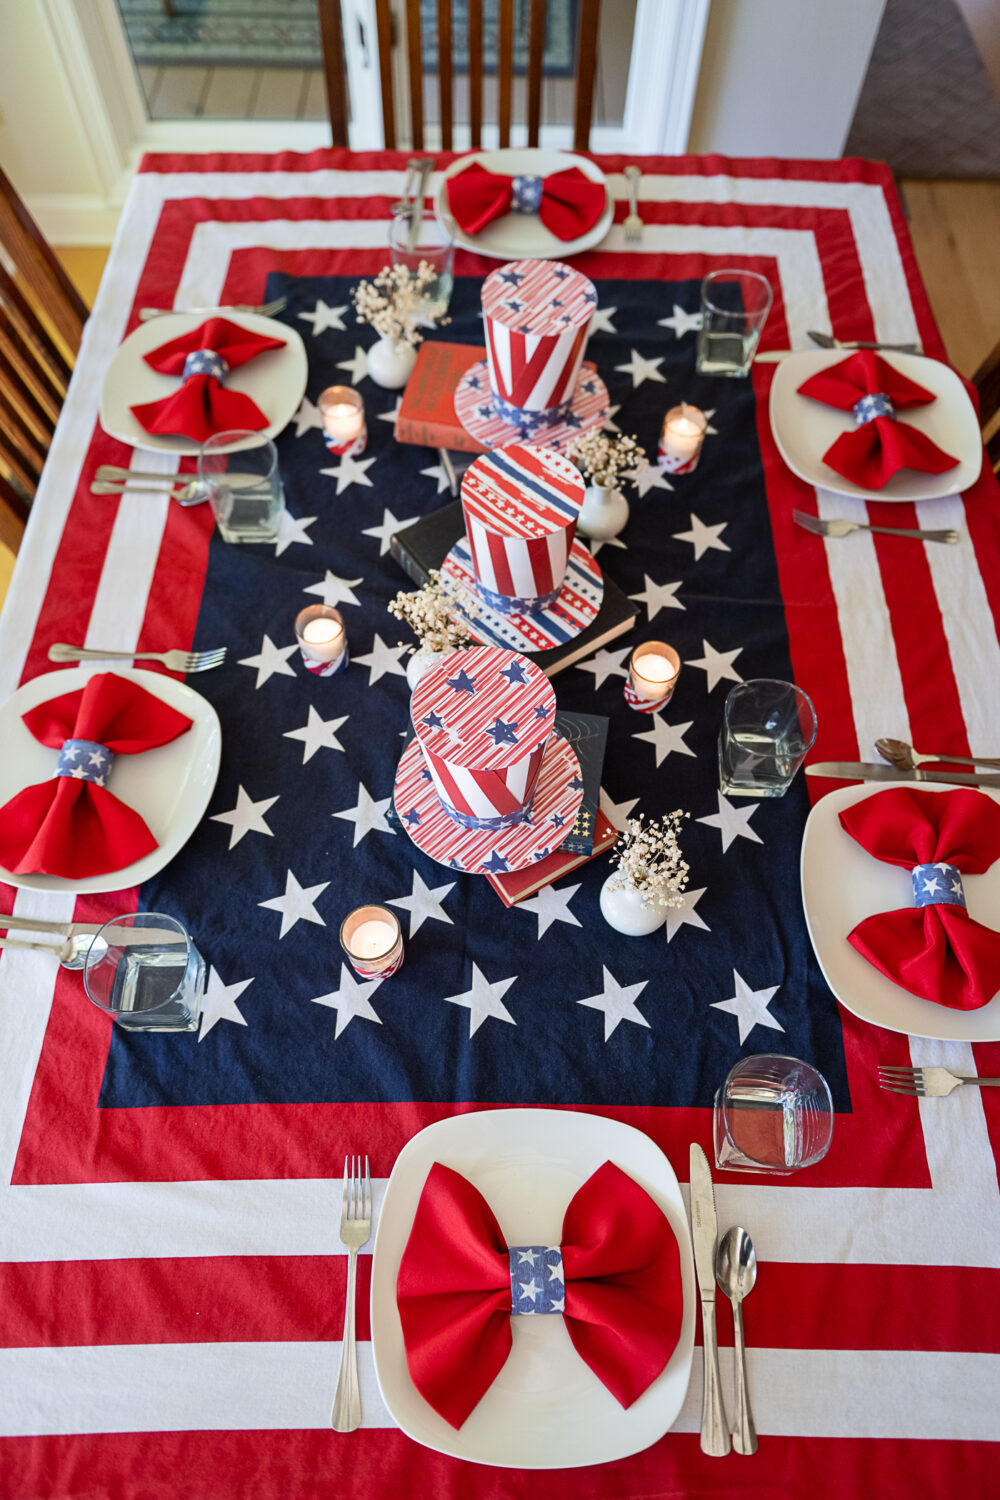
Start Assembling Your Uncle Sam-inspired 4th of July Tablescape
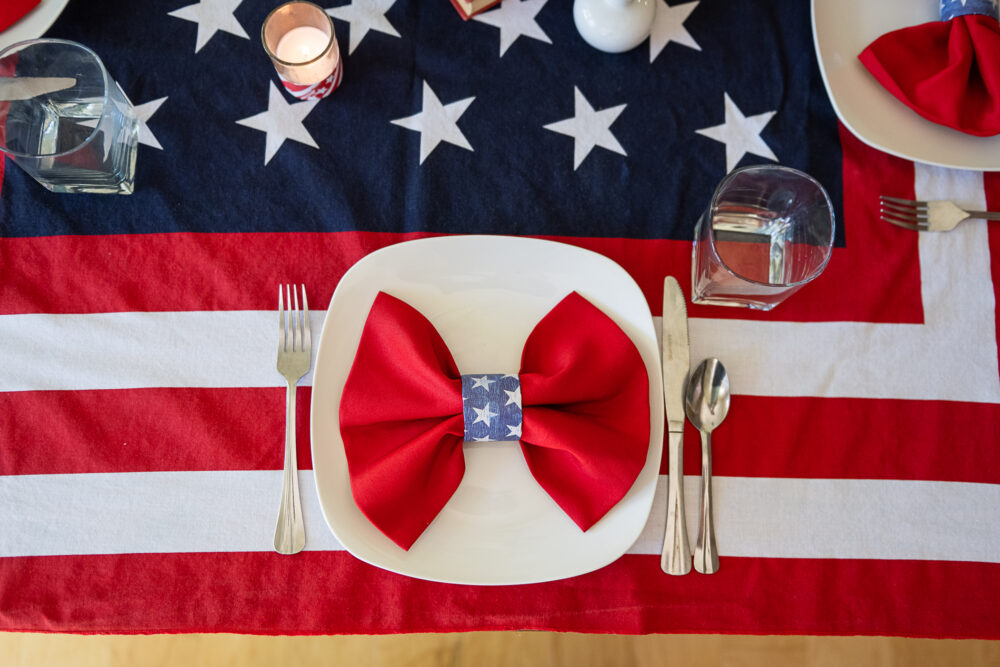
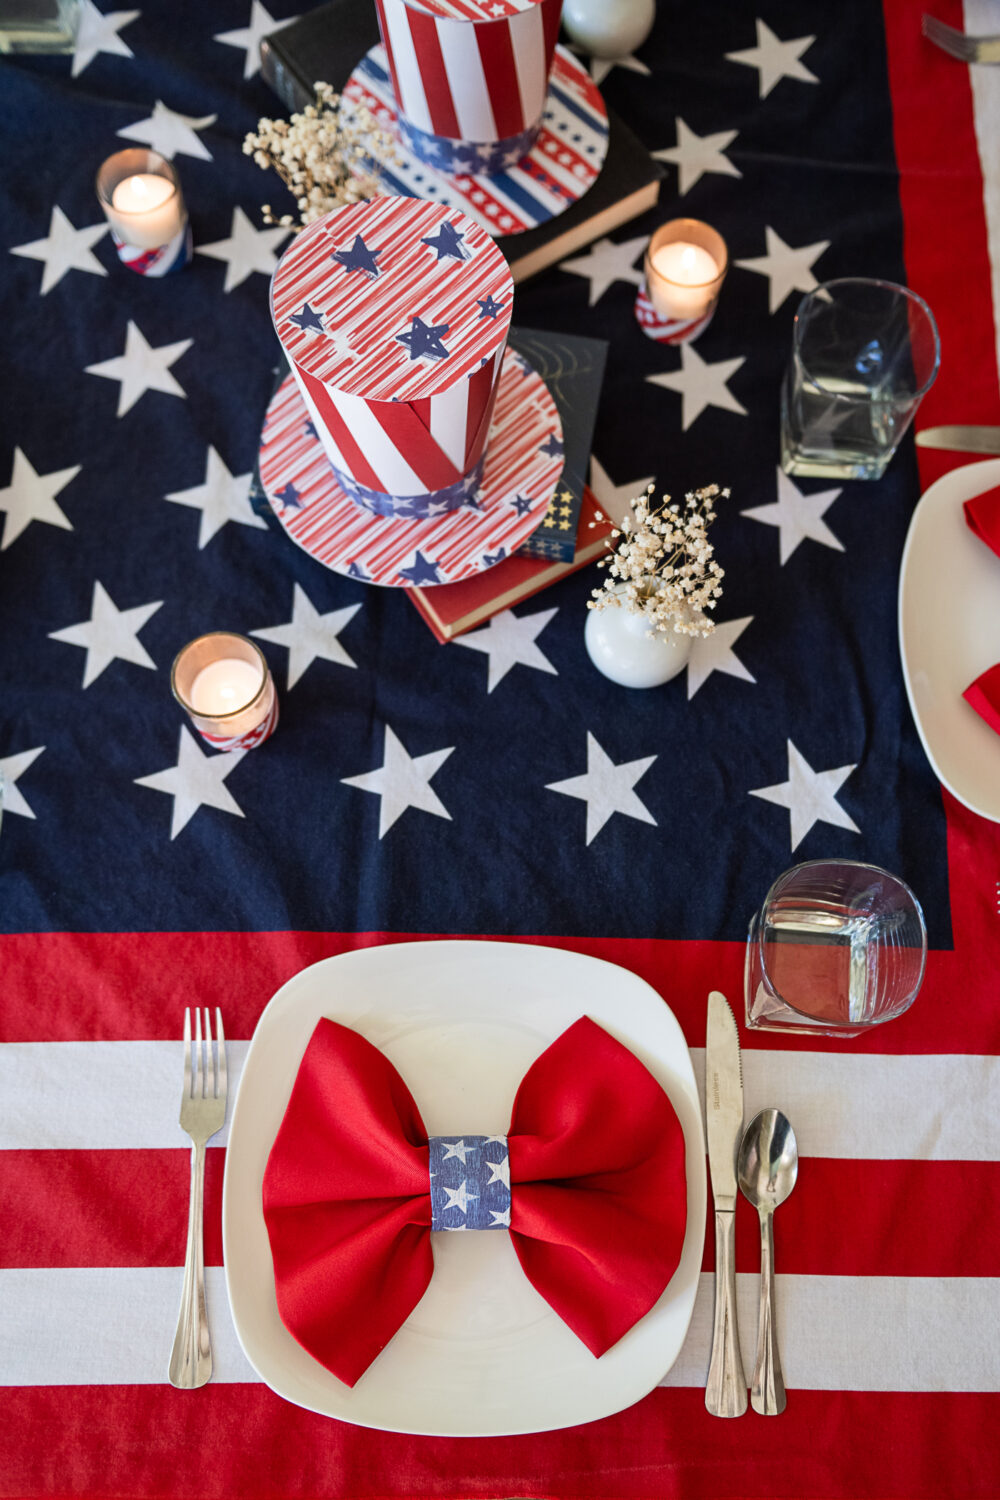
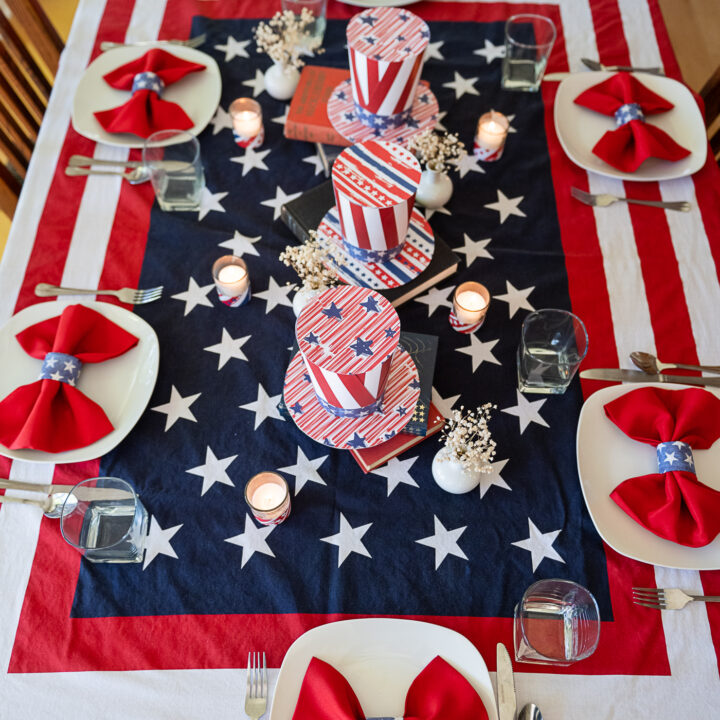
- Iron any wrinkles from your tablecloth and napkins, and lay the napkins flat.
- Set your table with the plates, flatware, and glasses.
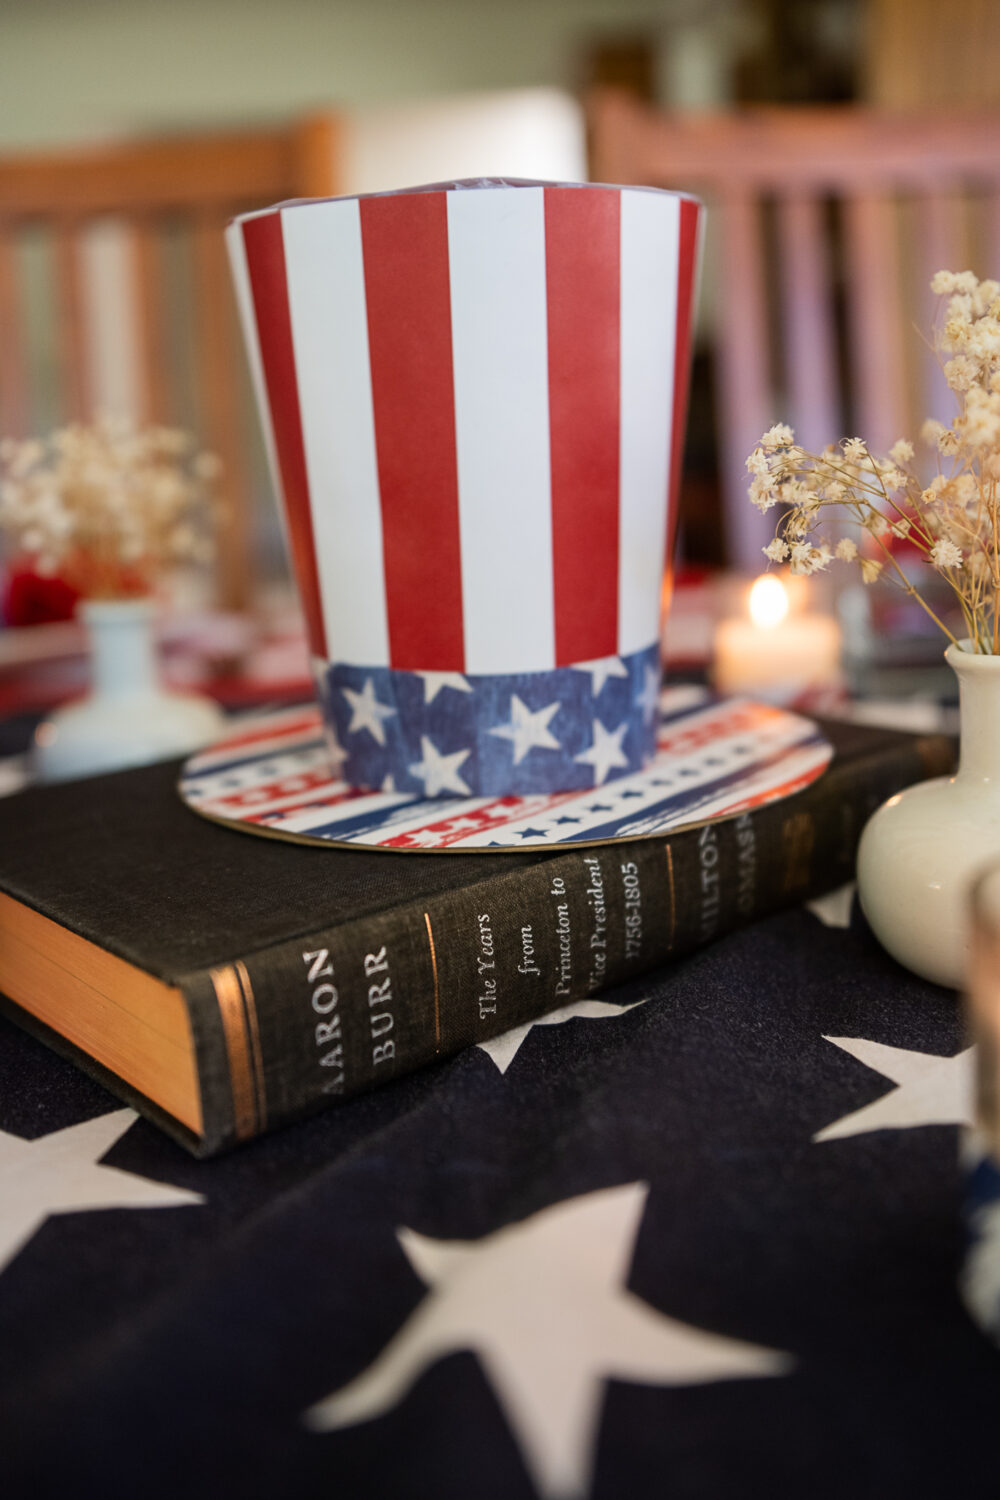
- Stack your books 2-3 high along the center of the table. You can turn the titles to face an adjoining stack of books if they feel too off-topic.
- Make your Uncle Sam hats.


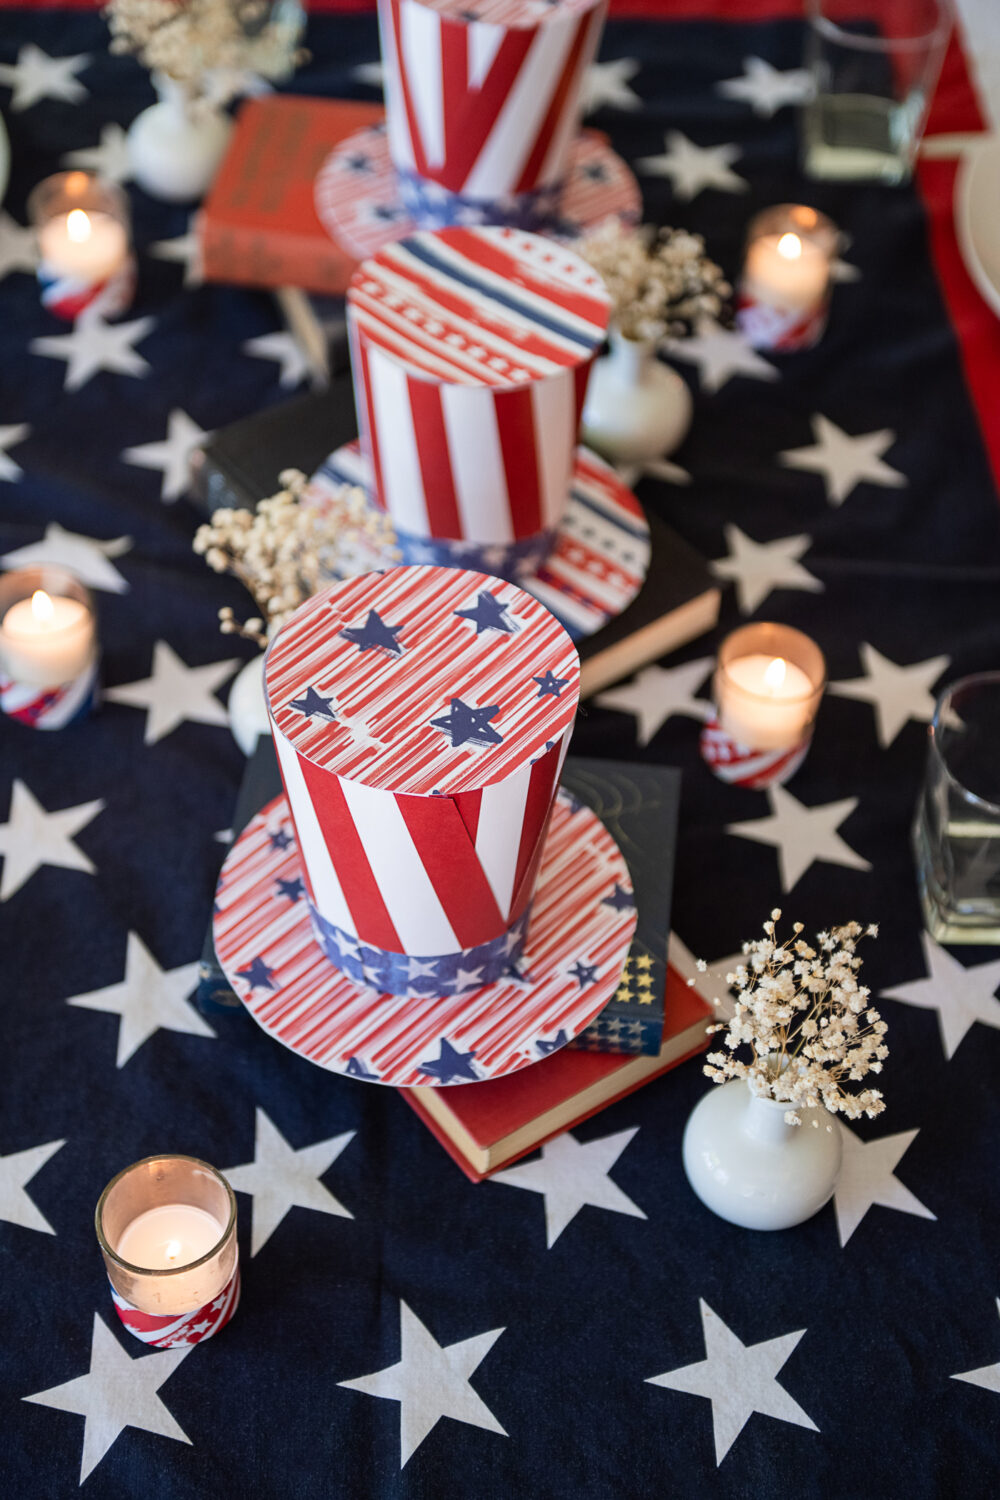
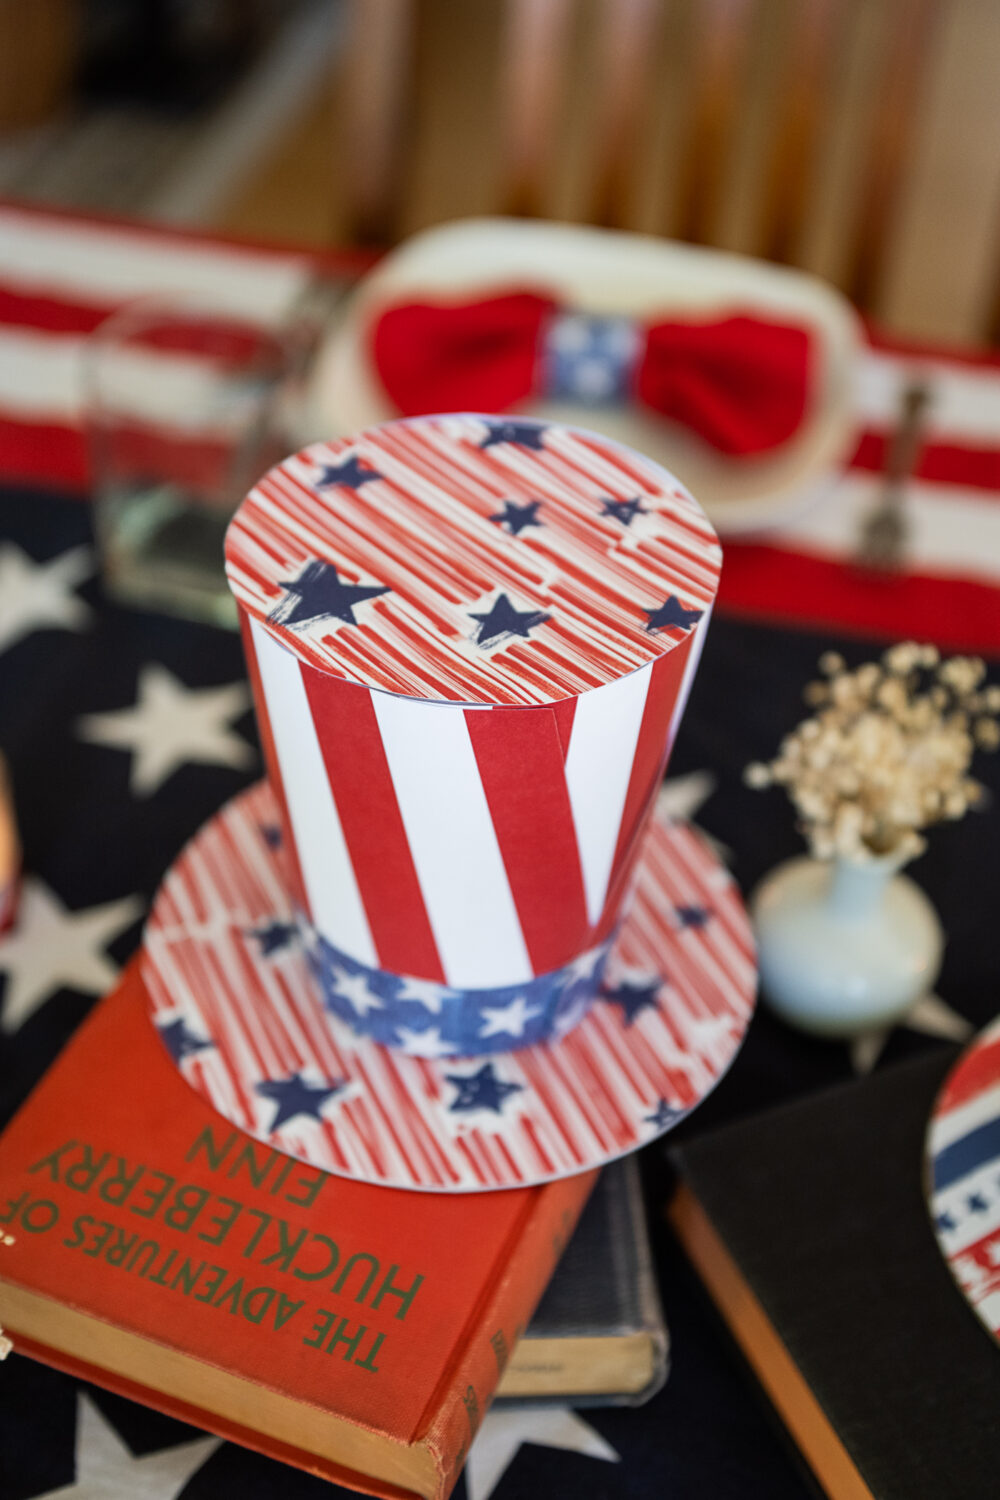
How to Make an Uncle Sam Centerpiece from Take-out Containers
- Set aside the lids, and then wash and dry 3 large plastic soup containers.
- Place a piece of 12” x 12” decorative paper with the colorful side facing down. Align the narrow base of your to-go container with the center point of your paper. Then wrap the paper around the base of your plastic container. It will not be flush to the edge around the entire base, and that’s fine.
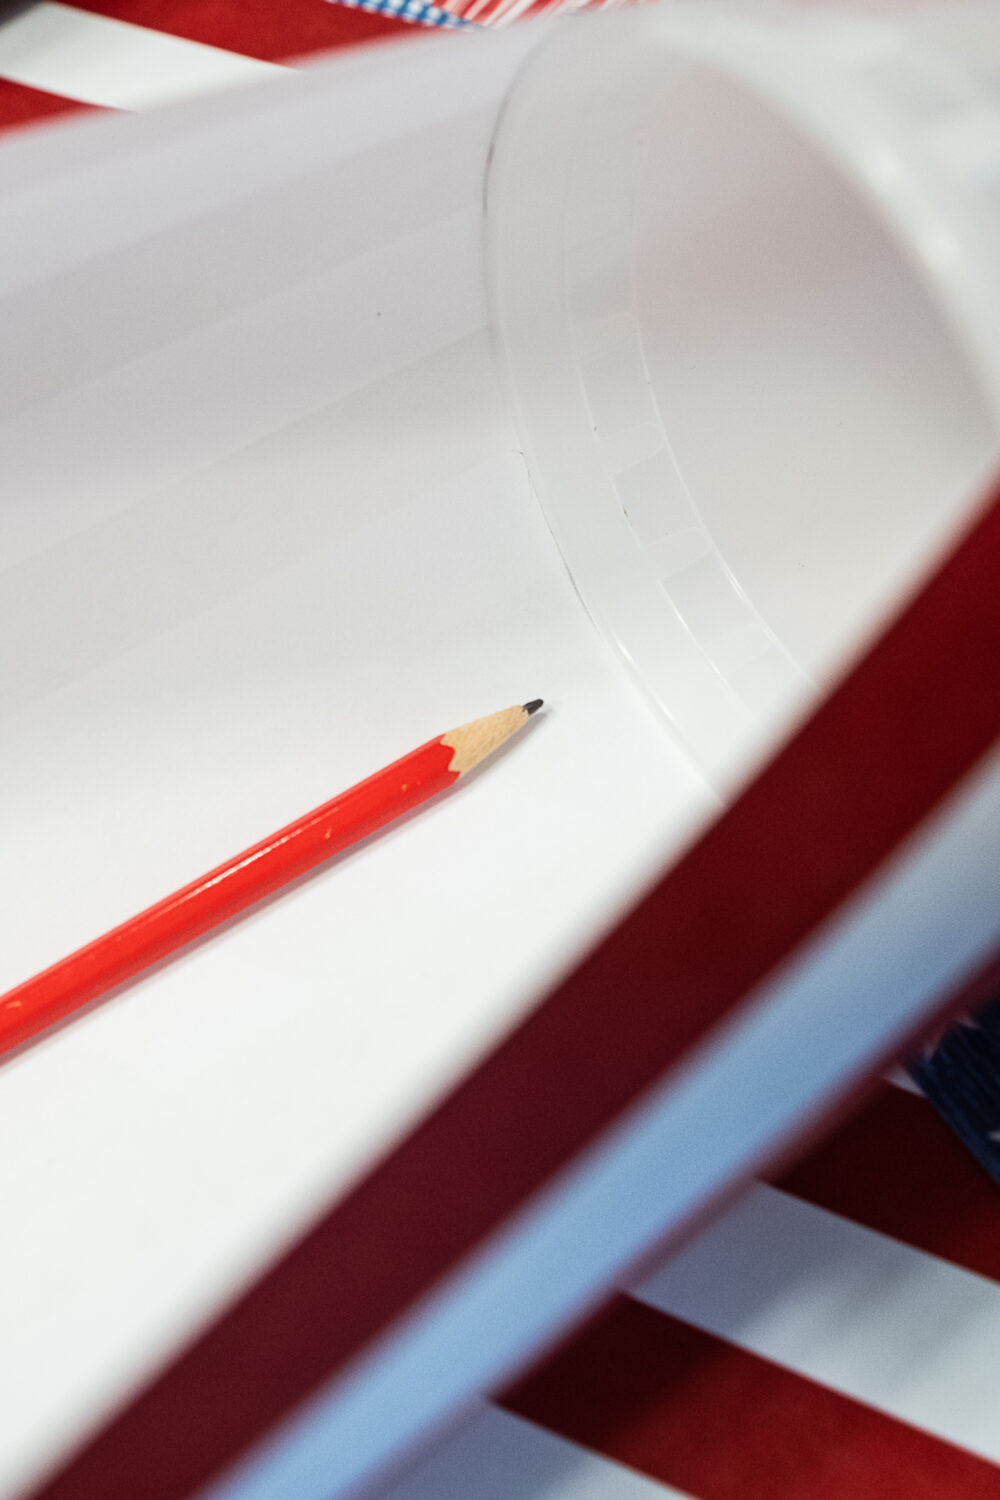
- Hold the paper in place with one hand, and use the pencil to trace around the edge of the mouth of your to-go container. It should form an arc shape. Release your paper to lay flat. Repeat with remaining to-go containers and 12” x 12” papers. (See pictures for additional instructions.)
- Let your glue gun heat while you cut along the lines you traced with the pencil in the step above.
- Working quickly, attach your paper to your to-go container. Align the base of the plastic with the center of the straight edge of a paper cut-out so that the curved arch is well-aligned with the top edge, and secure it with a dab of hot glue. Then add additional dots of glue to secure the bottom and repeat for the top edge. Let the glue set and cool.
- Repeat the step above on the opposite side of your canister to cover all the plastic. Then use a sharp, fine pair of scissors to trim away any overhanging paper around the base so that the hat will sit flat on the brim. Repeat steps 5-6 for each to-go container.
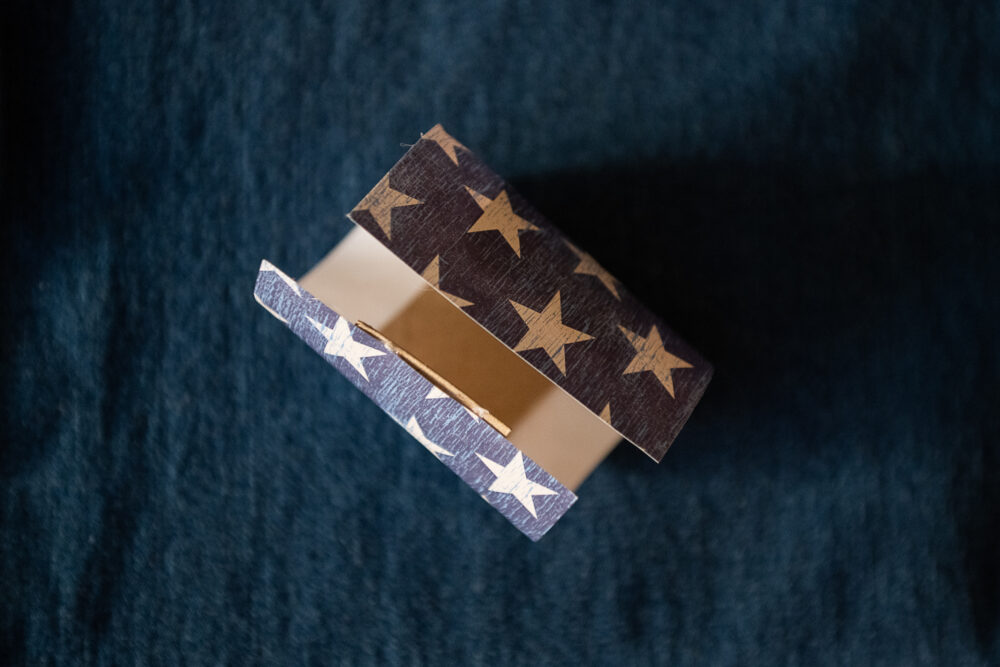
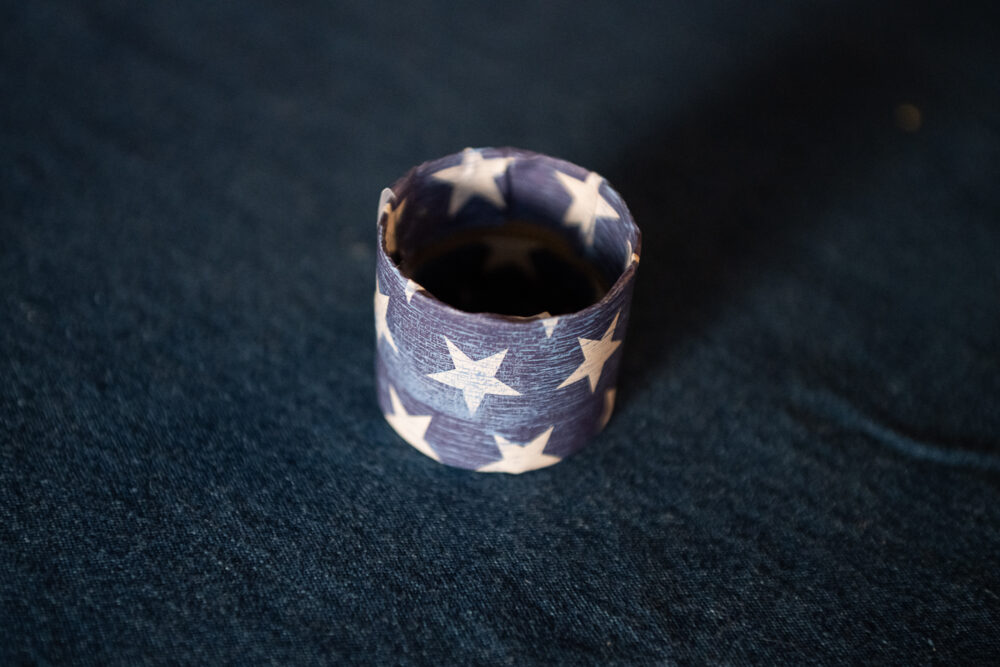
- Make the hat belts by cutting 1.25” by 10” strips of paper from a piece of your 8” x 10” decorative paper. (Alternately, you can let kids decorate a piece of printer paper and use that in place of decorative paper.)
- Arrange the hat belts around the base of the container to ensure there’s no paper overhang and the hat can still sit upright easily. Secure the belts with small dabs of glue.
- To make the top covering of your hat, place the to-go container mouth-side-down on a piece of decorative paper and trace. Trace it again on your lightweight cardboard. Cut out your circles, glue the decorative paper to the cardboard, and then glue it to the cardboard to the hat with the ugly side facing down.
- Let’s make the brim of your hat. Trace your salad bowl on a piece of lightweight cardboard and a piece of decorative paper. Cut them out and glue them together.
- Assemble your hats! Place your brim “pretty side up” and attach the rest of the hat with a substantial dollop of hot glue. If the bottom of your to-go container has ridges, you’ll want to apply it along the part that will touch the brim.
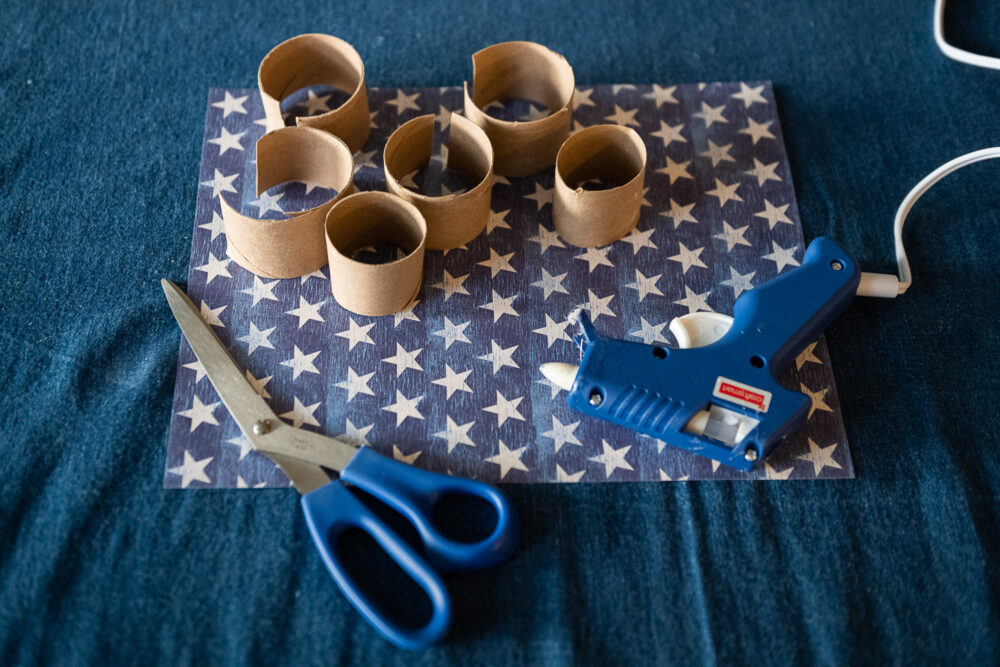
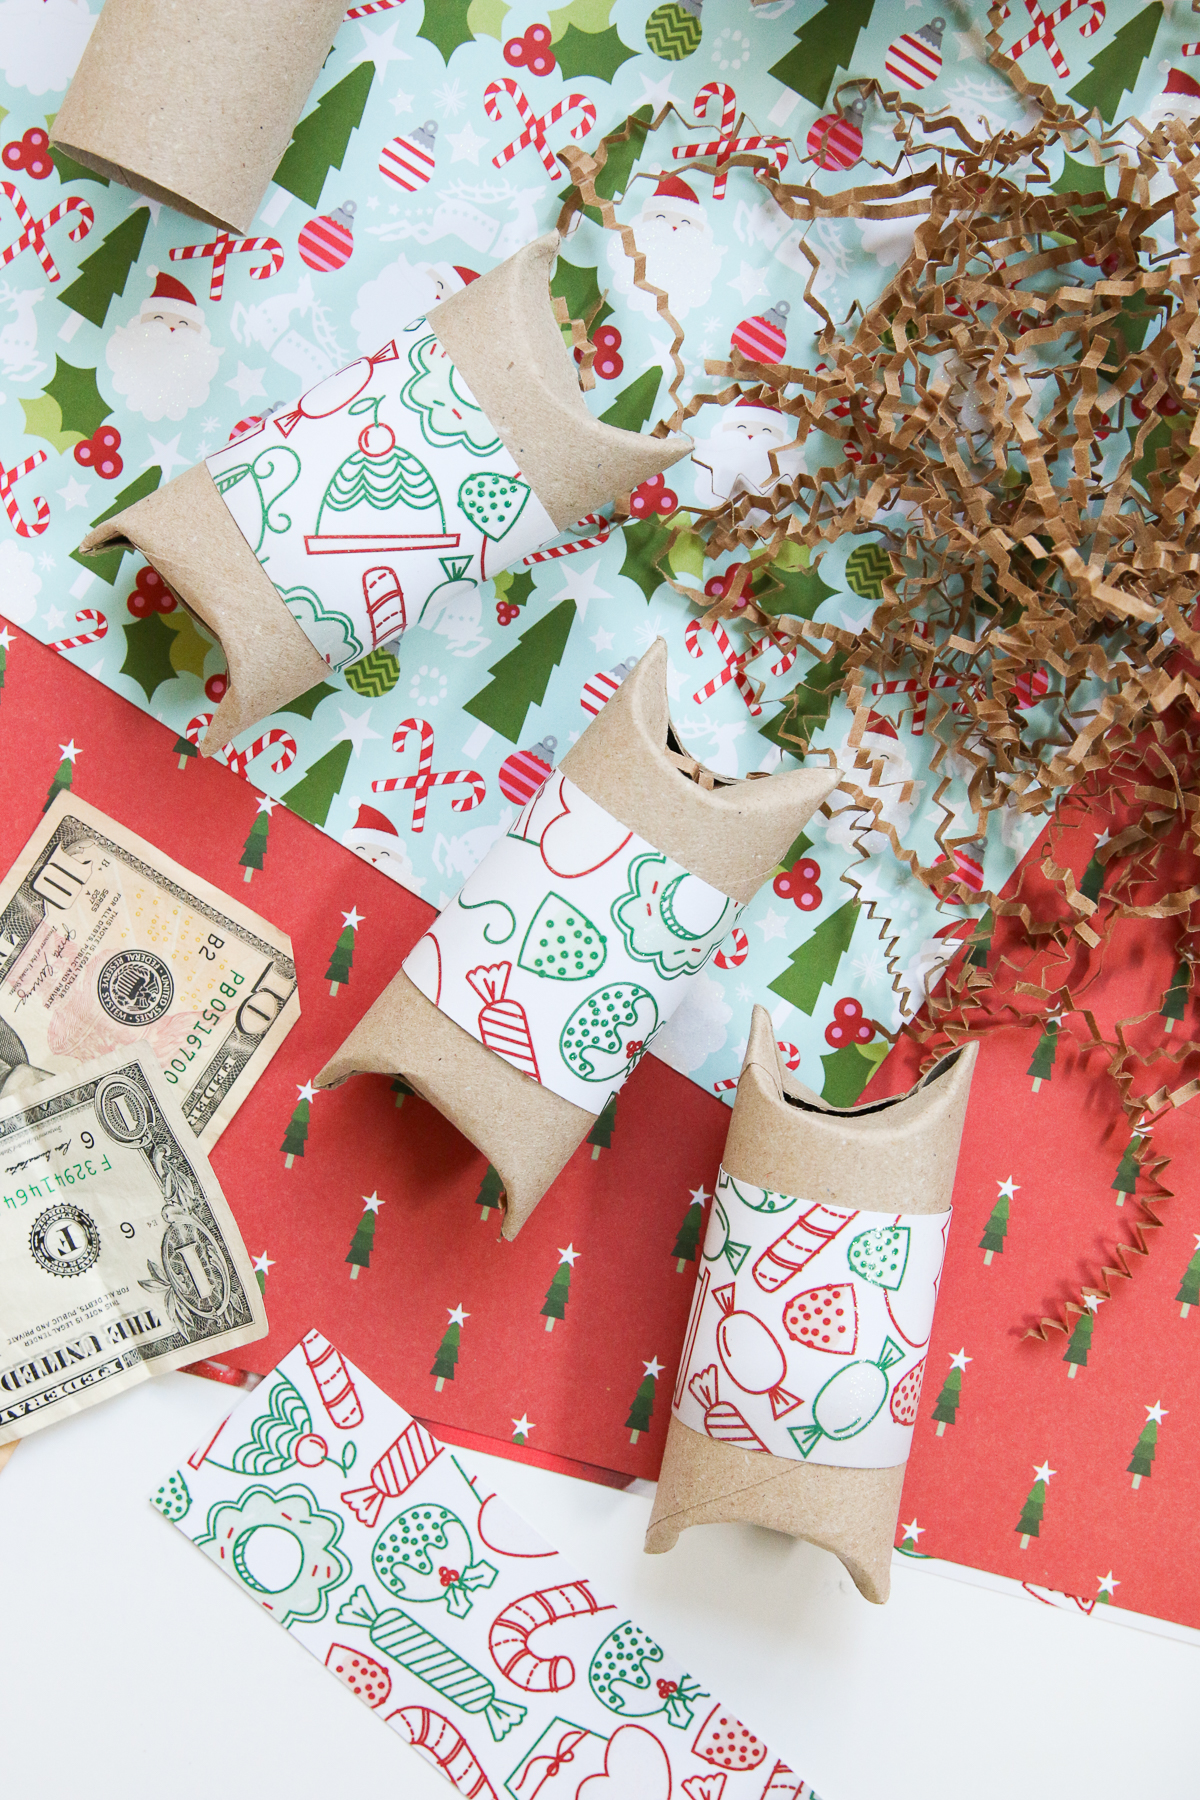
To Make Upcycled Toilet Paper Roll Napkin Rings
- Cut down the length of your toilet paper and or paper towel rolls, and then cut them into approximately 1.5-inch wide rings. Use your ruler to cut strips of decorative paper that are at least 3” x 6”.
- Position your rings in the center of the decorative paper so that they curve up towards you, secure them with a dot of glue, and then fold the long edges of the paper over the edges of the cardboard and secure them with dots of hot glue. There may be a gap along the center, but no one will see that.
- Trim any excess paper away from one short edge, and leave about ¼ inch of paper overhanging on the opposite short edge. Tuck the flush edge inside the overhanging edge, securing the closure with hot glue.

To Finish Assembling Your Uncle Sam-inspired 4th of July Tablescape
- Place your hats on top of your stacks of books. Add small vases filled with dried or fresh baby’s breath (and dry yours after the tablescape to reuse for the next year!).
- Fold your napkins into bow ties by laying them flat and folding opposing sides to meet along the center (also called “hot dogging” on YouTube, if that makes sense). Then repeat with the opposite sides, gather the edges of the napkin in a loose “M shape, and pull it through your napkin ring.
- Did that step above make no sense? You’ll find the easy step-by-step DIY here.
- If desired, decorate your votive candles with leftover scraps of decorative paper and double-sided tape. I cut mine to approximately ¾ inch wide. Lay your strip flat, place your votive in the center and secure it with a piece of tape, and then wrap the sides around. Trim any excess paper and secure it with small pieces of double-sided tape.
Light your candles, and enjoy! Do you have a fun, sustainable 4th of July DIY to share? Leave it in the comments below.

To dispose of this upcycled 4th of July tablescape responsibly, check out the tips below:
- Reuse your dried flowers as home decor or gift wrap accents. If that doesn’t appeal to you, you can compost them.
- Remove the paper and tape from your votives and enjoy them as you did before this DIY. Remove the tape from the paper and recycle the decorative paper.
- Enjoy your books, add them to a Little Free Library, or read Sustainable Craft Ideas: 20 Creative Things to Do With Old Books.
- Recover or paint your napkin rings for your next dinner party.
- Remove the paper and glue, and reuse your to-go containers or recycle them.
- Remove the portions of your decorative paper and cardboard with glue on them, and recycle the rest.
All photos via Reese Moore Photography
If you enjoyed Sustainable Craft: Uncle Sam-inspired 4th of July Tablescape, you may also enjoy:
Cheap DIY Halloween Decorations: Haunted Orchard Tablescape
How To Make A Whimsical, Garden-inspired Vegetarian Charcuterie Board in Less than 45 Minutes
9 Ways to Reuse Single-Use Containers
About the Author

Reese Moore
Reese Moore is a photographer, content creator, and pickle connoisseur who divides time between Charleston and Lake Lure. When she’s not behind the lens shooting stunning images for Reese Moore Photography, Reese loves to spend her time wandering the woods with her dog Gatsby or adventuring with her husband Logan in their Airstream Basecamp.
Uncle Sam-inspired 4th of July Tablescape
Are you looking for a sustainable craft to make patriotic centerpieces? Read on for how to easily use items from your home or recycling bin to build a festive, eco-friendly 4th of July tablescape!
Materials
- Red, white, blue, or patriotic tablecloth (I borrowed my mom’s.)
- Solid red napkins
- White plates
- Knives, forks, and spoons
- Glasses
- Thrift store books with red, white, or blue covers or presidential titles
- Small white or clear vases or repurpose Oui yogurt jars
- Dried or fresh baby’s breath. (I highly recommend drying some baby’s breath and tucking it away for upcoming tablescapes so you can reuse it over and over again.)
- Empty toilet paper rolls or paper towel rolls
- 2-3 8x10 sheets of decorative paper with stripes or stars*
- 3 To-go soup or cylindrical take-out containers. (Something like a large yogurt container could work as well.)
- 3 12” x 12” sheets of decorative paper with stripes or stars*
- 1-2 sheets of decorative paper with stripes or stars* for the hat band, brim, and top
- Heavy cardstock or light cardboard (such as an old cereal box)
- Glass votive holders and votives
Tools
- An iron
- Sharp scissors
- Ruler
- Glue gun
- Pencil
- Salad bowl to use as a template
- Double stick tape
Instructions
- Iron any wrinkles from your tablecloth and napkins, and lay the napkins flat.
- Set your table with the plates, flatware, and glasses.
- Stack your books 2-3 high along the center of the table. You can turn the titles to face an adjoining stack of books if they feel too off-topic.
- Make your Uncle Sam hats.
- Set aside the lids, and then wash and dry 3 large plastic soup containers.
- Place a piece of 12” x 12” decorative paper with the colorful side facing down. Align the narrow base of your to-go container with the center point of your paper. Then wrap the paper around the base of your plastic container. It will not be flush to the edge around the entire base, and that’s fine.
- Hold the paper in place with one hand, and use the pencil to trace around the edge of the mouth of your to-go container. It should form an arc shape. Release your paper to lay flat. Repeat with remaining to-go containers and 12” x 12” papers. (See pictures for additional instructions.)
- Let your glue gun heat while you cut along the lines you traced with the pencil in the step above.
- Working quickly, attach your paper to your to-go container. Align the base of the plastic with the center of the straight edge of a paper cut-out so that the curved arch is well-aligned with the top edge, and secure it with a dab of hot glue. Then add additional dots of glue to secure the bottom and repeat for the top edge. Let the glue set and cool.
- Repeat the step above on the opposite side of your canister to cover all the plastic. Then use a sharp, fine pair of scissors to trim away any overhanging paper around the base so that the hat will sit flat on the brim. Repeat steps 5-6 for each to-go container.
- Make the hat belts by cutting 1.25” by 10” strips of paper from a piece of your 8” x 10” decorative paper. (Alternately, you can let kids decorate a piece of printer paper and use that in place of decorative paper.)
- Arrange the hat belts around the base of the container to ensure there’s no paper overhang and the hat can still sit upright easily. Secure the belts with small dabs of glue.
- To make the top covering of your hat, place the to-go container mouth-side-down on a piece of decorative paper and trace. Trace it again on your lightweight cardboard. Cut out your circles, glue the decorative paper to the cardboard, and then glue it to the cardboard to the hat with the ugly side facing down.
- Let’s make the brim of your hat. Trace your salad bowl on a piece of lightweight cardboard and a piece of decorative paper. Cut them out and glue them together.
- Assemble your hats! Place your brim “pretty side up” and attach the rest of the hat with a substantial dollop of hot glue. If the bottom of your to-go container has ridges, you’ll want to apply it along the part that will touch the brim.
- Cut down the length of your toilet paper and or paper towel rolls, and then cut them into approximately 1.5-inch wide rings. Use your ruler to cut strips of decorative paper that are at least 3” x 6”.
- Position your rings in the center of the decorative paper so that they curve up towards you, secure them with a dot of glue, and then fold the long edges of the paper over the edges of the cardboard and secure them with dots of hot glue. There may be a gap along the center, but no one will see that.
- Trim any excess paper away from one short edge, and leave about ¼ inch of paper overhanging on the opposite short edge. Tuck the flush edge inside the overhanging edge, securing the closure with hot glue.
- Place your hats on top of your stacks of books. Add small vases filled with dried or fresh baby’s breath (and dry yours after the tablescape to reuse for the next year!).
- Fold your napkins into bow ties by laying them flat and folding opposing sides to meet along the center (also called “hot dogging” on YouTube, if that makes sense). Then repeat with the opposite sides, gather the edges of the napkin in a loose “M shape, and pull it through your napkin ring.
- Did that step above make no sense? You’ll find the easy step-by-step DIY here.
- If desired, decorate your votive candles with leftover scraps of decorative paper and double-sided tape. I cut mine to approximately ¾ inch wide. Lay your strip flat, place your votive in the center and secure it with a piece of tape, and then wrap the sides around. Trim any excess paper and secure it with small pieces of double-sided tape.


How beautiful….I will 4th of July riddles to the table for extra fun. Perfect for a 4th cookout. Thanks for the ideas!
Thanks! And that’s a great idea for an addition.