Paper Mache Ideas for Adults: Compostable, Zero-Waste Decorative Fish
Are you looking for eco-friendly crafts for adults? Are you on the hunt for fun and playful paper mache ideas for adults? You’ll love these simple, DIY compostable fish!
There’s a lot of talk about the skeletons in our closets, but what about the really horrifying items cluttering up our garages and attics: old art projects? The ghosts of my college art career haunt an entire quarter of our garage and let me tell you, a lot of it is stuff not even a mother could love. (And I mean that literally; she unceremoniously dropped it all on my doorstep two years ago without warning.)
And, even if you didn’t complete a four-year high school and four-year college art program, you’re probably related to at least one or two very prolific young artists whose work is not always fridge-worthy.
What do you do with all that art? Is unwanted art (or pieces that have been thoroughly loved and enjoyed but are at the end of their life cycle) actually just one step away from garbage? Are all creative projects, with all the toxic paints, plastic-based adhesives, and excessive packaging, doomed ultimately to pollute the planet and wind up in the landfill?
I firmly believe creativity is essential to problem-solving and finding sustainable living alternatives, so I became obsessed with trying to come up with eco-friendly crafts, sustainable art projects, and zero-waste DIYs. There must be a way to nurture creative thinking without generating trash and clutter.
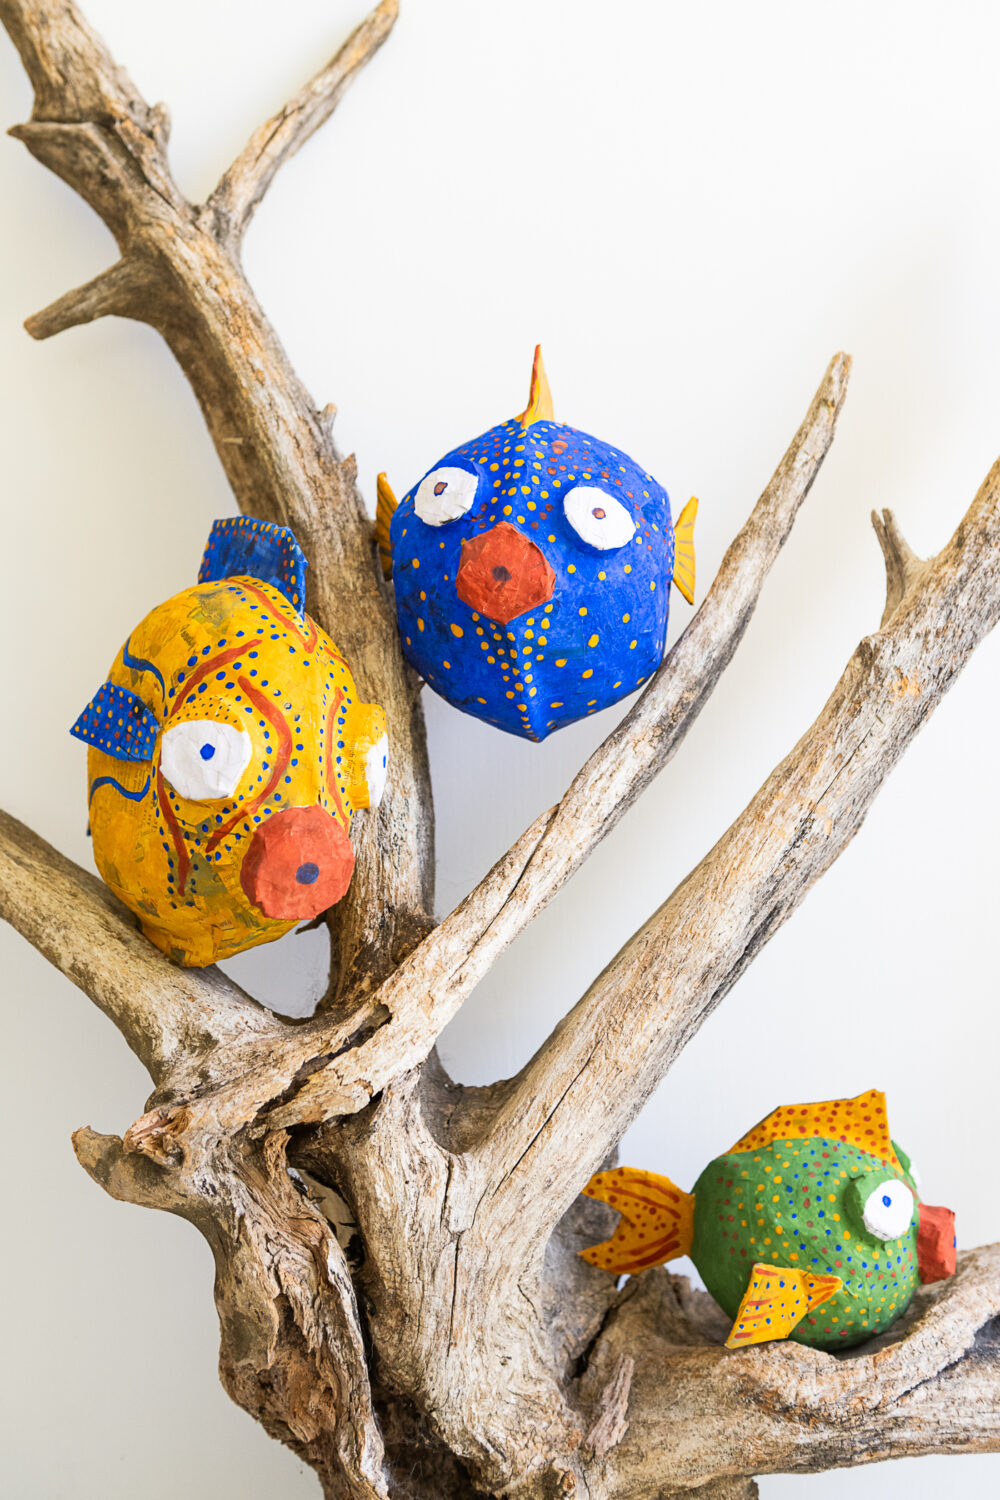
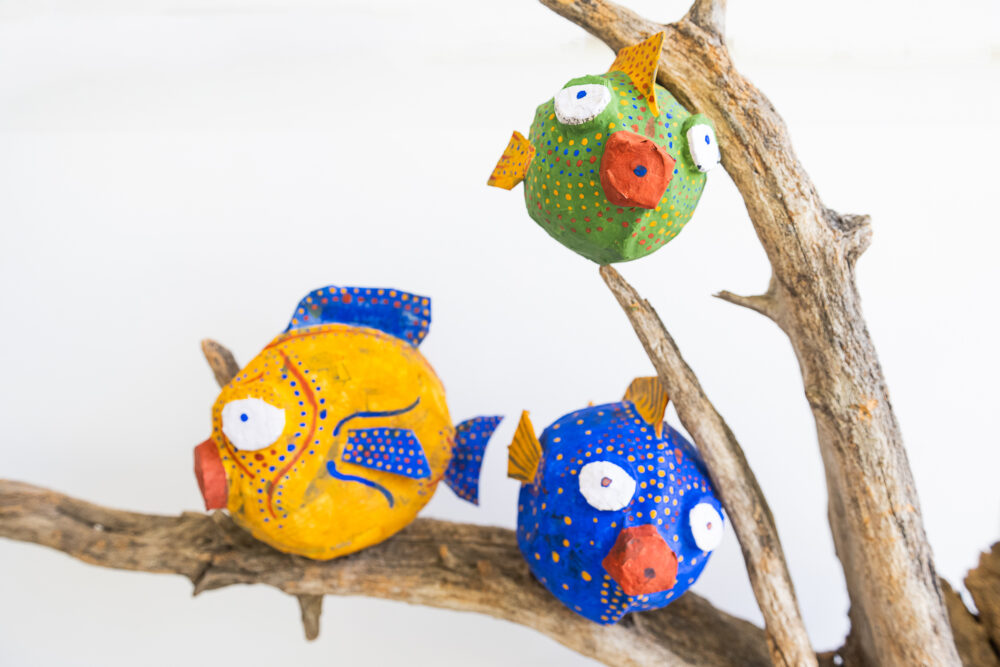
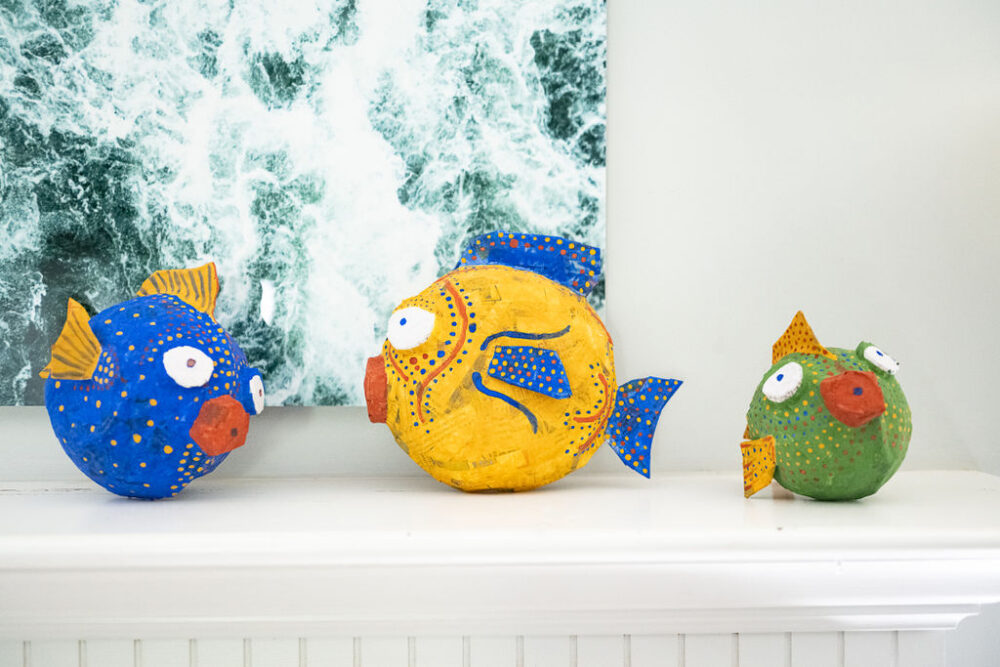
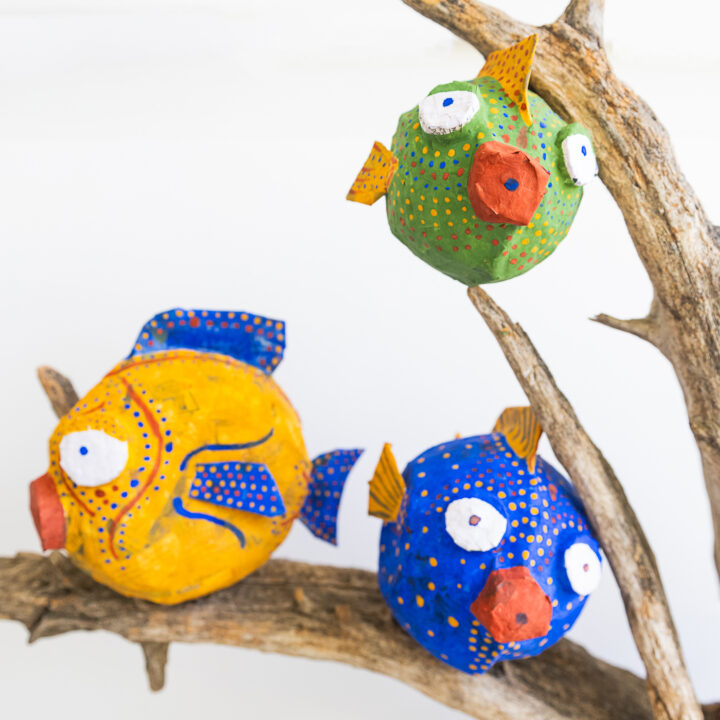
These paper mache fish are the closest I’ve come to a genuinely zero-waste craft, and I couldn’t be happier with how they’ve turned out! These funky fish are the perfect addition to our mantel and bookshelves, and I’ve currently nestled them in a giant piece of decorative driftwood. I’m also going to use them in my mother-in-law’s birthday tablescape, so stay tuned.

The best parts of making these zero-waste decorative fish are:
- You can use easily accessible items from your kitchen and recycling bin.
- You can give a new purpose to typically disposable items like rubber bands and twist ties.
- You’ll reuse plastic bags to create the removable barrier between your form and the foundation layer of paper mache instead of a plastic balloon.
- You can work on them a little bit at a time.
- You’ll use Natural Earth Paint, which operates out of a 100% solar-powered facility, to create ethical, organic, plant-based paints with recyclable and home-compostable packaging. Natural Earth Paint also offers a zero-waste shipping option.
- You can toss them in the backyard compost bin when you’re tired of them!
- You could easily adapt this craft to do with older kids or let younger children decorate the finished paper-mache forms.
Note: This is not a difficult eco-friendly craft in terms of skill level, but you need to allow time for your paper-mache forms to dry thoroughly – so this may be a project you work on, take a break from, and come back to over several days.
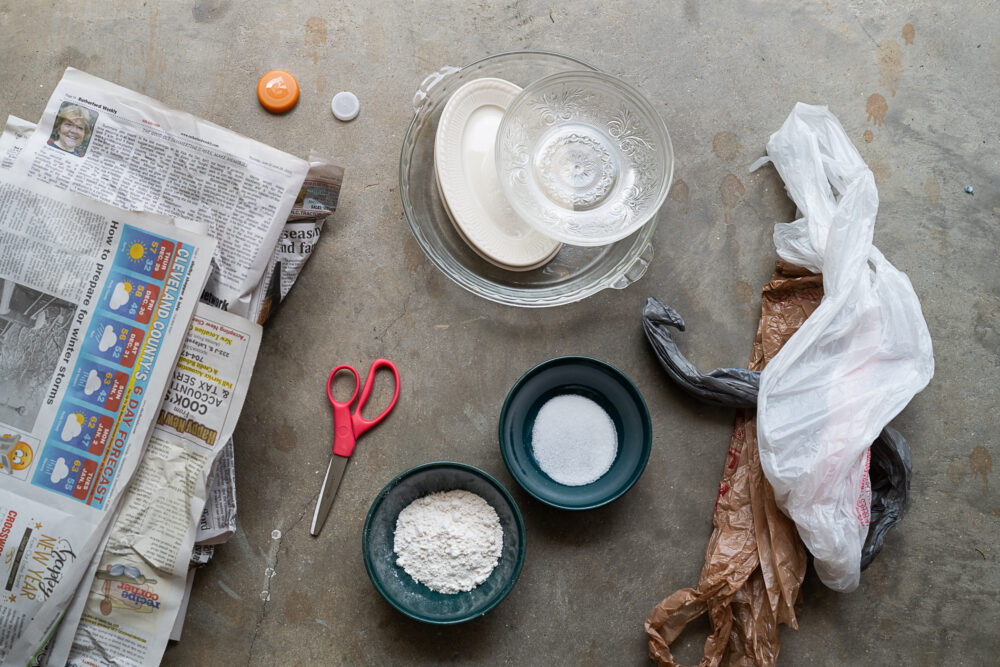
Suggested Materials for Zero-Waste Decorative Fish
- 2-3 stacks of newspaper (I reused old newspapers used to package purchases from the thrift store.)
- Scissors
- Flour, salt, and water for the paper-mache paste
- A small saucepan, measuring cups, mixing bowl, and whisk
- 2 matching bowls per fish form you plan to make
- One plastic bag per bowl
- Twist ties and/or produce rubber bands to secure the bags over the bowls
- Baking pan and an oven rack (I used ones from the thrift store.)
- White paper, plastic bags, and bottle caps for making bug eyes and lips (optional)
- Scrap cardboard and a pen or pencil for the fins
- Natural Earth Paint kit (They offer white paint if you’d rather paint on eyes to save time.)
- Small bowls for mixing paints
- Additional newspaper, cardboard, or scrap plastic to protect your work surface
Directions for Zero-Waste Decorative Fish
Getting Started with Your Foundation Layer of Paper-Mache
- Plan how many fish you’d like to make. I made three fish in three different sizes, but if you’re concerned about time, you may want to create one.
- Cut your newspaper into several different-sized strips. I used the larger strips for my foundation layer of paper mache and to bond the halves of my form together, and I used the smaller strips to refine the shape and for detail work on the fins, lips, and eyes.
- Place each bowl inside of a plastic bag and secure it as smoothly and tightly as possible with a rubber band or twist tie. I positioned my bowl along the smooth “front” of the bag instead of the bottom to reduce air bubbles.
- Repeat the process with your bottle caps and smaller plastic bags (or simply snip some unused portions of your plastic bags used in Step 3).
- Tuck the “tail” of your plastic bag inside your bowl and place each bowl upside down on a baking sheet.
- Make your paper-mache paste. I recommend adapting this Cooked Paper-Mache Recipe from The Spruce by adding one additional tablespoon of flour for a thicker paste.
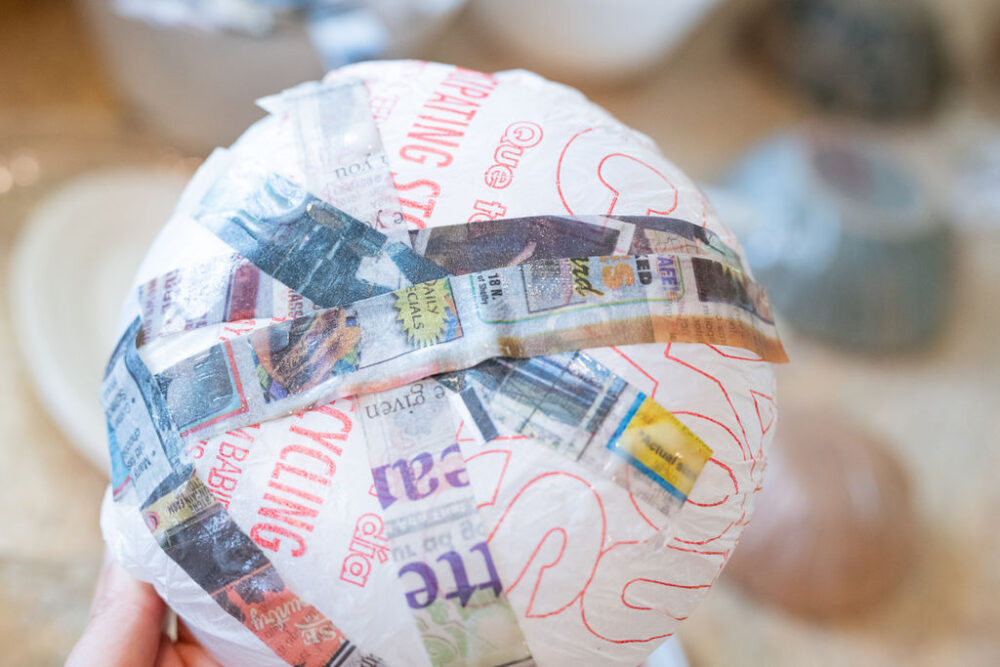
- Cover your paper-mache forms by dipping newspaper strips in the paste, running them through your fingers to remove the excess, and smoothing them over the surface of your plastic bag-covered bowl. Create one solid layer by overlapping your strips in various directions. Note: You’ll make your life easier later on if the rim of your bowl remains tidy. Otherwise, you’ll have to cut the overhanging paper mache before you bond the halves together.
- Let the foundation layer of your paper mache dry thoroughly before applying a second or possibly third layer, depending on how sturdy you’d like your forms to be. (I did three layers, but I only kept my paper mache paste for two days before making a fresh batch and composting whatever was left over.) Note: You can greatly expedite the drying process by placing your bowls in direct sunlight or under a fan, but check the weather before sitting them outside!
- For the lips and bug eyes, I found it easiest to adhere two long, narrow strips around the edge of my lids to overlap and secure the “ring” shape. I then paper mached tiny squares of paper over the entire form, using white paper for the eyes (because I didn’t purchase the white paint option from Natural Earth Paint).

Finishing Your Paper-Mache Forms
- Once your paper-mache has thoroughly dried, remove the plastic-covered bowls and bottle caps. I found the easiest way to do this was to gently run a serrated kitchen knife along the edge of the paper mache before undoing the twist tie and removing the bowl or lid from inside the bag. The bag then separated much more easily.
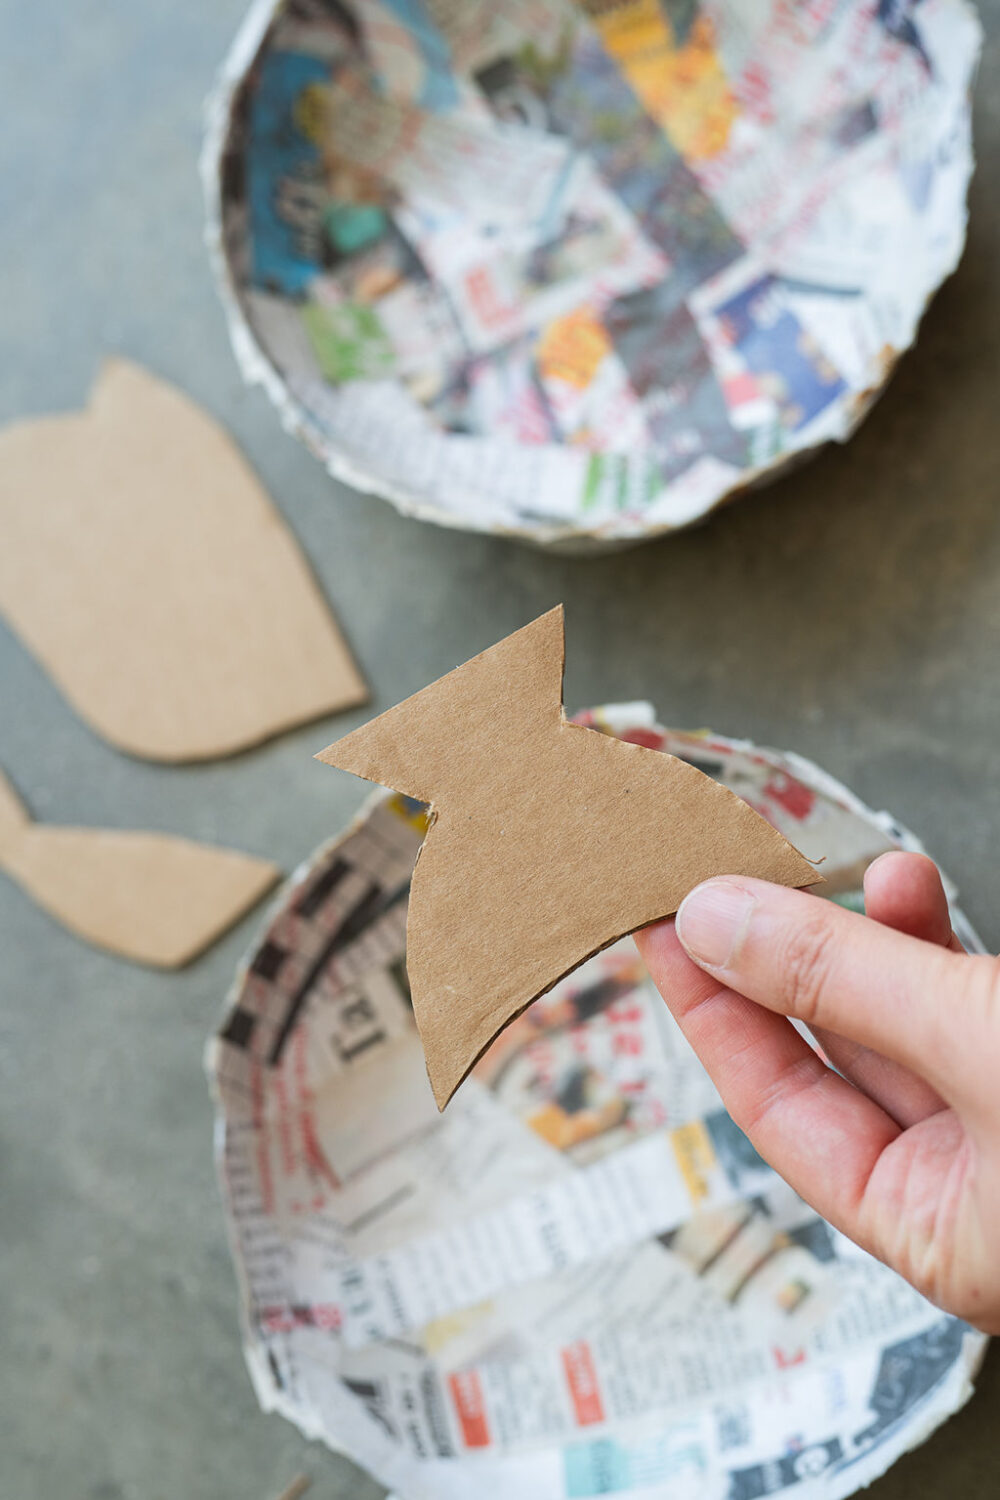
- Trace your top and tail fins on the scrap cardboard. I created an additional wedge shape to nestle unseen inside the bowl so that it would help anchor the tail after paper-macheing over the narrowest part, where the tail and fins protrude from the bowl.
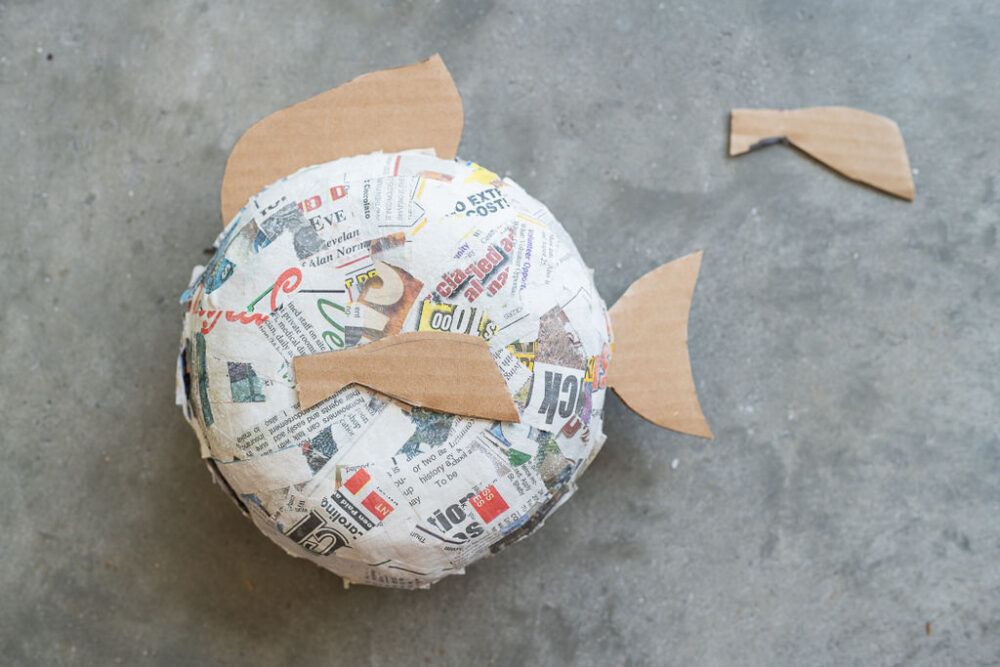
- Align the halves of your fish forms as best you can – it’s okay if they’re not a perfect match.
- Attach the halves by “bandaging” paper mache strips in all directions over the seams and let dry. Add extra strips as support over the top and tail fins. You may find it easier to let the halves adhere by resting one bowl normal-side up and the other on top so that gravity works with you versus against you. Add a second layer if desired.
- To create your gill fins, trace your fins and add an extra inch-by-half-inch strip to the finished visible form. You’ll fold your fin at the base of this strip and paper-mache over the strip to anchor the fin to the fish form. Let it dry, and add a second layer to firmly anchor the fins. Note: This step is where the oven rack comes in! The easiest way to let your second gill fin dry is to tuck the first dried fin through the grates of your oven rack while the second one dries. That way, you won’t squish or damage your bottom fin.
- To attach your eyes and lips, run wet paper-mache strips from the edges of your small pieces down the finished fish form. Add a few perpendicular pieces over the ones running in the starburst pattern from the lips and eyes for additional support.

Painting Your Zero-Waste Paper Mache Fish
- Mix your Natural Earth Paint according to the 1:1 instructions, making only as much as you know you’ll need at one time, as it does dry quickly. Let your paint dry thoroughly between colors or coats, noting that it is both fine and beautiful for the newsprint to show through your paint. I love the patterns, complexity, and interest it adds!
- Consider using complementary colors for the fins to draw attention to the shape and form of your paper-mache masterpiece!
- Let your fish dry on the oven rack to protect your fins.
- Enjoy your fish by hanging them from a doorframe or lighting fixture, lining them up along a table or mantle, or nestling them in a bookshelf. If your fish has trouble standing up on its own, you can hang it, lean it against something, or create a paper-mache base for it to sit on.

After You’ve Finished Your Eco-friendly Craft
- Wash and put your bowls away.
- Wash and recycle your bottle caps and plastic bags.
- Recycle or compost any unused newspaper.
- Compost any unused paper-mache paste and paint.
- Wash and reuse your rubber bands or twist ties.
- Compost and recycle any Natural Earth Paint packaging.
- Enjoy your fish until you’re ready to compost them!

All photos via Reese Moore Photography
If you enjoyed Paper Mache Ideas for Adults: Compostable, Zero-Waste Decorative Fish, you may enjoy:
Festive Sustainable Craft: Upcycle Corks into DIY 4th of July Decorations
How To Make a DIY Egg Carton Succulent Garden
How to Reuse Old Books to Make Homemade Cards
DIY Photo Booth | Reuse Gift Bags
How to Repurpose Old Christmas Trees into DIY Fire Starters
About the Author

Reese Moore
Reese Moore is a photographer, content creator, and pickle connoisseur who divides time between Charleston and Lake Lure. When she’s not behind the lens shooting stunning images for Reese Moore Photography, Reese loves to spend her time wandering the woods with her dog Gatsby or adventuring with her husband Logan in their Airstream Basecamp.
Zero Waste Paper Mache Decorative Fish
Are you looking for eco-friendly crafts for adults? Try these simple DIY paper mache compostable fish!
Materials
- 2-3 stacks of newspaper (I reused old newspapers used to package purchases from the thrift store.)
- Flour, salt, and water for the paper-mache paste
- Natural Earth Paint kit (They offer white paint if you’d rather paint on eyes to save time.)
Tools
- Scissors
- A small saucepan, measuring cups, mixing bowl, and whisk
- 2 matching bowls per fish form you plan to make
- One plastic bag per bowl
- Twist ties and/or produce rubber bands to secure the bags over the bowls
- Baking pan and an oven rack (I used ones from the thrift store.)
- White paper, plastic bags, and bottle caps for making bug eyes and lips (optional)
- Scrap cardboard and a pen or pencil for the fins
- Small bowls for mixing paints
- Additional newspaper, cardboard, or scrap plastic to protect your work surface
Instructions
- Plan how many fish you’d like to make. I made three fish in three different sizes, but if you’re concerned about time, you may want to create one.
- Cut your newspaper into several different-sized strips. I used the larger strips for my foundation layer of paper mache and to bond the halves of my form together, and I used the smaller strips to refine the shape and for detail work on the fins, lips, and eyes.
- Place each bowl inside of a plastic bag and secure it as smoothly and tightly as possible with a rubber band or twist tie. I positioned my bowl along the smooth “front” of the bag instead of the bottom to reduce air bubbles.
- Repeat the process with your bottle caps and smaller plastic bags (or simply snip some unused portions of your plastic bags used in Step 3).
- Tuck the “tail” of your plastic bag inside your bowl and place each bowl upside down on a baking sheet.
- Make your paper-mache paste. I recommend adapting this Cooked Paper-Mache Recipe from The Spruce by adding one additional tablespoon of flour for a thicker paste.
- Cover your paper-mache forms by dipping newspaper strips in the paste, running them through your fingers to remove the excess, and smoothing them over the surface of your plastic bag-covered bowl. Create one solid layer by overlapping your strips in various directions. Note: You’ll make your life easier later on if the rim of your bowl remains tidy. Otherwise, you’ll have to cut the overhanging paper mache before you bond the halves together.
- Let the foundation layer of your paper mache dry thoroughly before applying a second or possibly third layer, depending on how sturdy you’d like your forms to be. (I did three layers, but I only kept my paper mache paste for two days before making a fresh batch and composting whatever was left over.) Note: You can greatly expedite the drying process by placing your bowls in direct sunlight or under a fan, but check the weather before sitting them outside!
- For your lips and bug eyes, I found it easiest to adhere two long, narrow strips around the edge of my lids to overlap and secure the “ring” shape. I then paper mached tiny squares of paper over the entire form, using white paper for the eyes (because I didn’t purchase the white paint option from Natural Earth Paint).
- Once your paper-mache has thoroughly dried, remove the plastic-covered bowls and bottle caps. I found the easiest way to do this was to gently run a serrated kitchen knife along the edge of the paper mache before undoing the twist tie and removing the bowl or lid from inside the bag. The bag then separated much more easily.
- Trace your top and tail fins on the scrap cardboard. I created an additional wedge shape to nestle unseen inside the bowl so that it would help anchor the tail after paper-macheing over the narrowest part, where the tail and fins protrude from the bowl.
- Align the halves of your fish forms as best you can - it’s okay if they’re not a perfect match.
- Attach the halves by “bandaging” paper mache strips in all directions over the seams and let dry. Add extra strips as support over the top and tail fins. You may find it easier to let the halves adhere by resting one bowl normal-side up and the other on top so that gravity works with you versus against you. Add a second layer if desired.
- To create your gill fins, trace your fins and add an extra inch-by-half-inch strip to the finished visible form. You’ll fold your fin at the base of this strip and paper-mache over the strip to anchor the fin to the fish form. Let it dry, and add a second layer to firmly anchor the fins. Note: This step is where the oven rack comes in! The easiest way to let your second gill fin dry is to tuck the first dried fin through the grates of your oven rack while the second one dries. That way, you won’t squish or damage your bottom fin.
- To attach your eyes and lips, run wet paper-mache strips from the edges of your small pieces down the finished fish form. Add a few perpendicular pieces over the ones running in the starburst pattern from the lips and eyes for additional support.
- Mix your Natural Earth Paint according to the 1:1 instructions, making only as much as you know you’ll need at one time, as it does dry quickly. Let your paint dry thoroughly between colors or coats, noting that it is both fine and beautiful for the newsprint to show through your paint. I love the patterns, complexity, and interest it adds!
- Consider using complementary colors for the fins to draw attention to the shape and form of your paper-mache masterpiece!
- Let your fish dry on the oven rack to protect your fins.
- Enjoy your fish by hanging them from a doorframe or lighting fixture, lining them up along a table or mantle, or nestling them in a bookshelf. If your fish has trouble standing up on its own, you can hang it, lean it against something, or create a paper-mache base for it to sit on.