
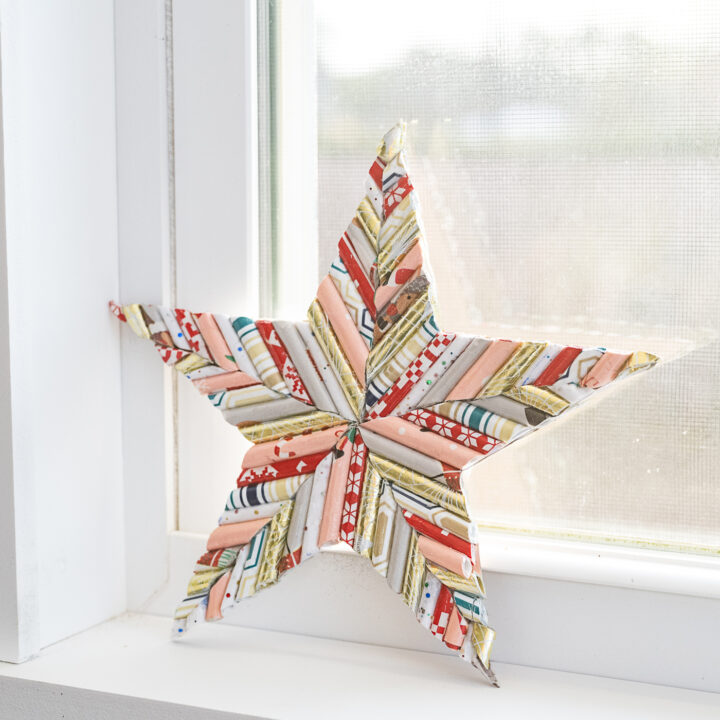
Reuse Wrapping Paper in This Adorable Upcycled Paper Star Project
Are you wondering what to do with used wrapping paper? Are you looking for ways to upcycle used gift wrap? Try this upcycled paper star project, and learn all about reusing wrapping paper as a crafting material in this simple, eco-friendly DIY!
One minute, you’re in your hot party girl era wearing 5-inch heels and Barbie-sized clothes. The next thing you know, you’re 30-something, wearing sensible footwear at a holiday party, and eagerly hoarding all the used wrapping paper. When did I go from raccoon mascara to full-blown trash panda? What happened here?
Maybe it’s a weirdly crunchy midlife crisis, or maybe I’m just determined to think a little differently about the 25% more waste Americans generate during the holidays.
Did you know we throw a whopping 2.3 million pounds of wrapping paper in the landfill each year?
Why is that? Isn’t wrapping paper recyclable? While wrapping paper should theoretically be recyclable, it’s a lot trickier than you may think. To recycle wrapping paper, the following criteria must be met:
- No glitter, foil, or metallic elements
- Not laminated
- Not too thin
- All tape and ribbons removed
- No sticky labels

So, is any wrapping paper compostable? Not really, not unless it’s plain brown paper or brown paper decorated with compostable inks.
As someone who loves glitter and shiny things, I realize this can be a major bummer. However, all that shimmery, sparkly, beautiful paper doesn’t have to be landfill-bound immediately! Wrapping paper, even the crumpled-up, used stuff, is a fantastic and free crafting material! (And because the paper is ultimately landfill-bound because of its components, I don’t see any point in restricting this craft to compostable materials, like with some of my other zero-waste crafts.)
To date, I’ve upcycled wrapping paper into beaded necklaces, lovely paper crowns, festive New Year’s banners, and now these adorable paper stars. One man’s trash truly is another woman’s crafting treasure trove!
Suggested Materials for Upcycled Paper Star Project
Note: I strongly encourage you to make this project your own by playing with your paper colors, the patterns you make on your star, or applying a coat of opaque gold paint over the entire thing for a more cohesive look.
- Used wrapping paper or tissue paper
- Clothing iron
- Used cardboard box, broken down and cut into flat panels
- Sheet of paper (optional)
- Xacto knife and extra blades
- Sharp, sturdy scissors
- Pen
- Ruler
- Mod podge
- Paintbrush
- Bamboo skewers

Instructions for Upcycled Paper Star Project
- Flatten your paper as much as possible, snipping through any residual tape that may cause bunching.
- Use your iron to smooth your sheets of wrapping paper by flipping your paper so that any glitter or metallic elements are facing down and swiftly ironing the paper. I usually use the cotton setting on paper and use a light, quick touch, and I’ve never had any issues with scorching.
- Next, cut your wrapping paper into strips for rolling, and don’t worry too much about any rips, tears, or leftover bits of tape. I found that 4” x 11” sections were ideal for me, partially because my paper was so ripped up that it couldn’t accommodate any larger, but also because a 4-inch roll of paper can be snipped and used in several sections of the star.
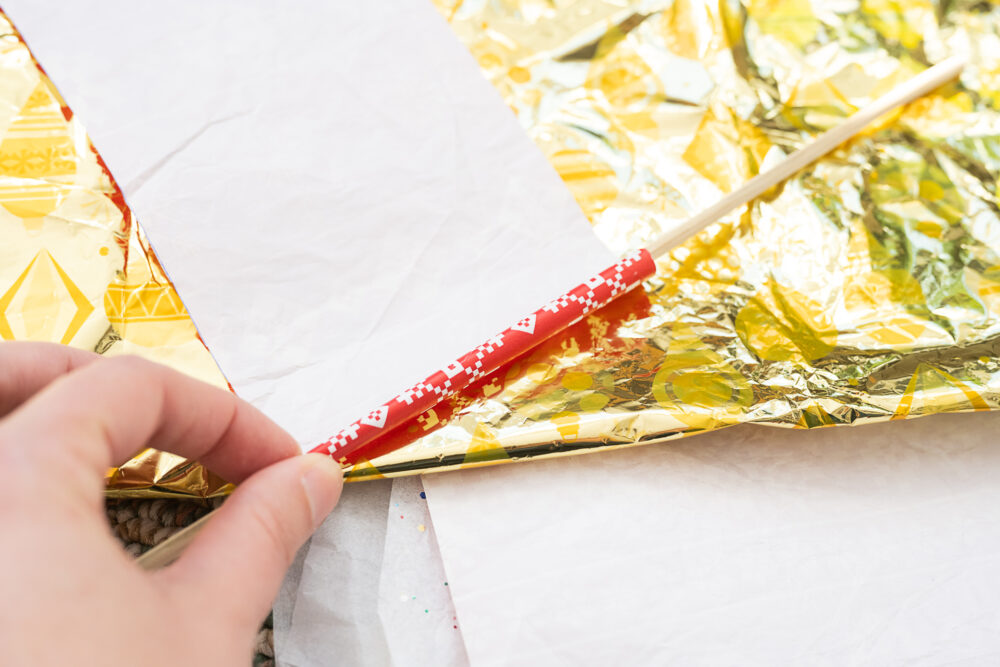
- Lay a bamboo skewer parallel along the short end of the paper strip and tightly roll the length of the paper around the skewer, leaving a ¼-inch tab. Brush a thin coat of Mod Podge on the inside of the paper tab and roll it over the rest of the paper to secure your paper roll.
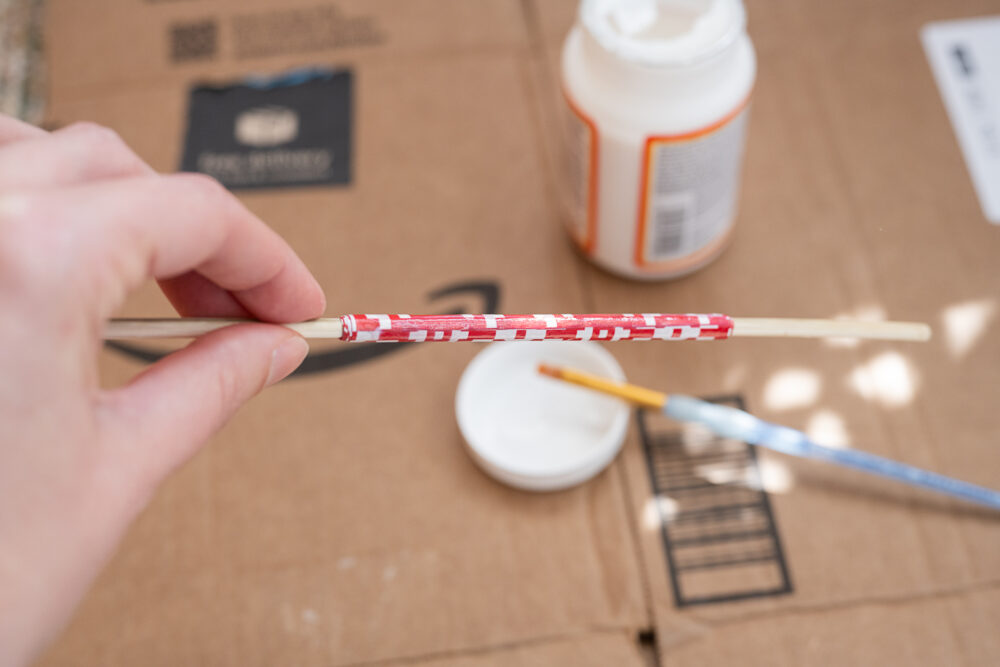
- Then, brush a layer of Mod Podge over the outside of your roll of paper, taking care not to get it on the skewer. Let your rolled paper dry thoroughly, which shouldn’t take long. If you’re short on time, let your skewers dry next to a space heater, fan, or on a dehydrator. Mine were in front of a space heater, and they dried in minutes.
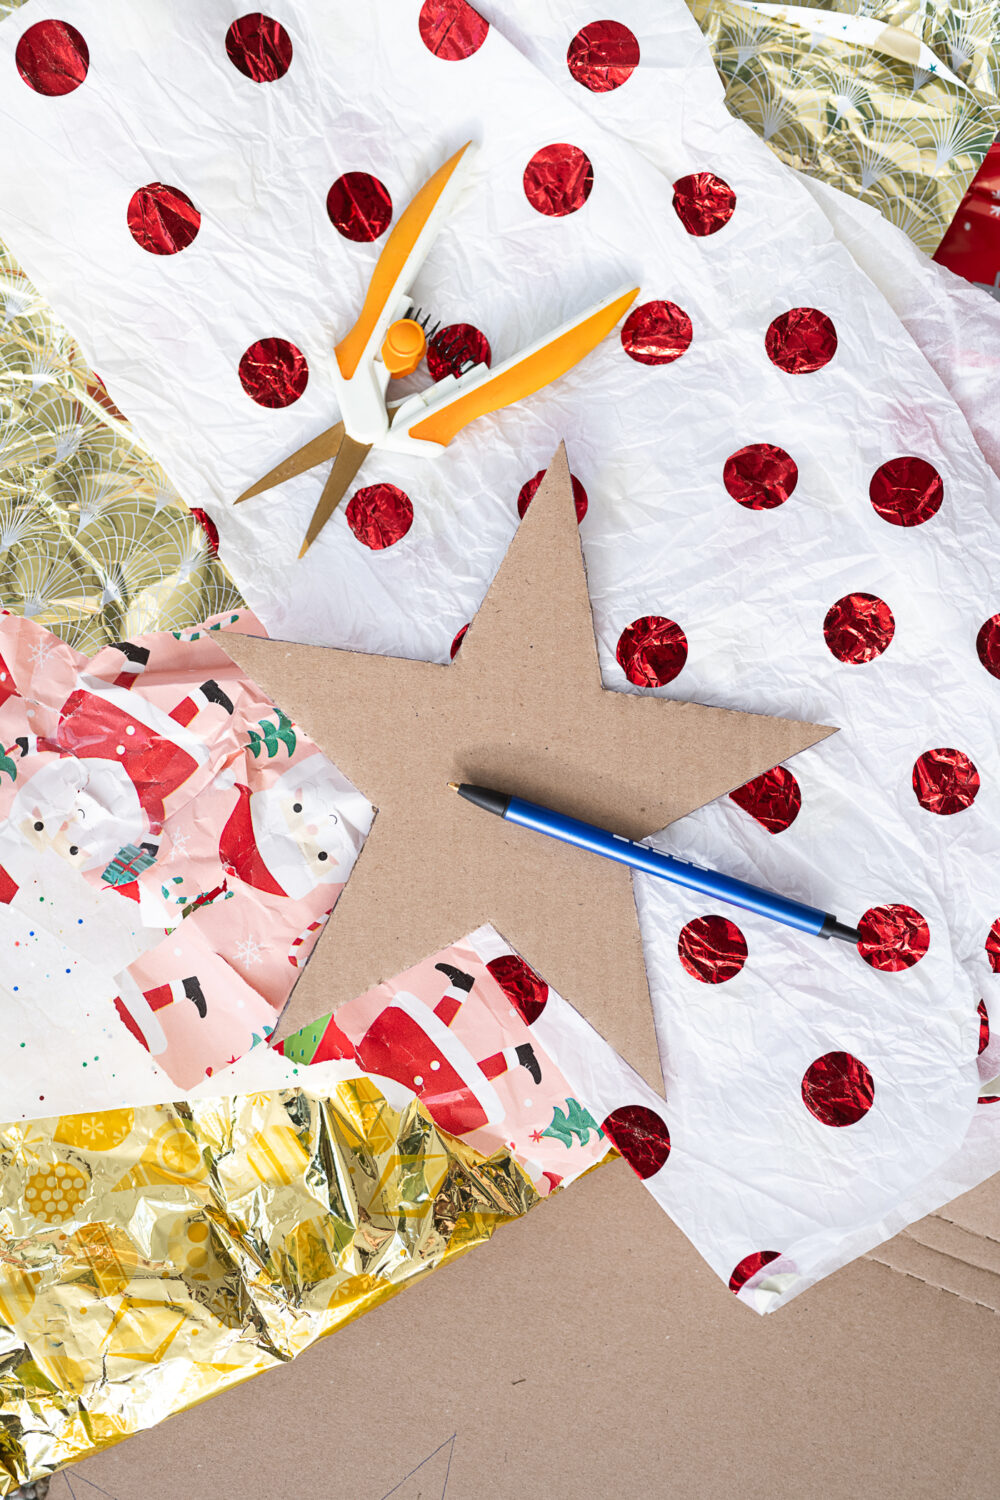
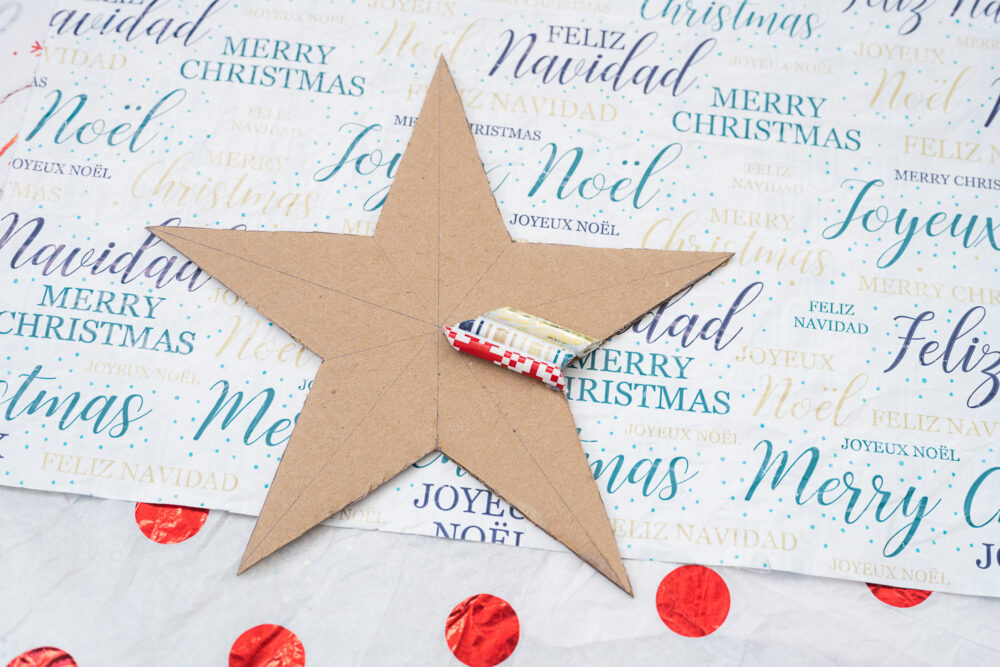
- While your rolled paper dries, trace and cut a star from your cardboard. You can freehand this, or you can print a star vector on a sheet of 8”x11” printer paper to cut out and use as a template, which is what I did. Use your ruler to draw lines from the tip of each point of your cardboard star to the opposing indentation. All the lines will overlap in the exact center of your star, which will help you lay your paper down in a more precise pattern.
- Remove your rolled paper from the bamboo skewers by wiggling them to loosen the paper and then firmly pressing the top of your thumbnail against the bottom of your rolled paper. If your paper starts to “unreel” while you’re sliding it off, simply push it down into a roll again before trying to remove it. Your paper rolls are surprisingly durable and malleable. If you accidentally flatten one, you can fluff it back up again by reinserting a bamboo skewer into the center hole.
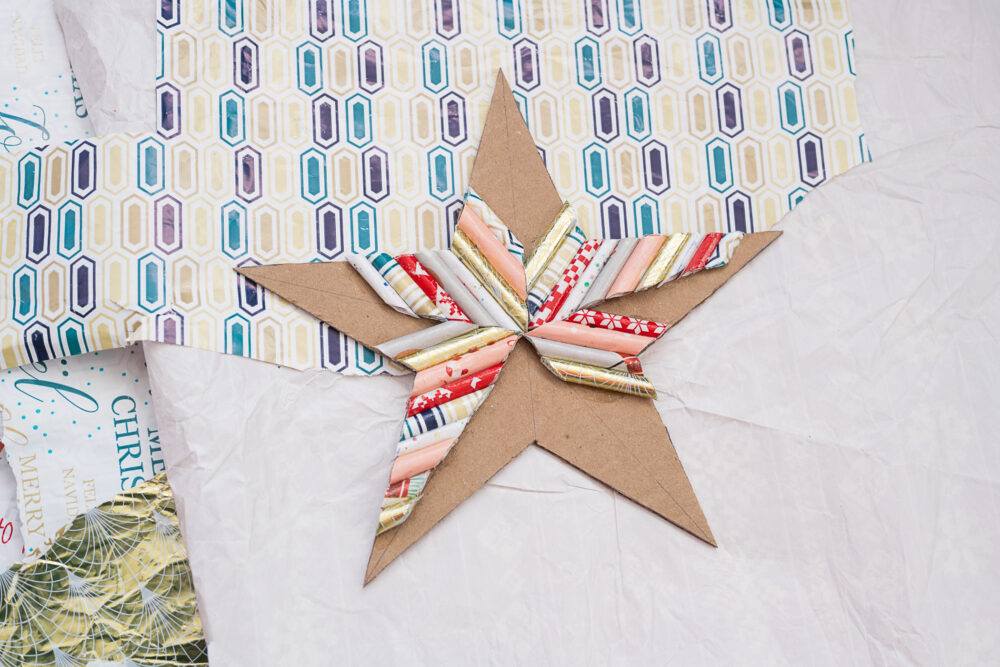
- Starting at the center point of your star, lay a paper roll so that the end overlaps the center and exterior edge of your cardboard star. To determine where to make your cuts, either trace the lines of the star over the paper with a pen or lightly score it with your Xacto knife. Transfer your rolled paper to a cutting surface (or an additional broken-down cardboard box) and cut a segment of your rolled paper as marked. It is MUCH easier to work from the center of your star out to the tip than the other way around, trust me.
- Reserve the “scrap” ends of your rolled paper because they will become very useful in finishing the narrow ends of your star.
- Glue your rolled paper to your cardboard star by brushing a generous line of Mod Podge to the underside of your rolled paper. If you’re short on time, you can also use a glue gun or place your Mod Podged star in front of a heater. Repeat step 8, working your way outward until your entire cardboard base is covered. Don’t worry if the ends of the tips of your star aren’t “quite” perfect – no one will notice once the project is finished!
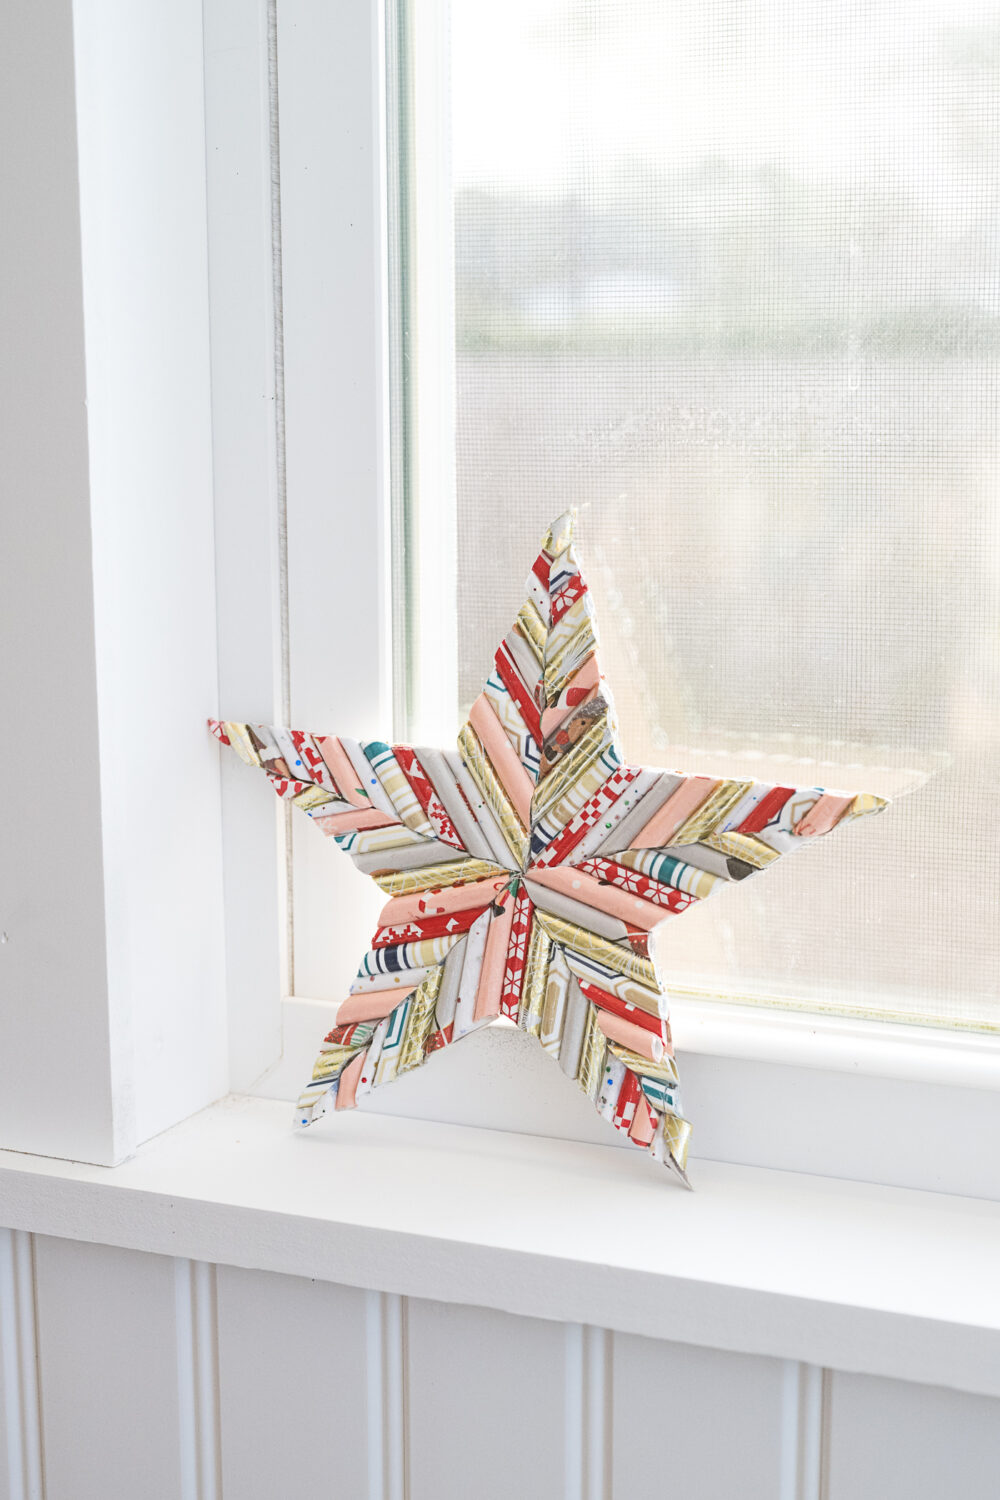
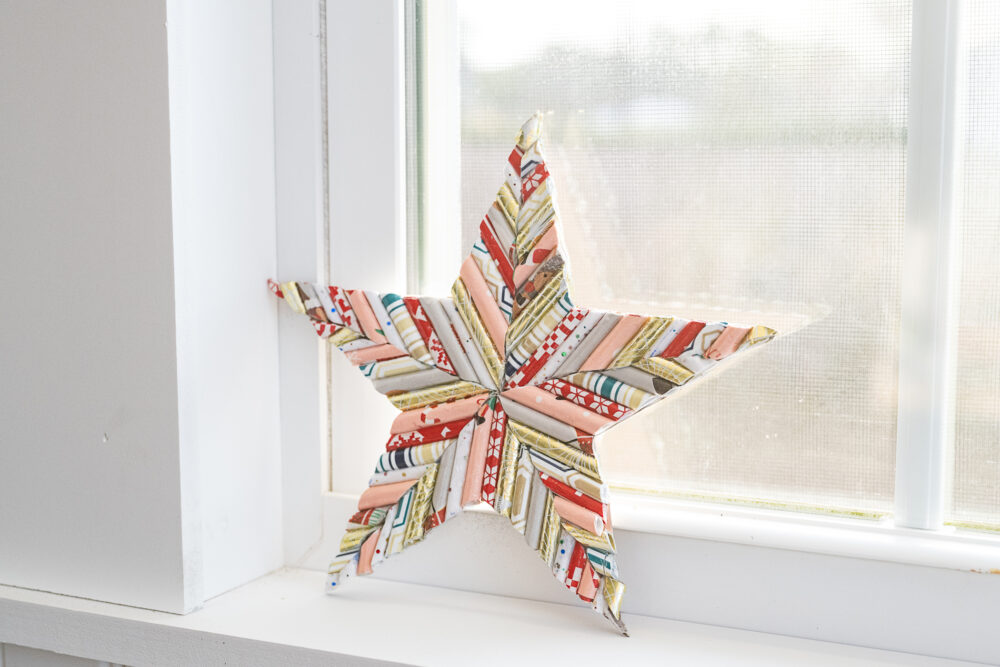
- Let your star dry completely, and enjoy!

Ideas for Enjoying Your Upcycled Wrapping Paper Star Project
- If you’ve made multiple stars, hang them as party decor.
- Enjoy your upcycled wrapping paper star as a homemade embellishment to your favorite macrame or wall hanging.
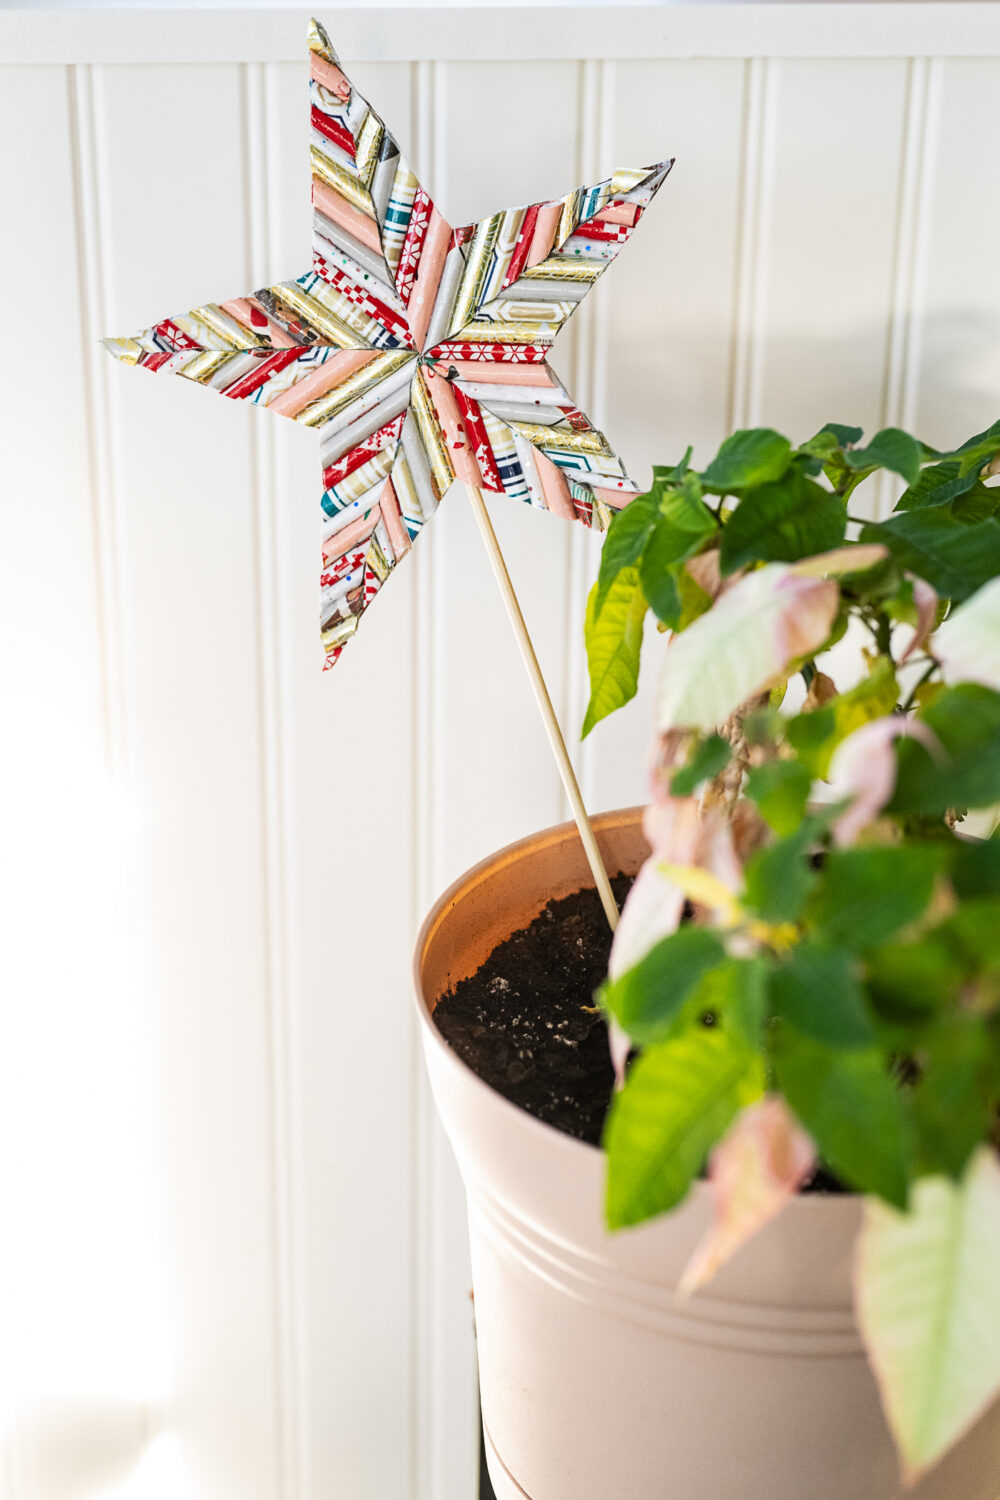
- Slide one of the bamboo skewers back into a paper roll at the bottom of your star, and use it as “plant flair” in your succulent garden or patio.
- If you have more patience than I do, apply a thick coat of clear Mod Podge to your finished star and let it cure for at least 4 weeks before using it as a large coaster.
If you enjoyed Sustainable Christmas Ideas: Try Reusing Wrapping Paper in This Adorable Upcycled Paper Star Project, you may also enjoy:
21 Fun Ways to Repurpose Cookie Cutters All Year Round
How To Get Materials For Sustainable Crafts
Fun & Affordable Upcycling Ideas for Boho Garden Decor
About the Author

Reese Moore
Reese Moore is a photographer, content creator, and pickle connoisseur who divides time between Charleston and Lake Lure. When she’s not behind the lens shooting stunning images for Reese Moore Photography, Reese loves to spend her time wandering the woods with her dog Gatsby or adventuring with her husband Logan in their Airstream Basecamp.
Upcycled Paper Star Project
Try this upcycled paper star project, and learn all about reusing wrapping paper as a crafting material in this simple, eco-friendly DIY!
Materials
- Used wrapping paper or tissue paper
- Used cardboard box, broken down and cut into flat panels
- Sheet of paper (optional)
- Mod podge
Tools
- Clothing iron
- Xacto knife and extra blades
- Sharp, sturdy scissors
- Pen
- Ruler
- Paintbrush
- Bamboo skewers
Instructions
- Flatten your paper as much as possible, snipping through any residual tape that may cause bunching.
- Use your iron to smooth your sheets of wrapping paper by flipping your paper so that any glitter or metallic elements are facing down and swiftly ironing the paper. I usually use the cotton setting on paper and use a light, quick touch, and I’ve never had any issues with scorching.
- Next, cut your wrapping paper into strips for rolling, and don’t worry too much about any rips, tears, or leftover bits of tape. I found that 4” x 11” sections were ideal for me, partially because my paper was so ripped up that it couldn’t accommodate any larger, but also because a 4-inch roll of paper can be snipped and used in several sections of the star.
- Lay a bamboo skewer parallel along the short end of the paper strip and tightly roll the length of the paper around the skewer, leaving a ¼-inch tab. Brush a thin coat of Mod Podge on the inside of the paper tab and roll it over the rest of the paper to secure your paper roll.
- Then, brush a layer of Mod Podge over the outside of your roll of paper, taking care not to get it on the skewer. Let your rolled paper dry thoroughly, which shouldn’t take long. If you’re short on time, let your skewers dry next to a space heater, fan, or on a dehydrator. Mine were in front of a space heater, and they dried in minutes.
- While your rolled paper dries, trace and cut a star from your cardboard. You can freehand this, or you can print a star vector on a sheet of 8”x11” printer paper to cut out and use as a template, which is what I did. Use your ruler to draw lines from the tip of each point of your cardboard star to the opposing indentation. All the lines will overlap in the exact center of your star, which will help you lay your paper down in a more precise pattern.
- Remove your rolled paper from the bamboo skewers by wiggling them to loosen the paper and then firmly pressing the top of your thumbnail against the bottom of your rolled paper. If your paper starts to “unreel” while you’re sliding it off, simply push it down into a roll again before trying to remove it. Your paper rolls are surprisingly durable and malleable. If you accidentally flatten one, you can fluff it back up again by reinserting a bamboo skewer into the center hole.
- Starting at the center point of your star, lay a paper roll so that the end overlaps the center and exterior edge of your cardboard star. To determine where to make your cuts, either trace the lines of the star over the paper with a pen or lightly score it with your Xacto knife. Transfer your rolled paper to a cutting surface (or an additional broken-down cardboard box) and cut a segment of your rolled paper as marked. It is MUCH easier to work from the center of your star out to the tip than the other way around, trust me.
- Reserve the “scrap” ends of your rolled paper because they will become very useful in finishing the narrow ends of your star.
- Glue your rolled paper to your cardboard star by brushing a generous line of Mod Podge to the underside of your rolled paper. If you’re short on time, you can also use a glue gun or place your Mod Podged star in front of a heater. Repeat step 8, working your way outward until your entire cardboard base is covered. Don’t worry if the ends of the tips of your star aren’t “quite” perfect - no one will notice once the project is finished!
- Let your star dry completely, and enjoy!

Such great ideas! Thank you