Glittery Salt Dough Recipe for a Fun Sustainable Christmas Craft
Are you looking for an easily adaptable salt dough recipe? These DIY salt dough ornaments are the perfect kid-friendly, sustainable Christmas craft, and this article offers creative ideas on how to make them your own!
I love glitter at Christmas.
I love when it gets everywhere. I love leaving a little shimmering trail of it in my wake, much to the horror of those around me. It’s like magic fairy dust, and it makes me smile.
Did you just bellow BAH HUMBUG and slam your laptop shut in a rage? I get it, but I said what I said. Some people want to watch the world burn; some people want to watch the world shimmer.
I DON’T love that traditional glitter is a microplastic that’s horrible for the environment. Honestly, giving up glitter as a go-to crafting material was one of the hardest parts about committing to a more eco-friendly lifestyle several years ago. I just… missed it.
Fortunately, there are now a lot of options when it comes to eco-friendly glitter, and this year, I wanted to spruce up (get it?) my salt dough ornaments with a little sparkle. I loved the modern minimalist salt dough ornaments I made a few years ago, but I had dreams of shimmering salt ornaments dancing in my head for this Christmas. Why not adapt my original salt dough recipe to create glamorous, fun ornaments that are still compostable?
This sustainable Christmas craft is a fun and playful way to transform traditional salt dough ornaments into something festive, modern, and delightfully modern. And it’s kid-friendly!
Read on for my glittery salt dough recipe, creative modification ideas for your salt dough ornaments, and how to keep that glitter from spreading everywhere (boo, you Scrooges) while still ensuring your ornaments are fully compostable.

Glittery Salt Dough Recipe Ingredients and Suggested Materials
- 2 cups of flour (a great use for flour past its expiration date) plus extra for the rolling pin and cutting board to prevent sticking
- 1 cup of salt
- 1 cup of water
- Edible glitter (I got mine from the baking aisle at the craft store)
- Food coloring (optional)
- Whole spices such as star anise and cinnamon (optional)
- Used but still wet loose-leaf tea or tea bags (optional)
- Cutting board
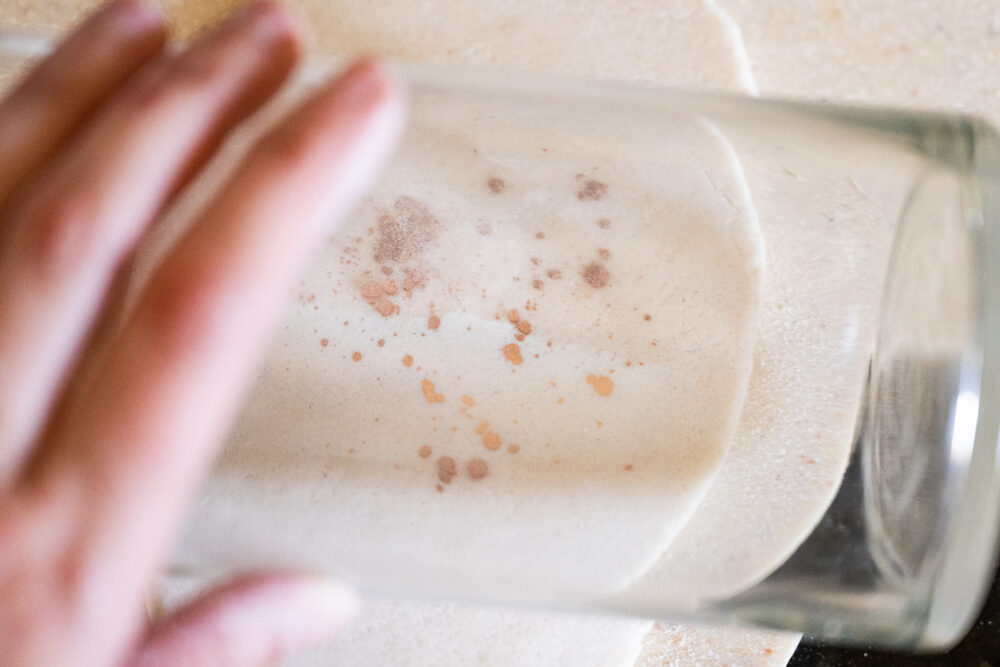
- Rolling pin or large, smooth glass bottle or vase (I used a vase)
- Mixing bowls
- Cookie cutters or wine or champagne glasses (I used a wine glass because the glass is thinner than our water glasses, making it easier to cut out circles in the dough.)
- Dehydrator
- Natural twine such as cotton, jute, or hemp
- Thin, pointed utensil for making holes in your ornaments (a meat thermometer is perfect for this)
- Egg white varnish (optional): 1 egg white and ½ tablespoon of water whisked + paintbrush
Note: You can make salt dough ornaments in the oven, but you’re more likely to have issues with cracking or the edges of your ornaments curling up. To make your salt dough ornaments in the oven, bake them at 250 degrees on a parchment-lined baking sheet for approximately 2 hours. Did you know you can buy compostable parchment paper?

Basic Instructions for Glittery Salt Dough Recipe (Modifications are below)
- In a medium mixing bowl, combine your flour and salt. Whisk quickly to combine.
- Pour the cup of water into a large mixing bowl. Add the flour and salt mixture and knead until a uniform dough forms, about 3-5 minutes.
- Lightly flour your cutting board and rolling pin and roll your dough to approximately ¼ inch thick. Sprinkle your edible glitter as desired and roll it one more time to press the glitter into the surface of your dough. Cut your dough into ornaments by pressing your cookie cutters firmly into the surface of your dough and wiggling them slightly to ensure a clean cut. If your salt dough ornaments feel stuck to the cutting board, slide a chef’s knife between the dough and the cutting board.
- Carefully remove your salt dough ornaments from the cookie cutters and place them in a single layer on the dehydrator so that none are touching. Make a hole toward the top of your ornament for hanging, but make it a little larger than your twine to allow for any shrinking of the ornament.
- Let your ornaments dry on high for approximately an hour. When they’re done, you’ll notice a color and texture change in your dough, and you should be able to remove them from your dehydrator trays easily. If your ornaments are stuck to your dehydrator trays but fully dry, try giving them a little twist from the center of your ornament (not the edges of your snowflakes, which will be thinner and more likely to break).
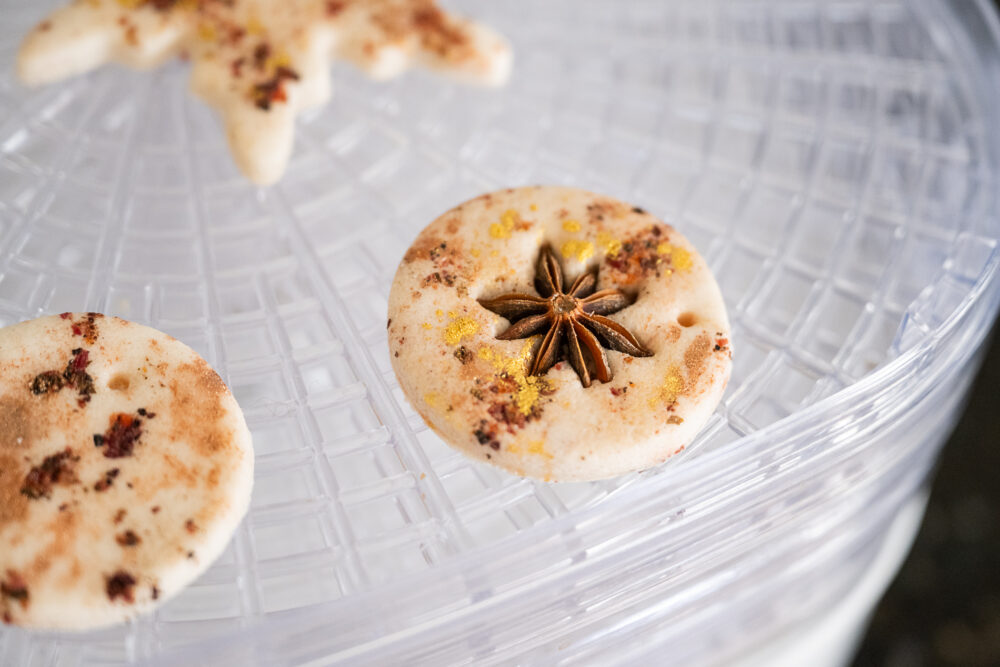
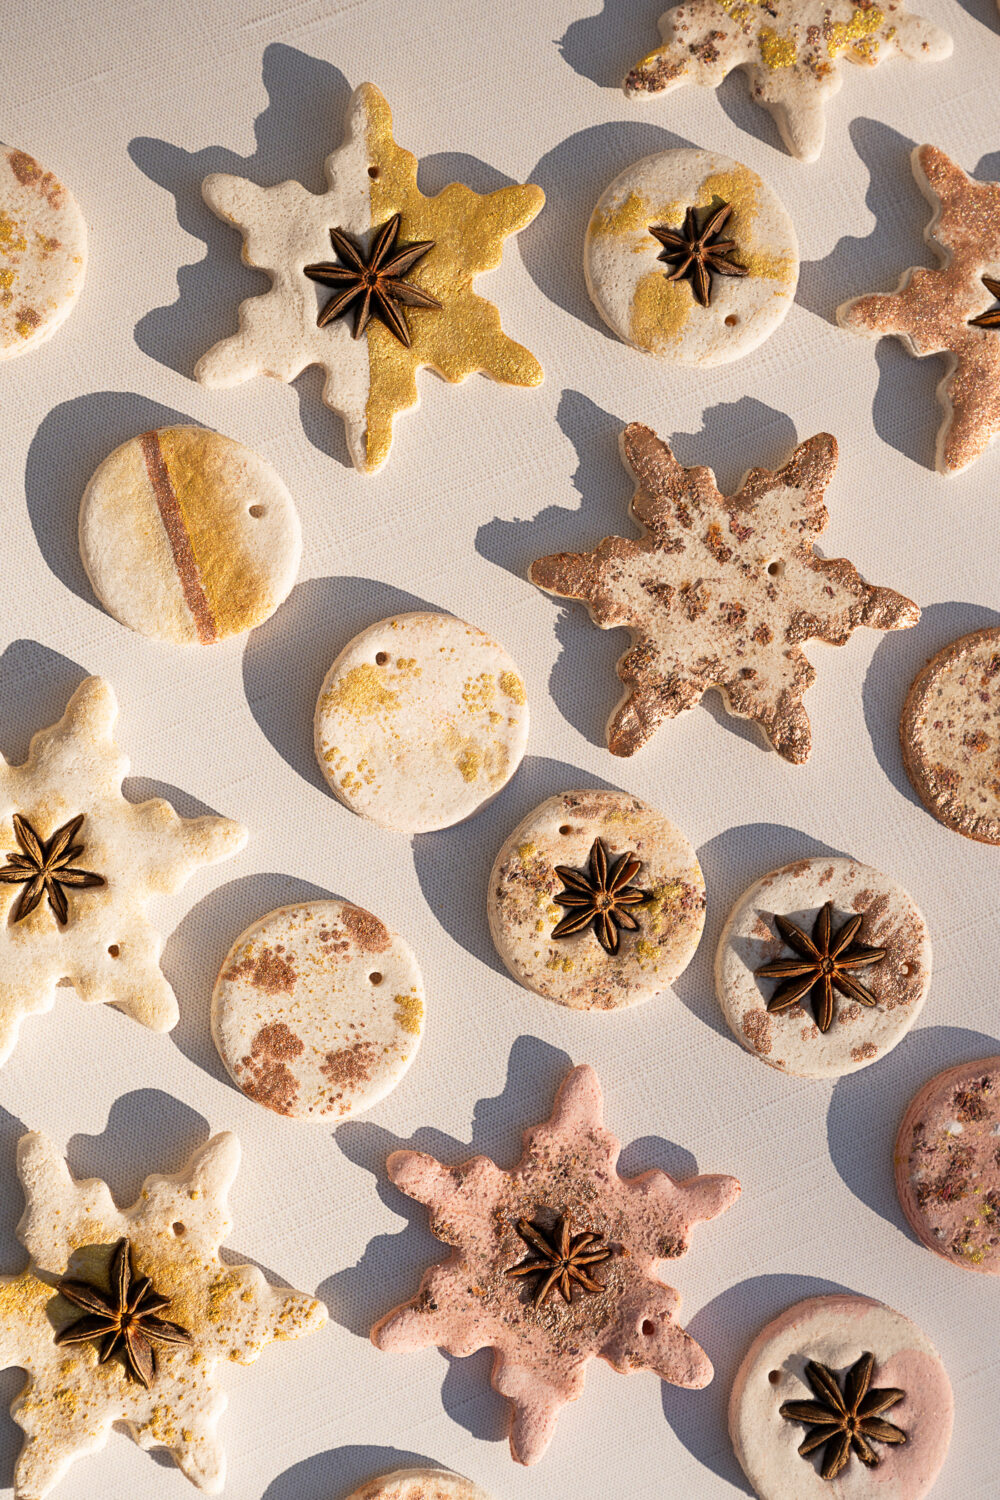
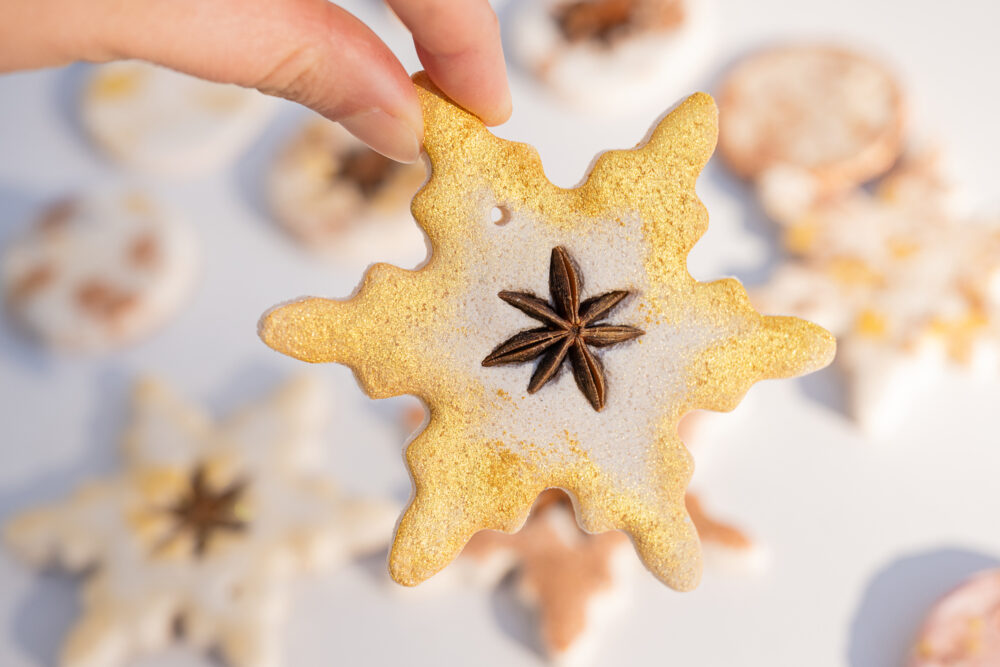
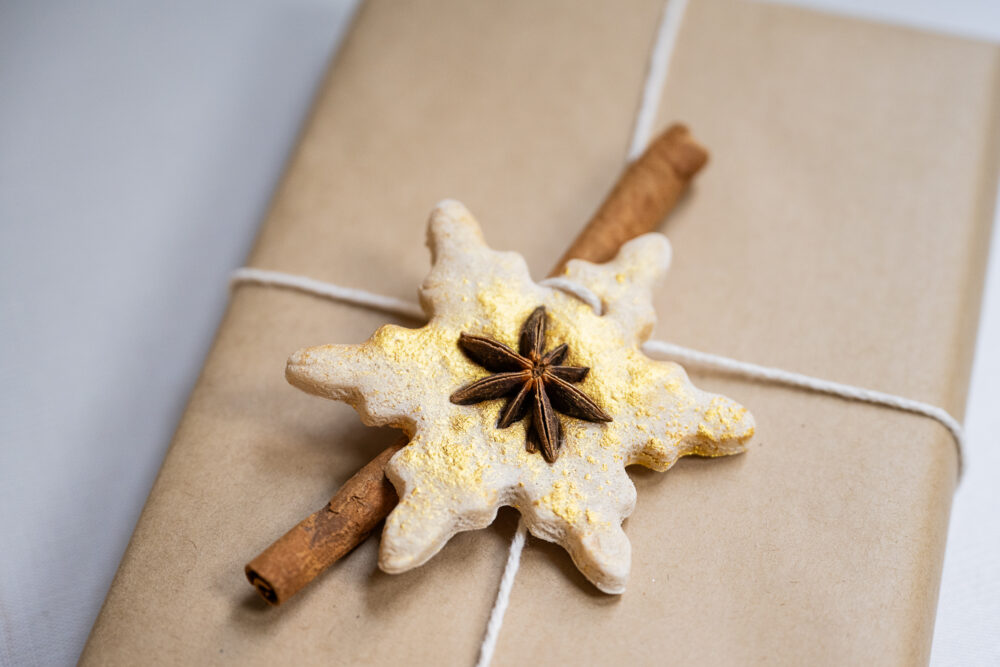
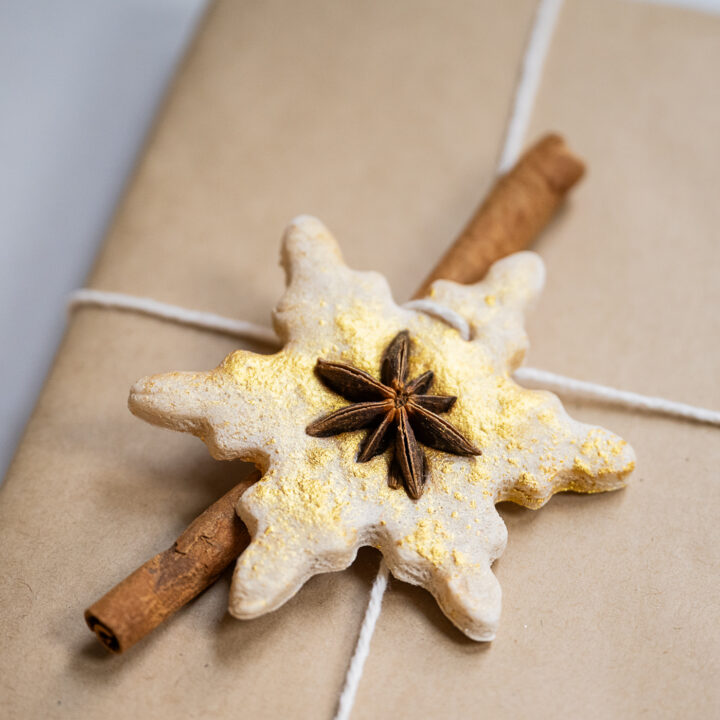
Adding Star Anise or Dried Spices to Your Glittery Salt Dough Ornaments
Star anise is a gorgeous natural accent that looks beautiful in salt dough ornaments. To get your star anise to stay, I recommend firmly pressing the star anise deep into the dough BEFORE cutting out your ornament shape. If you press the star anise into the dough after you’ve cut your salt dough ornament form, you risk warping the design.
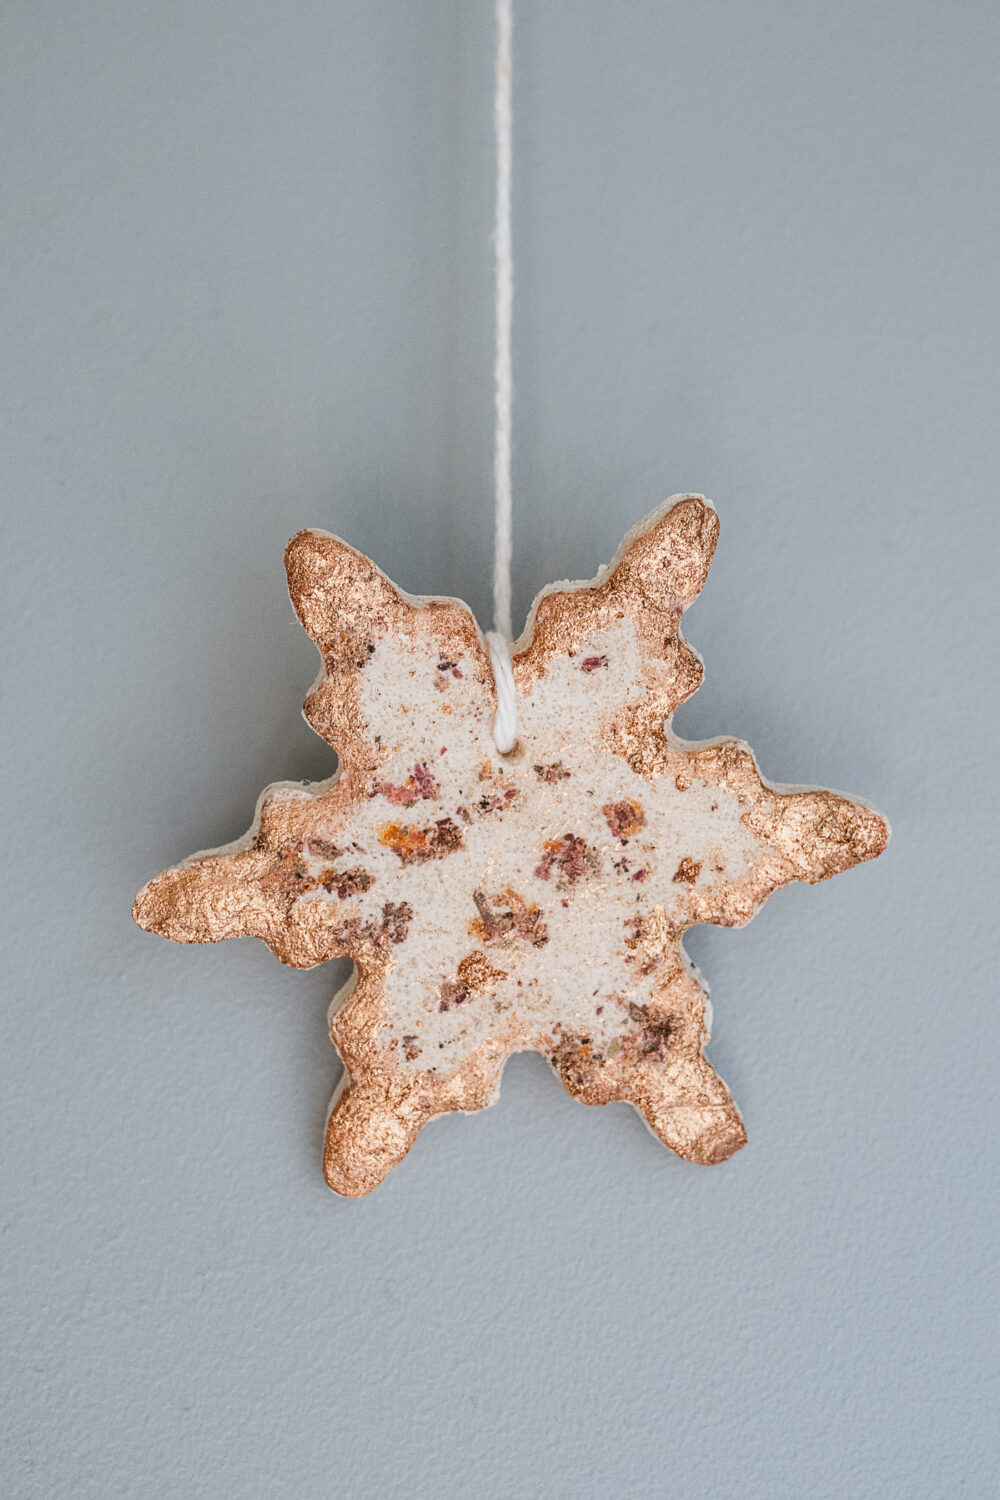
Adding Loose Tea or Fresh Botanicals to Your Glittery Salt Dough Ornaments
Who doesn’t love snuggling up with a cup of tea during the winter? Here’s a great way to put those spent tea bags to work: Herbal tea leaves can add bright pops of color and an organic feel, and they’ll stick in your finished ornaments much more successfully if you apply them when damp. To add tea leaves to your salt dough ornaments, scatter them across the surface of your rolled dough and roll them once with your rolling pin before cutting out your salt dough ornaments.
Note: Your rolling pin will be damp and sticky after rolling the tea leaves onto the surface of your ornaments. I strongly recommend washing, thoroughly drying, and re-flouring your rolling pin before using it again. If you don’t, you will have a sticky, gross mess on your hands.
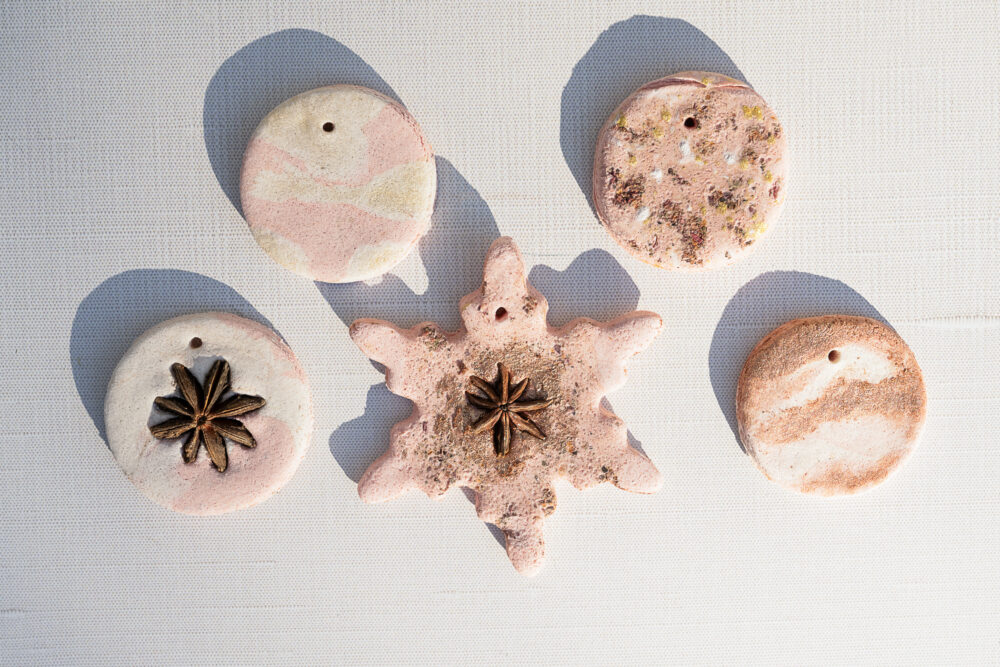
Making Colorful Salt Dough Ornaments
Are you looking for a pop of color this holiday season? Try adding a squirt of food coloring to your kneaded salt dough. You’ll need to mix it in thoroughly, and because the flour is white, your colors will tend more toward the pastel side, but they’re beautiful regardless.
Making Peppermint Swirl Salt Dough Ornaments
I went a little nuts with a peppermint-themed Christmas a few years ago, and I still love the nostalgia called up by those little swirl candies. To make a peppermint swirl (or a tie-dye effect), you’ll need to portion out one lump of dough into a separate bowl for each color. Then, add your food coloring and knead the dough until the color is thoroughly blended. Create your swirl dough by pulling off small handfuls of each color of dough, twirling them together and back on each other, and rolling out the combined salt dough.

Painting Your Salt Dough Ornaments with Edible Glitter
Are you a salt dough ornament artiste who desires more artistic control to execute your grand ideas? I totally feel that. Try applying your glitter with paintbrushes of various sizes. You’ll want to allocate one brush per type of glitter to keep from having to wash and dry your brushes (this is a moisture-sensitive craft).
If you’re worried about containing the mess, I found it best to apply glitter to the edges of my snowflakes while the cookie cutter was still pressed into the rolled dough. The edges of the cookie cutter will keep the glitter from poofing off your brush onto the neighboring dough, and cookie cutters are much easier to wash and dry.

Keep Glitter from Shedding From Your Salt Dough Ornaments
Are you worried it’s going to look like your presents were delivered by a team of Vegas showgirls? First, you’d be the envy of the neighborhood, but second, you can easily prevent your edible glitter from shedding with a quick egg white wash.
In a small bowl, whisk together one egg white and half a tablespoon of water. Apply a quick, thin coat of egg white wash with a paintbrush, taking care to shake off any excess glitter before you start. Extra glitter that’s resting on top of your design may spread a bit when you apply your wash. (I mean, I feel like the more glitter, the better, but that’s just me.)
Pop your ornaments back on a dehydrator tray on high for another 20 minutes or until your egg wash is dry.
The pros to applying an egg white wash to your salt dough ornaments? Your salt dough will now have a richer, glossier surface. Your colors will appear more vibrant, your glitter won’t shed nearly as much, and your ornaments will still be fully compostable.
The main con to an egg white wash is that your glitter will lose a little bit of its shimmer. It will still be shiny and metallic, but it will dull a bit of the reflectivity.
How Long Do Salt Dough Ornaments Last?
These compostable salt dough ornaments should last up to two years, depending on what you’ve put in them, how you store them, and their overall humidity exposure. I’ve never kept mine for more than six months, but that’s because I hate storing things.
If you seal salt dough ornaments with acrylic varnish or add acrylic paints, they will last for decades. However, they will not be compostable.

How Should I Use My Salt Dough Ornaments?
Honey, the world is your oyster when it comes to enjoying your salt dough ornaments. You can hang them on your Christmas tree. You can hang them on a wreath. You can hang them from your mantle. You can hang them by themselves as a simple statement piece.
A couple of years ago, I hung a tree branch in my bedroom and displayed my very minimalist salt dough ornaments as winter decorations. My friends loved it!
For an elegant and rustic garland, string your salt dough ornaments alongside cinnamon sticks or pine cones.
Last but certainly not least, your glittery salt dough ornaments add the perfect pop of holiday pizzazz to simple brown paper wrapping, which is how I’m using the ones pictured this year!

All photos via Reese Moore Photography
If you enjoyed Sustainable Christmas Craft: Glittery Salt Dough Recipe, you may also enjoy:
Elegant Winter Wonderland Tablescape for a Sustainable Christmas Party
21 Fun Ways to Repurpose Cookie Cutters All Year Round
How to Repurpose Old Christmas Trees into DIY Fire Starters
About the Author

Reese Moore
Reese Moore is a photographer, content creator, and pickle connoisseur who divides time between Charleston and Lake Lure. When she’s not behind the lens shooting stunning images for Reese Moore Photography, Reese loves to spend her time wandering the woods with her dog Gatsby or adventuring with her husband Logan in their Airstream Basecamp.
Glittery Salt Dough Ornaments
Are you looking for an easily adaptable salt dough recipe? These DIY salt dough ornaments are the perfect kid-friendly, sustainable Christmas craf
Materials
- 2 cups of flour (a great use for flour past its expiration date) plus extra for the rolling pin and cutting board to prevent sticking
- 1 cup of salt
- 1 cup of water
- Edible glitter (I got mine from the baking aisle at the craft store)
- Food coloring (optional)
- Whole spices such as star anise and cinnamon (optional)
- Used but still wet loose-leaf tea or tea bags (optional)
- Natural twine such as cotton, jute, or hemp
- Egg white varnish (optional): 1 egg white and ½ tablespoon of water whisked + paintbrush
Tools
- Cutting board
- Rolling pin or large, smooth glass bottle or vase (I used a vase)
- Mixing bowls
- Cookie cutters or wine or champagne glasses (I used a wine glass because the glass is thinner than our water glasses, making it easier to cut out circles in the dough.)
- Dehydrator
- Thin, pointed utensil for making holes in your ornaments (a meat thermometer is perfect for this)
Instructions
- In a medium mixing bowl, combine your flour and salt. Whisk quickly to combine.
- Pour the cup of water into a large mixing bowl. Add the flour and salt mixture and knead until a uniform dough forms, about 3-5 minutes.
- Lightly flour your cutting board and rolling pin and roll your dough to approximately ¼ inch thick. Sprinkle your edible glitter as desired and roll it one more time to press the glitter into the surface of your dough. Cut your dough into ornaments by pressing your cookie cutters firmly into the surface of your dough and wiggling them slightly to ensure a clean cut. If your salt dough ornaments feel stuck to the cutting board, slide a chef’s knife between the dough and the cutting board.
- Carefully remove your salt dough ornaments from the cookie cutters and place them in a single layer on the dehydrator so that none are touching. Make a hole toward the top of your ornament for hanging, but make it a little larger than your twine to allow for any shrinking of the ornament.
- Let your ornaments dry on high for approximately an hour. When they’re done, you’ll notice a color and texture change in your dough, and you should be able to remove them from your dehydrator trays easily. If your ornaments are stuck to your dehydrator trays but fully dry, try giving them a little twist from the center of your ornament (not the edges of your snowflakes, which will be thinner and more likely to break).
Notes
See above for a variety of modifications for adding colorful swirls, garnishes, and more.
Recommended Products
As an Amazon Associate and member of other affiliate programs, Honestly Modern earns from qualifying purchases.