Upcycled DIY Easter Centerpiece
Do you love a beautiful tablescape but don’t want to trash the planet? Read on to learn how to make an upcycled, compostable, and show-stopping centerpiece!
When it comes to table decor, Martha Stewart has NOTHING on my mother. The proud owner of no less than 16 sets of china, my momma decorates our family dinner table for spring, Easter, Mother’s Day, late spring, and just because it’s Tuesday.
Her cabinets are stuffed to the brim with ornate platters and gravy boats. The garage shelves overflow with vases and votive holders. And there’s an entire closet devoted to tablecloths and runners. The house is basically a William Sonoma museum, y’all.
I adore gathering my loved ones around a festive seasonal tablescape, however, I can’t stand clutter. It feels like we’re constantly waging a war against “stuff” in our never-quite-organized home, which is especially stressful when you’re an avid environmentalist who hates throwing things away. The eco-guilt is real.
So what’s a girl to do? Create an elegant Easter centerpiece that not only elevates your table decor but is also entirely compostable. That’s right: After your guests leave, you can sweep the entire thing into the compost bin, kick back, and relax. (You can also upcycle the various components, but I’m getting ahead of myself.)
I love this DIY Easter centerpiece because it makes use of things that are delightfully accessible and upcycles items destined for the recycling bin or compost pile. Anytime you can take an item and extend its consumable life or broaden the potential of its usage, you’ve engaged with a sustainable mindset.
The flower choices in this Easter table decor are also very intentional: they all dry beautifully, extending their enjoyable life, and can be easily repurposed.
Note: This DIY is not hard, but does require a gentle touch. For that reason, I’ve included shortcuts and modifications in the instructions below for your busy life or the little hands that may be helping you with your Easter tablescape.
Why Eco-friendly Easter Decor Matters
Not unlike many holidays, Easter bears a heavy plastic burden. Before declaring bankruptcy due to the influx of cheaper plastic eggs from China, American plastic Easter egg manufacturer Bleyer Industries produced 250 million eggs a year in the early 2000s.
That plastic mess doesn’t even account for the plastic toys, tchotchkes, and fake Easter grass that makes a mess of everything. Try this 5-minute DIY eco-friendly Easter grass for a quick and compostable alternative. You won’t regret it.
While lovely to look at, the social and environmental impact of fresh flowers isn’t so lovely. Fresh flowers are an agricultural product and have many of the same issues attributed to the food supply chain. Fresh flowers have an enormous carbon footprint due to pesticides, extreme growing conditions, trans-continental flights in refrigerated containers, and plastic packaging.
Further, Americans plan to spend even more money on Easter gifts, food, and candy than ever before, generating tons of waste. Don’t let your Easter centerpiece become another landfill statistic.
Why I Love this Upcycled DIY Easter Centerpiece
- It smells INCREDIBLE.
- It dries beautifully.
- There’s no floral foam or wire involved.
- You can sweep the whole thing in the compost.
- You can upcycle the botanicals.
- It uses a lot of items you have on hand or that are easily accessible.
Materials for Upcycled DIY Easter Centerpiece:
- Empty cardboard wine crate with divider (I got mine for free at Trader Joe’s.)
- Box cutter or scissors
- 2 empty toilet paper rolls or 1 spent paper towel roll
- Ruler or tape measure
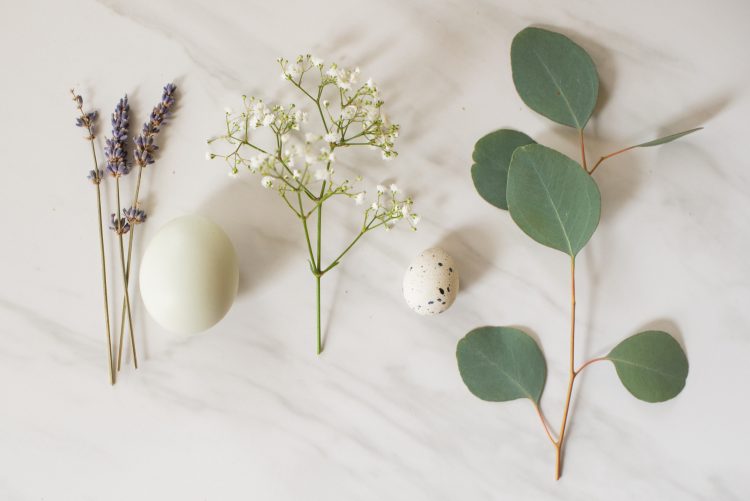
- 6 chicken eggs (The blue ones look beautiful.)
- 6 quail eggs (Available at many fine grocery stores, specialty Asian stores, or farmers’ markets.)
- Egg blower
- Embroidery needle
- 1 bunch baby’s breath (substitute thistle, hydrangea, or statice)
- 1 bunch eucalyptus
- 1 bunch lavender
Note: Are you in a hurry? You’ll want to use a glue gun and simply remove the glue before composting.
Optional items:
- Cotton thread
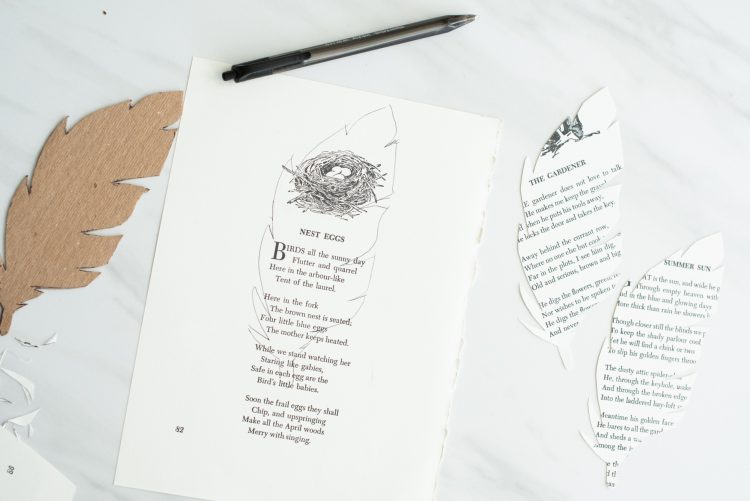
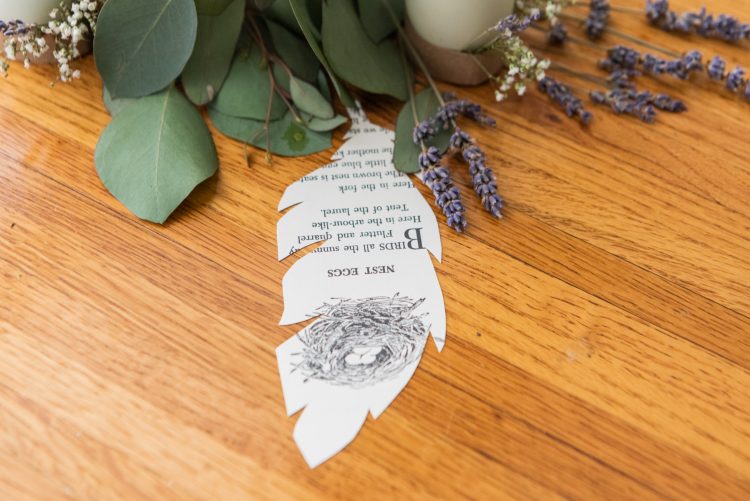
- Thrift store book for feathers
- Retain one piece of discarded wine crate cardboard for the feather template
- Pushpins for hanging garland
How to Make an Elegant Upcycled DIY Easter Centerpiece
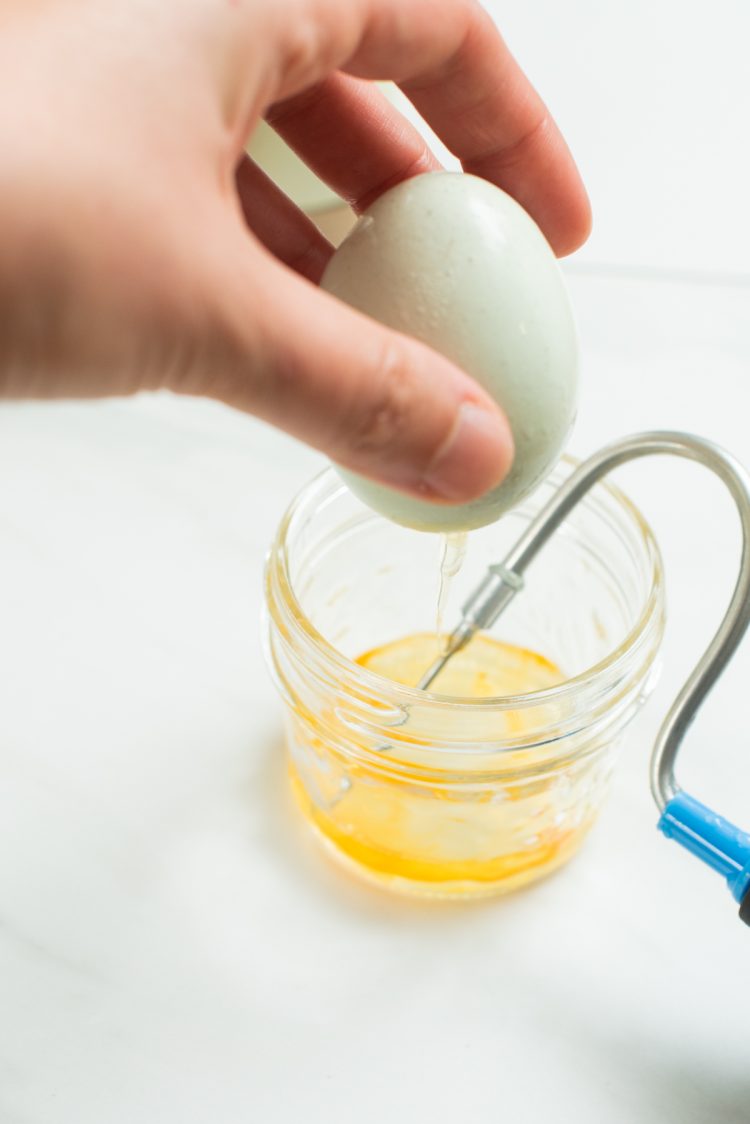
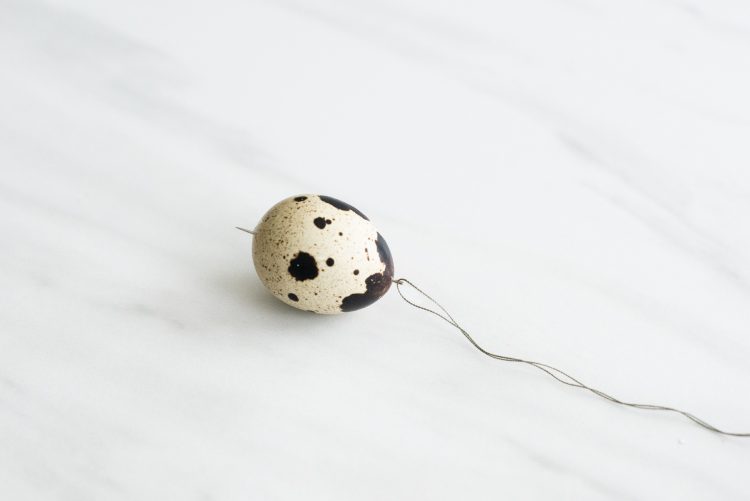
- Puncture your chicken and quail eggs using an egg piercer or your embroidery needle, and then blow out your eggs. I like this egg blower. This requires a little patience. Basically, you’ll want to slightly widen the hole with your sewing needle before blowing air into the hole as you hold your egg upside down over a bowl, thus forcing the egg matter out. I like to force several puffs of air in, then remove the blower so the egg can come out quickly, and then repeat. If you go too fast, your egg will crack, but you’ll be able to feel the shell straining under your fingers before that happens. Use the eggs in an omelet or pound cake! Here’s an egg-blowing video if you want more detailed instructions.
- Rest your eggs “hole side down” in the kitchen sink or on a towel to drain any remaining yolk or egg white.
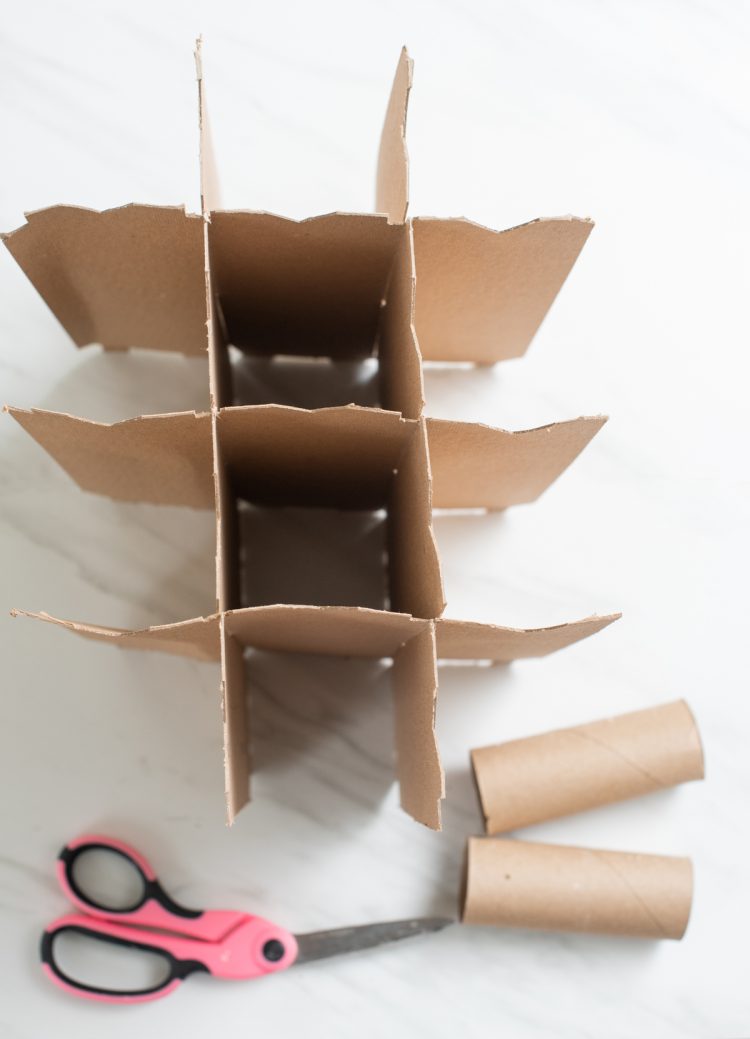
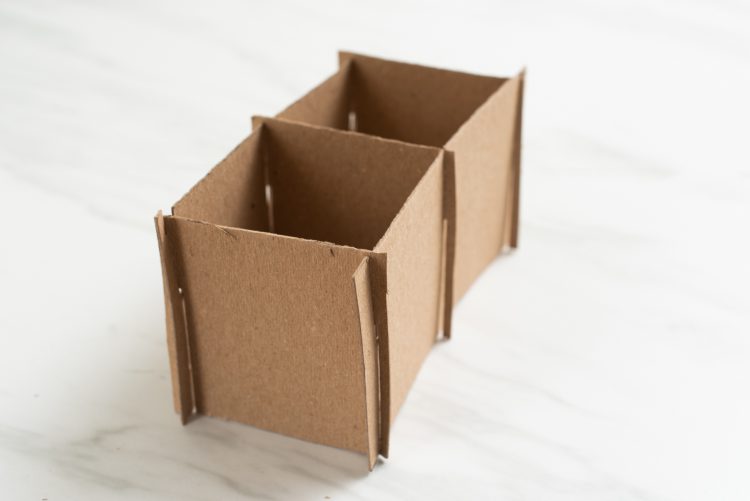
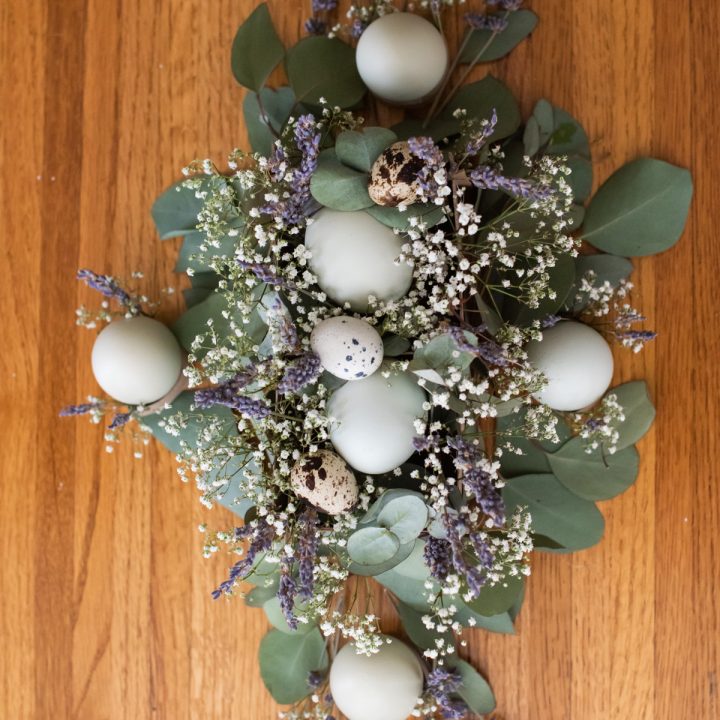
- Remove the cardboard divider from your wine crate and flatten it. Reserve the box for another use, such as a cat apartment, or recycle.
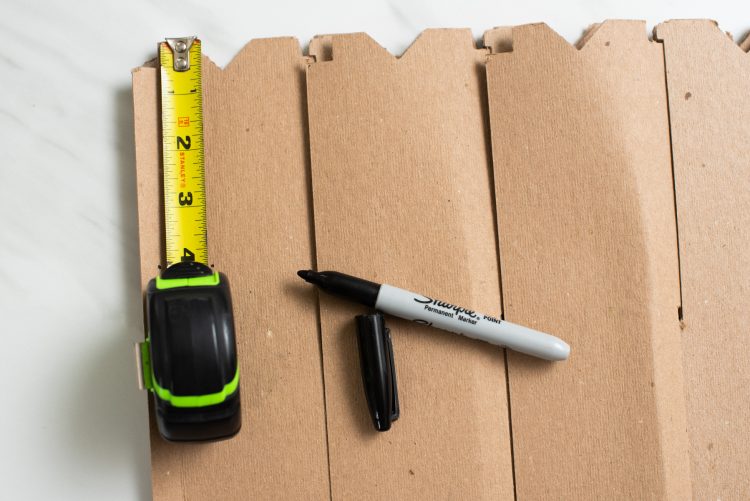
- Decide how tall you’d like your centerpiece to be (mine was 4 inches). Then, measure to cut away the excess cardboard flaps. YOU WILL WANT TO KEEP THE INTER-CONNECTING TABS, or this DIY will not work as the divider will not hold together.
- Trim the wine crate divider to your desired height with your scissors or box cutter. Then trim off the excess partitions, leaving two perfect boxes with approximately ½ inch cardboard overhang from the removed sections. You’ll use these slits to secure your flowers and eucalyptus around the sides and corners of your box. (Did you mess that up? Unholster that glue gun, girl, take a sip of wine, and keep crafting. It’ll be fine.)
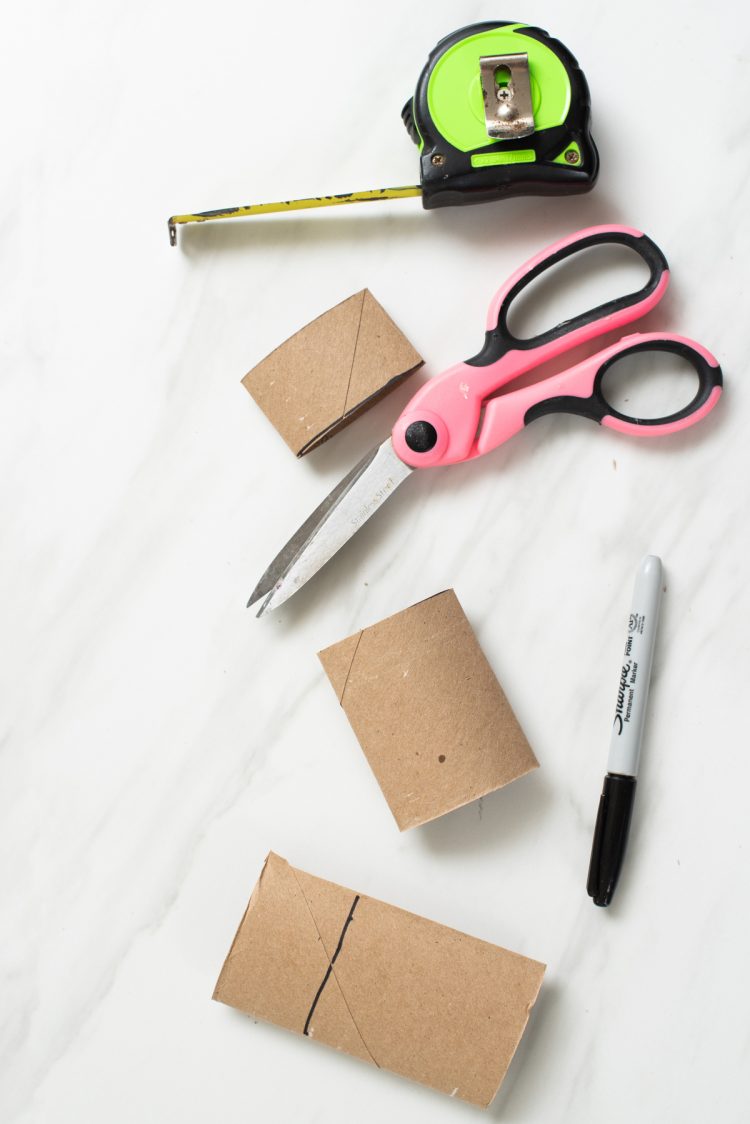
- Then, flatten your toilet paper rolls. Depending on how your week is going, I recommend letting out a primal scream while smashing your rolls for a dose of free craft therapy.
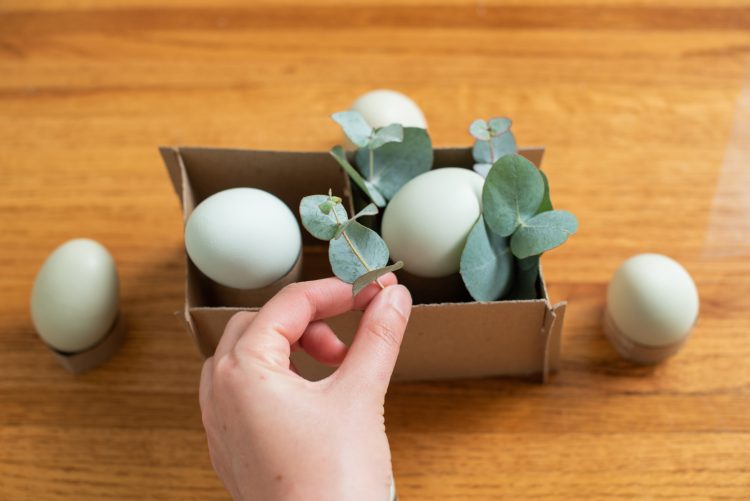
- Measure one inch shorter than the height of your centerpiece (3 inches for me), mark, and trim each toilet paper roll, reserving the cardboard you’ve just removed. The body of the rolls will support your chicken eggs inside the main “nest”, so return them to their original shape and tuck them inside your boxes.
- The trimmed 1-inch sections of your toilet paper rolls will be your egg holders for the eggshells resting directly on the table. Cut each in half to leave you with 4 cardboard rings.
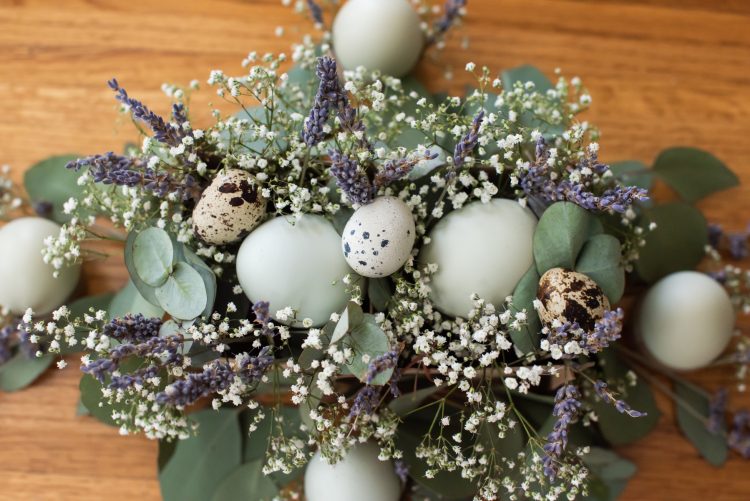
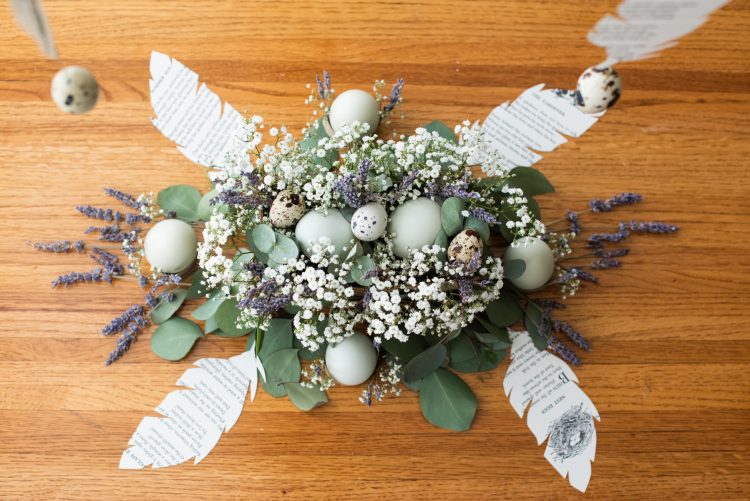
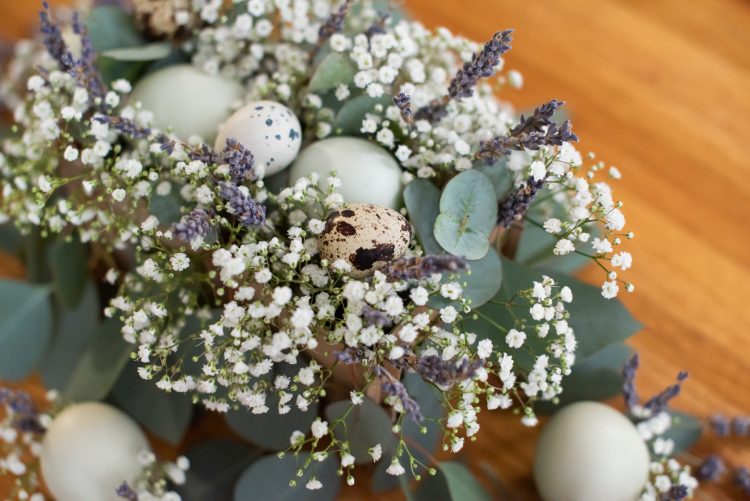
- Rest your chicken eggs on their stands inside the boxes, and then begin filling the tops with sprigs of your flowers and eucalyptus. I found it easiest to put the eucalyptus in first and prettiest to let pieces of the baby’s breath and eucalyptus hang down over the edges of the box.
- Camouflage the sides of your box by tucking the stems of your flowers into those ½ inch cardboard “slits” we mentioned earlier. Again, if you’re in a rush, just dab some hot glue on the stems and smack them on the cardboard, but you’ll want to remove the glue before recycling.
- Finish by nestling your quail eggs on top of your fully-packed centerpiece, resting your remaining chicken eggs on their cardboard stands, and tucking flowers around the cardboard rings.
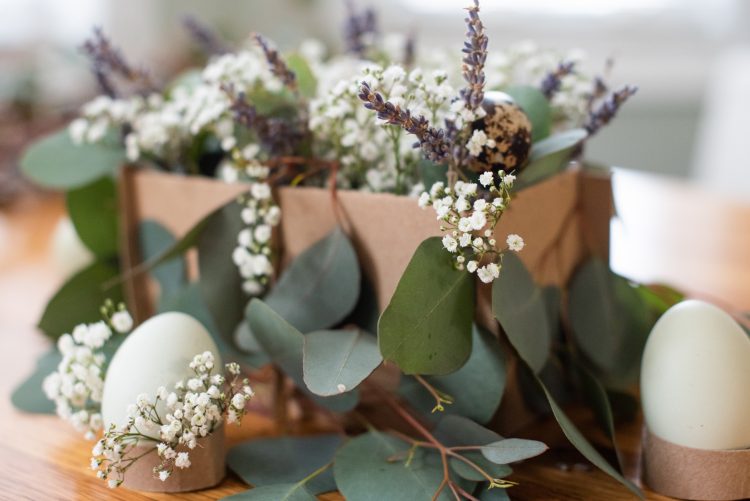
Note: You can quit here! This Easter centerpiece is gorgeous, elegant, and smells amazing. It will dry really well, but you may want to add extra baby’s breath as the flowers do shrink up some.
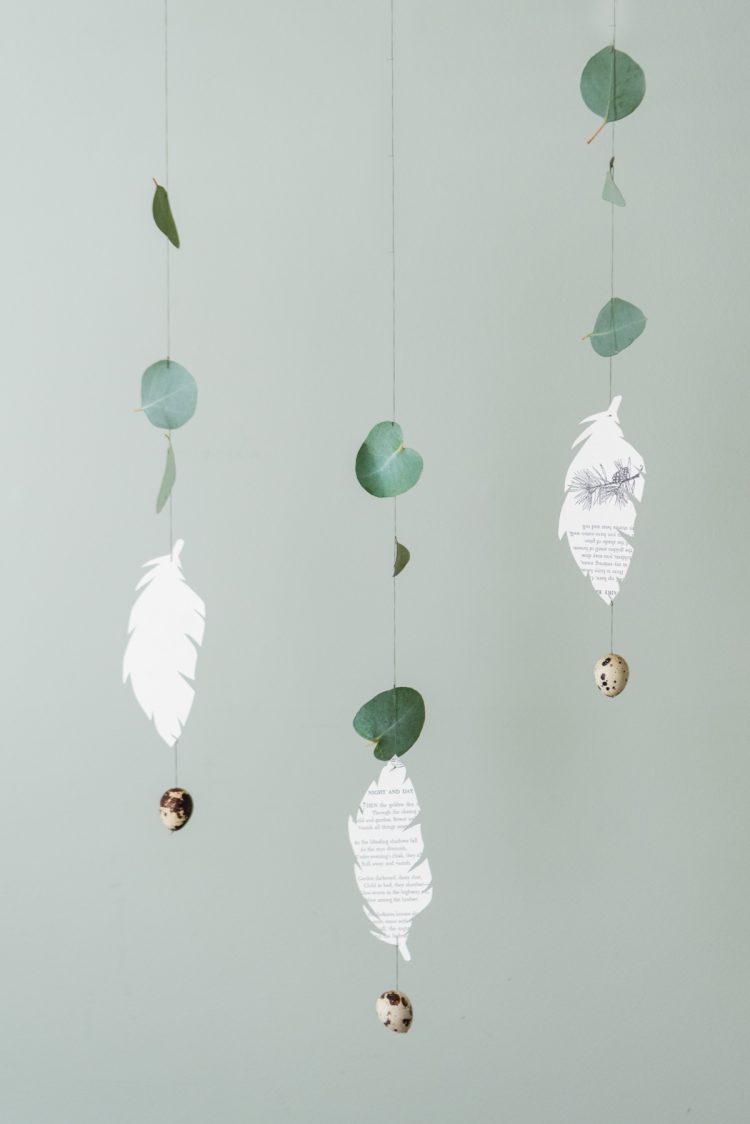
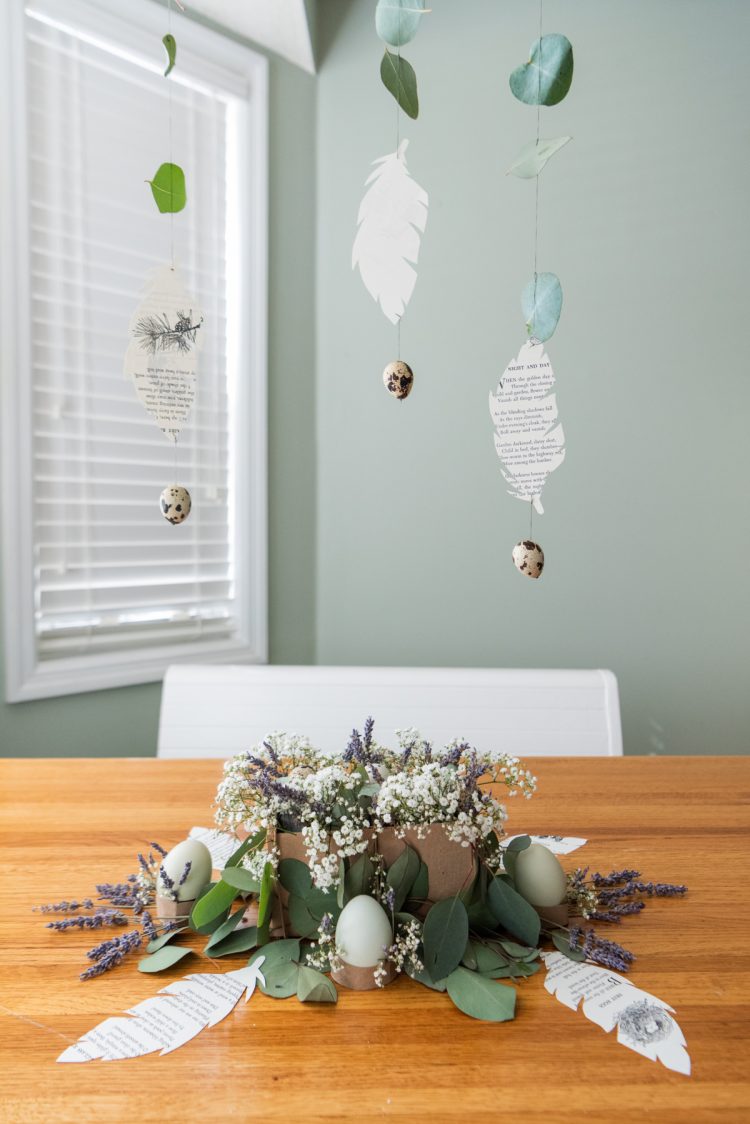
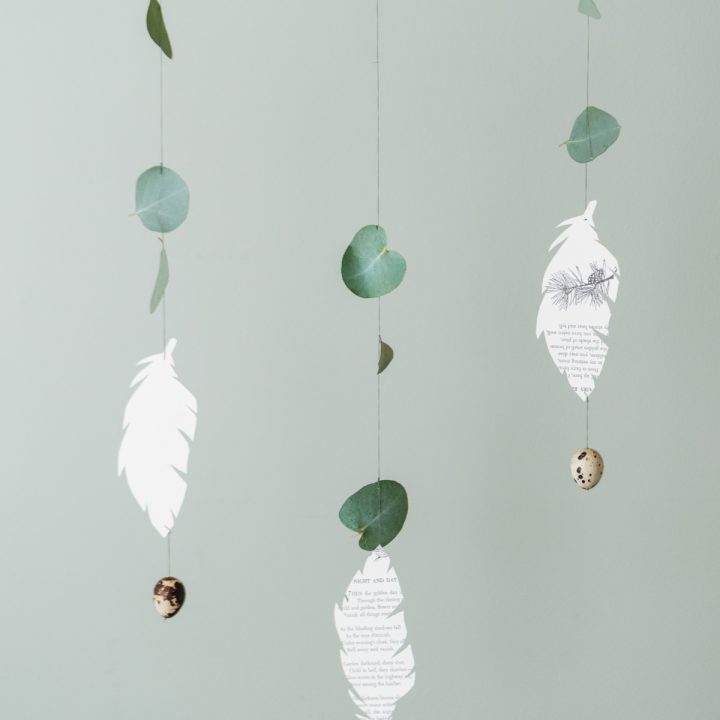
Instructions for DIY Hanging Quail Egg Garland:
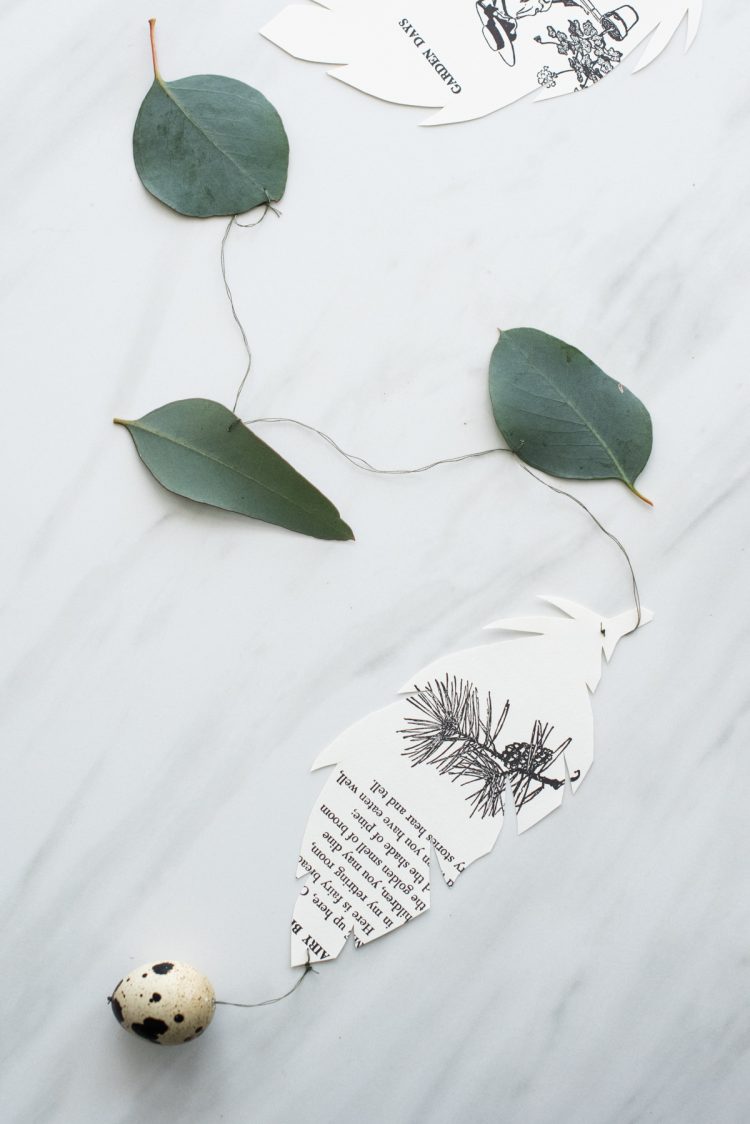
- Trace a feather on your reserved piece of cardboard and cut it out.
- Then trace your template on pages of the thrift store book, remove the pages, and cut out the feathers. I made 4 for the table and 3 for my garland.
- Thread your embroidery needle with 4-5 inches of thread and create a large knot to keep it from sliding through the egg. Then, puncture your quail egg at the untouched end and push the needle through the existing hole. Leave 2-3 inches of thread, then puncture an end of your paper feather and tie another knot (you’ll probably want another double or triple knot). Repeat for all 3 garlands.
- Then, thread your needle with a length of string that’s long enough to run from your feather to the ceiling or chandelier you’ll be hanging it from. Tie it off, and then thread the needle through the top of the feather. Sew through extra eucalyptus leaves as desired, and tie off, reserving a length of string to secure the garland.
- Hang the garland at your desired height, using push pins if you’re attaching them to the ceiling.
- Party on!
Can we take a moment for how incredible this upcycled DIY Easter centerpiece smells? Ok, now back to business.
How To Reuse or Dispose of Your Eco-Friendly Easter Centerpiece
I’m always thinking about what to do with DIY projects once you’re done using them for the initial purpose. In this case, you have a couple of options to complete the lifecycle of your DIY eco-friendly Easter centerpiece.
Once the party is over, you can: 1) Sweep the entire mess into the compost bin. 2) Repurpose the various elements.
Are you wondering what to do with the eggshells?
Let your kids decorate them for a fun rainy day craft, and turn them into Christmas ornaments by hot-gluing a loop of ribbon to the top. You can also crush them up and add them to your vegetable garden or dry them, crumble them, and feed them to chickens.
What do you do with eucalyptus?
Repurpose your eucalyptus. Enjoy it as a dried floral arrangement! You can also weave it into a compostable wreath, make DIY eucalyptus linen spray, or make a steam bath for a refreshing self-care moment or to soothe laryngitis or allergies.
And how to use lavender, you wonder.
There are about a million things you can do with lavender. Gather the kids for an afternoon of DIY lavender soap or candle making, or mix some into a homemade salt scrub. Simply toss the lavender into a sachet (or old jewelry bag) for a drawer freshener.
If your lavender is organic, use it in your favorite baking recipe. Finally, if your drawer freshener has lost its scent, you can toss the spent blooms into your next DIY aromatic fire starter – and use the ashes in the garden! How’s that for closing the loop?!
All photos via Reese Moore Photography
A Note on Buying and Borrowing Supplies
Note from the Editor: We’ve included affiliate links to some of the products used in this project. If you purchase through one of these links, Honestly Modern earns a small commission that has no impact on your purchase price.
Overconsumption is one of the key contributors to the climate crisis. With a focus on eco-friendly living, reducing consumption is an important principle of our content. We encourage you to use supplies you already have on hand, borrow tools or materials from friends, and shop secondhand when possible. We love Buy Nothing groups for lending requests, shared a bunch of ways to get sustainable craft supplies, and we have a full guide on all things secondhand shopping.
For ease of knowing which products to use in tutorials, we have included affiliate links to specific product recommendations. Despite a preference to support other retailers besides Amazon, we do include links to Amazon products at times when other links are not reasonable or useful for readers. Sustainability requires finding a balance that works and is sustainable itself. Gather supplies in the way that is most accessible to you.
As you set out to complete your project, we encourage you to remember the many R’s of sustainable living like reuse, reduce, recycle, repair, and more.
If you liked Upcycled DIY Easter Centerpiece, You May Enjoy:
Eco-friendly Crafting: 15 Creative Ways to Use Food Scraps
How To Repurpose Greeting Cards As Upcycled DIY Gift Tags
10 Fun & Easy Ways To Reuse Cardboard Boxes
DIY Eco-friendly Easter Centerpiece
Try this DIY eco-friendly Easter centerpiece. It is gorgeous, elegant, and smells amazing. It will dry really well, but you may want to add extra baby’s breath as the flowers do shrink up some.
Materials
- Empty cardboard wine crate with divider (I got mine for free at Trader Joe’s.)
- 2 empty toilet paper rolls or 1 spent paper towel roll
- 6 chicken eggs (The blue ones look beautiful.)
- 6 quail eggs (Available at many fine grocery stores, specialty Asian stores, or farmers' markets.)
- 1 bunch baby’s breath (substitute thistle, hydrangea, or statice)
- 1 bunch eucalyptus
- 1 bunch lavender
Tools
- Box cutter or scissors
- Ruler or tape measure
- Egg blower
- Embroidery needle
Instructions
- Puncture your chicken and quail eggs using an egg piercer or your embroidery needle, and then blow out your eggs. This requires a little patience. Basically, you’ll want to slightly widen the hole with your sewing needle before blowing air into the hole as you hold your egg upside down over a bowl, thus forcing the egg matter out. I like to force several puffs of air in, then remove the blower so the egg can come out quickly, and then repeat. If you go too fast, your egg will crack, but you’ll be able to feel the shell straining under your fingers before that happens. Use the eggs in an omelet or pound cake!
- Rest your eggs “hole side down” in the kitchen sink or on a towel to drain any remaining yolk or egg white.
- Remove the cardboard divider from your wine crate and flatten it. Reserve the box for another use, such as a cat apartment, or recycle.
- Decide how tall you’d like your centerpiece to be (mine was 4 inches). Then, measure to cut away the excess cardboard flaps. YOU WILL WANT TO KEEP THE INTER-CONNECTING TABS, or this DIY will not work as the divider will not hold together.
- Trim the wine crate divider to your desired height with your scissors or box cutter. Then trim off the excess partitions, leaving two perfect boxes with approximately ½ inch cardboard overhang from the removed sections. You’ll use these slits to secure your flowers and eucalyptus around the sides and corners of your box. (Did you mess that up? Unholster that glue gun, girl, take a sip of wine, and keep crafting. It’ll be fine.)
- Then, flatten your toilet paper rolls. Depending on how your week is going, I recommend letting out a primal scream while smashing your rolls for a dose of free craft therapy.
- Measure one inch shorter than the height of your centerpiece (3 inches for me), mark, and trim each toilet paper roll, reserving the cardboard you’ve just removed. The body of the rolls will support your chicken eggs inside the main “nest”, so return them to their original shape and tuck them inside your boxes.
- The trimmed 1-inch sections of your toilet paper rolls will be your egg holders for the eggshells resting directly on the table. Cut each in half to leave you with 4 cardboard rings.
- Rest your chicken eggs on their stands inside the boxes, and then begin filling the tops with sprigs of your flowers and eucalyptus. I found it easiest to put the eucalyptus in first and prettiest to let pieces of the baby’s breath and eucalyptus hang down over the edges of the box.
- Camouflage the sides of your box by tucking the stems of your flowers into those ½ inch cardboard “slits” we mentioned earlier. Again, if you’re in a rush, just dab some hot glue on the stems and smack them on the cardboard, but you’ll want to remove the glue before recycling.
- Finish by nestling your quail eggs on top of your fully-packed centerpiece, resting your remaining chicken eggs on their cardboard stands, and tucking flowers around the cardboard rings.
Recommended Products
As an Amazon Associate and member of other affiliate programs, Honestly Modern earns from qualifying purchases.

DIY Eco-Friendly Easter Garland
Reduce Easter waste and make this easy, DIY Easter garland using items you can compost after the holiday.
Materials
- 3 quali eggs
- Eucalyptus leaves
- Cotton thread
- Thrift store book for feathers
- Piece of cardboard (large enough for feather template) -- Retain one piece of discarded wine crate cardboard for the feather template
Tools
- Scissors
- Embroidery needle
- Thread
- Pushpins for hanging garland
Instructions
- Trace a feather on your reserved piece of cardboard and cut it out.
- Then trace your template on pages of the thrift store book, remove the pages, and cut out the feathers. I made 4 for the table and 3 for my garland.
- Thread your embroidery needle with 4-5 inches of thread and create a large knot to keep it from sliding through the egg. Then, puncture your quail egg at the untouched end and push the needle through the existing hole. Leave 2-3 inches of thread, then puncture an end of your paper feather and tie another knot (you’ll probably want another double or triple knot). Repeat for all 3 garlands.
- Then, thread your needle with a length of string that’s long enough to run from your feather to the ceiling or chandelier you’ll be hanging it from. Tie it off, and then thread the needle through the top of the feather. Sew through extra eucalyptus leaves as desired, and tie off, reserving a length of string to secure the garland.
- Hang the garland at your desired height, using push pins if you’re attaching them to the ceiling.
- Party on!
About the Author

Reese Moore
Reese Moore is a photographer, content creator, and pickle connoisseur who divides time between Charleston and Lake Lure. When she’s not behind the lens shooting stunning images for Reese Moore Photography, Reese loves to spend her time wandering the woods with her dog Gatsby or adventuring with her husband Logan in their Airstream Basecamp.