
How to Make a Gallery Wall From Thrift Store Finds
Are you interested in learning how to create a gallery wall from thrift store finds? You’ll love this simple DIY for a fun sustainable home decor project!
An enormous painting of Lil Wayne loomed over me, his bedazzled grill winking down on me, and I was shook. I turned to my husband, “I need this in my office.”
Ashley Longshore’s infamous and Instagram-famous portrait of Lil Wayne hangs at Jack Rose Restaurant in New Orleans, surrounded by an extensive gallery wall of dark, moody paintings of flowers, and I was obsessed.
While a giant Ashley Longshore rendering of Lil Wayne isn’t currently in the budget (and slightly at odds with our current decor), I was so taken with this dramatic, eclectic gallery wall. The rich colors and vintage feel lent a bold opulence to the room, and I became obsessed with creating a similar accent gallery wall from thrift store finds.
Now, I’m no stranger to thrifting or decorating with thrift store finds, but creating an entire gallery wall initially felt like a daunting task. What if it looks stupid? I asked my thrift store partner-in-crime, Elise. “Then we’ll redo it!” she said simply. And that, dear friends, is why Elise is my favorite thrift store shopping enabler.
Spoiler alert: It didn’t look stupid. I love it. I love it so much that when my husband jokingly said, “We should just do that to the whole house,” I nodded before he finished the sentence. He immediately backpedaled on that joke, by the way.
So today, I’m laying out practical tips and tricks to set you on the right path as you create your own gallery wall from thrift store finds!
Why Using Secondhand Artwork Matters
Before we dive in, however, let’s remember why sustainable home decor matters and why it’s always a good move to consider decorating with thrift store finds.
In 2018 alone, Americans threw out more than 12 million tons of furniture and furnishings, according to the United States Environmental Protection Agency. This home decor waste constitutes the second largest portion of urban waste. So skip your next trip to Target or HomeGoods and check out your local thrift store instead!
Related Reading: 25 Tips on Flipping Furniture for Beginners
Getting Started: Conceptualize Your DIY Gallery Wall
The most important part of creating a gallery wall is to decide on an aesthetic and set some parameters. Determining a cohesive aesthetic will make the variations between your thrift store finds seem charming and visually stimulating, rather than looking like you actually just brought the entire thrift store home with you.
Questions To Consider When Choosing A DIY Gallery Wall Theme
- What’s your subject matter going to be?
- Do you care what medium they are?
- How are they going to be displayed?
- Is there a frame color or color palette that will run throughout to set the tone?
Did you just get overwhelmed? Don’t be. These guidelines are yours to break when you find an irresistible piece, but they’ll help keep you focused and on track as you create your gallery wall.
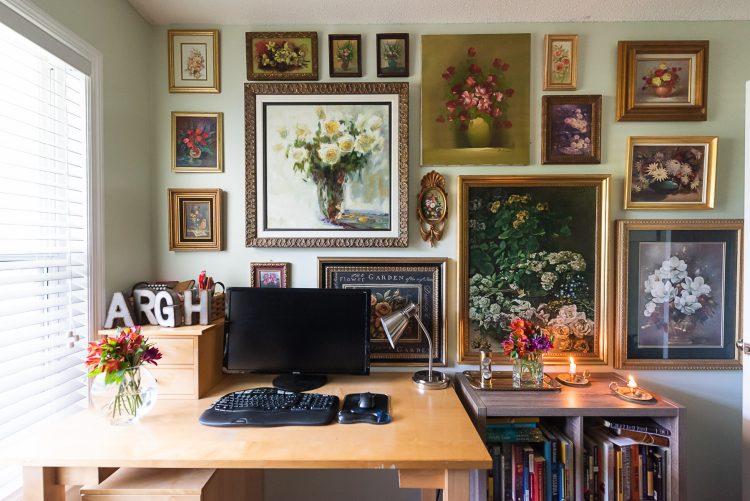
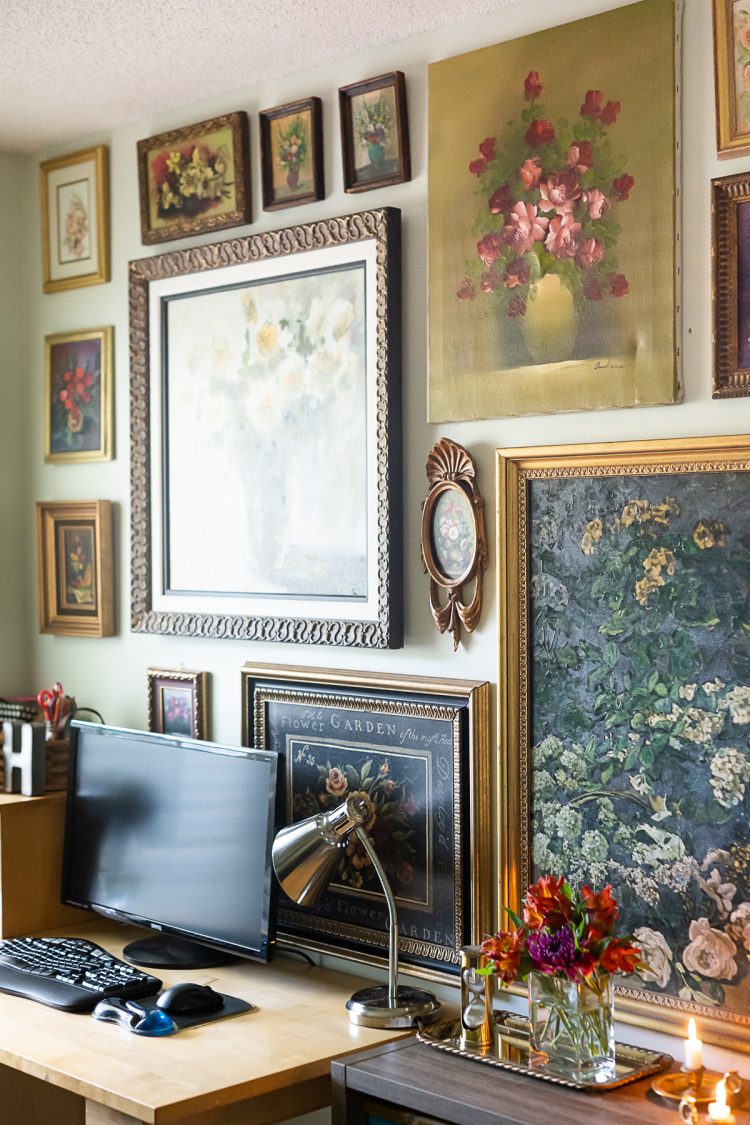
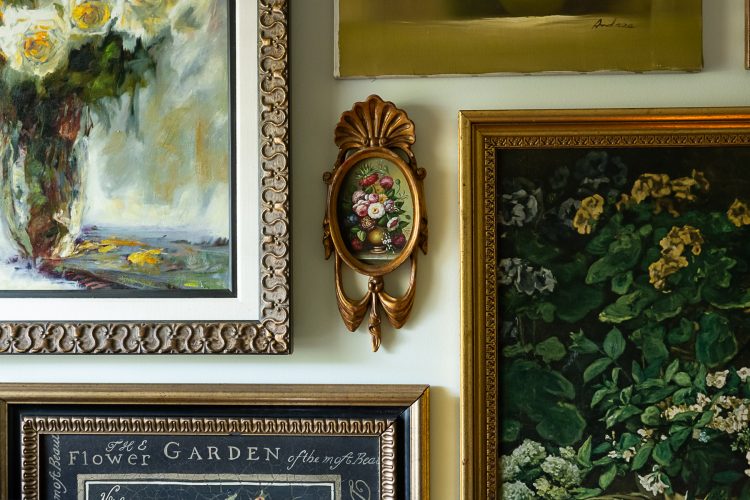
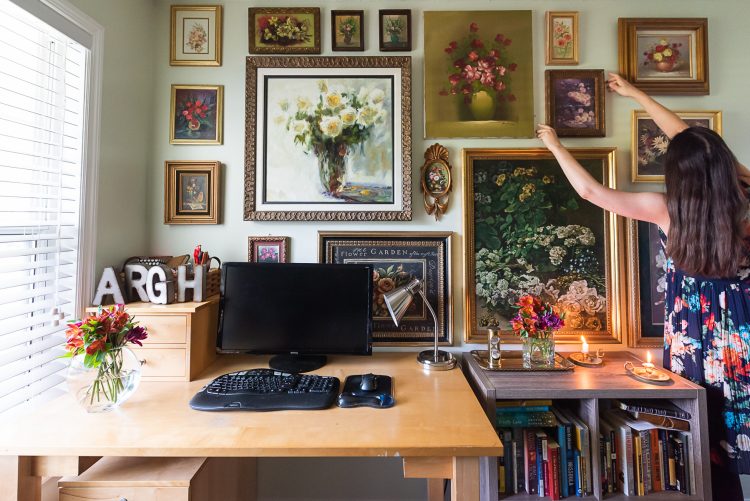
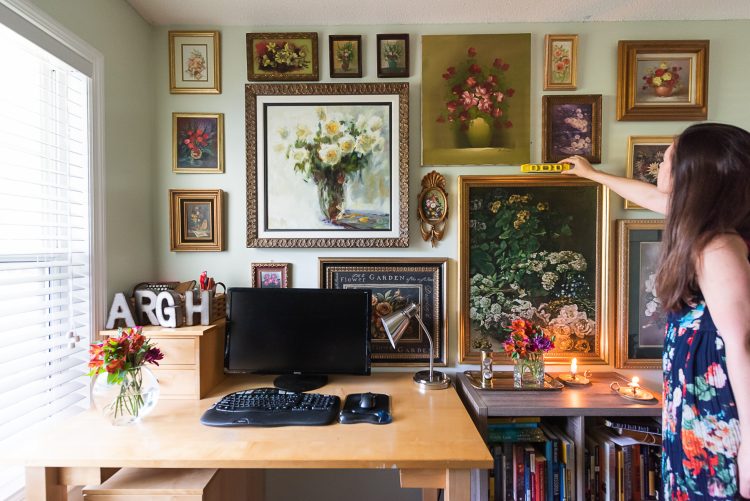
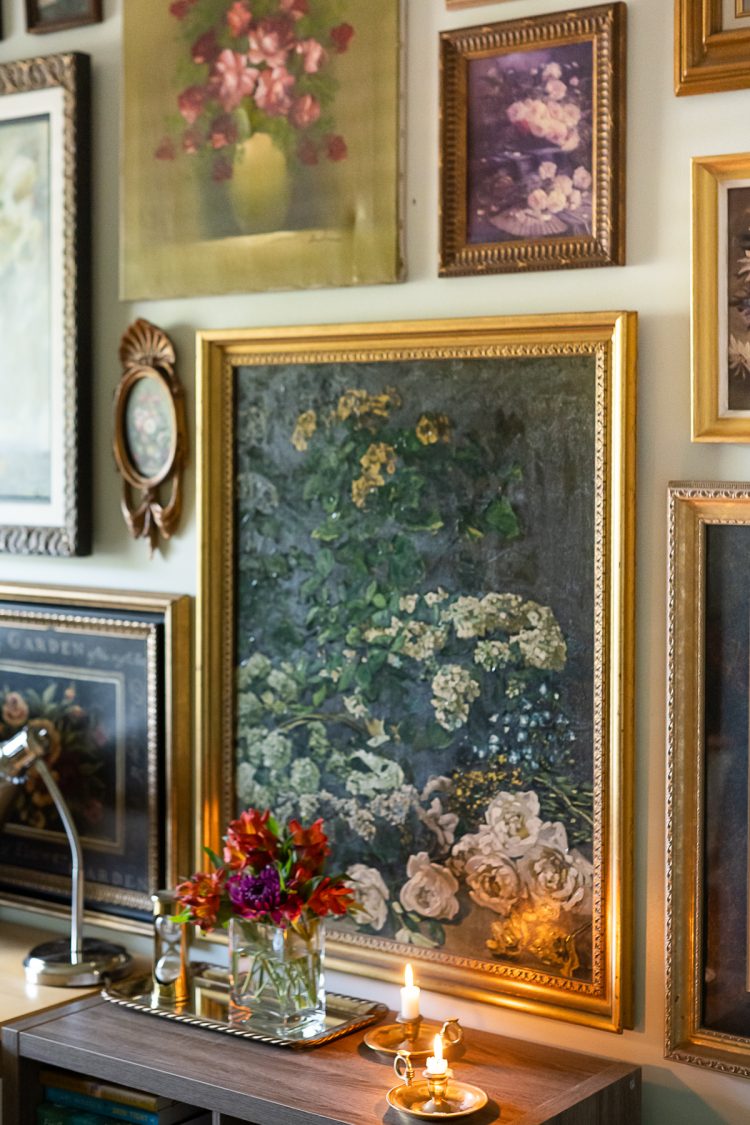
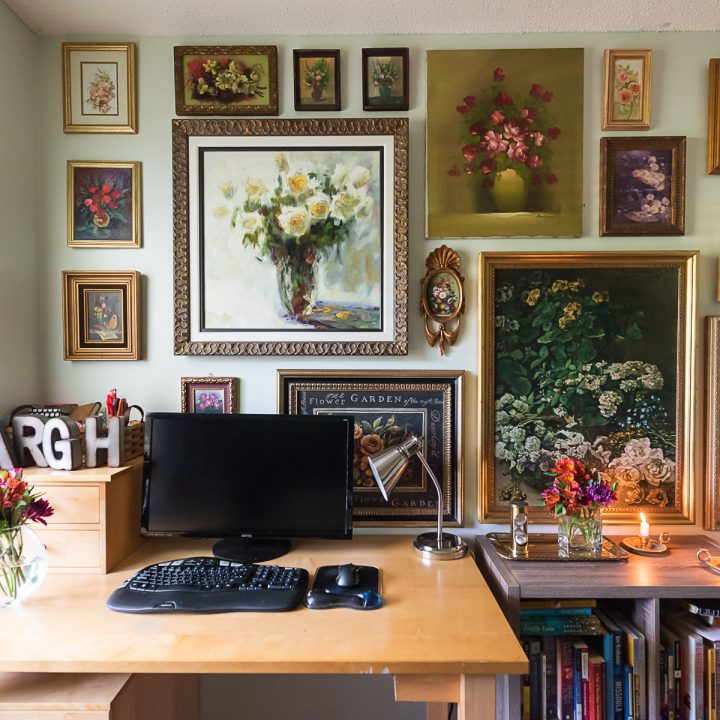
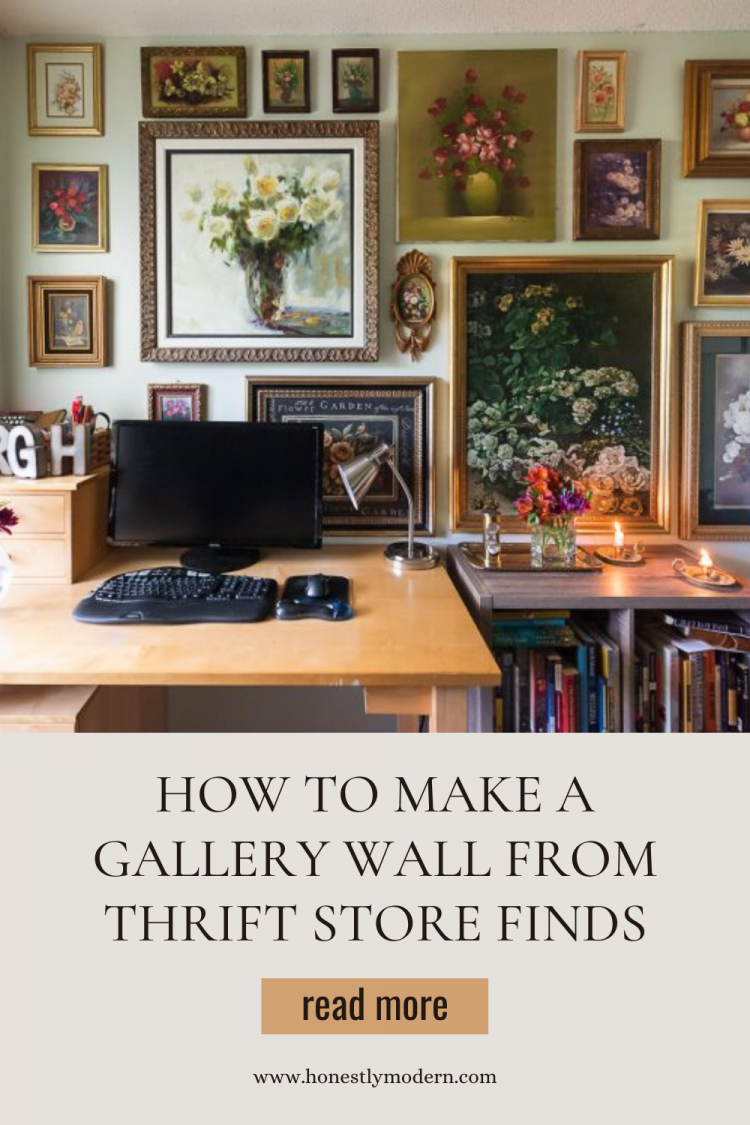
My wall is composed exclusively of vibrant pictures of flowers. You’ll notice almost all of them are moody, and with only one or two exceptions, they are straight-on square or rectangular paintings or prints of paintings of flowers in vases in gold frames. The colors of the flowers vary, the tones of the gold frames vary, and the size is delightfully varied, but the theme is obvious when you look at the wall.
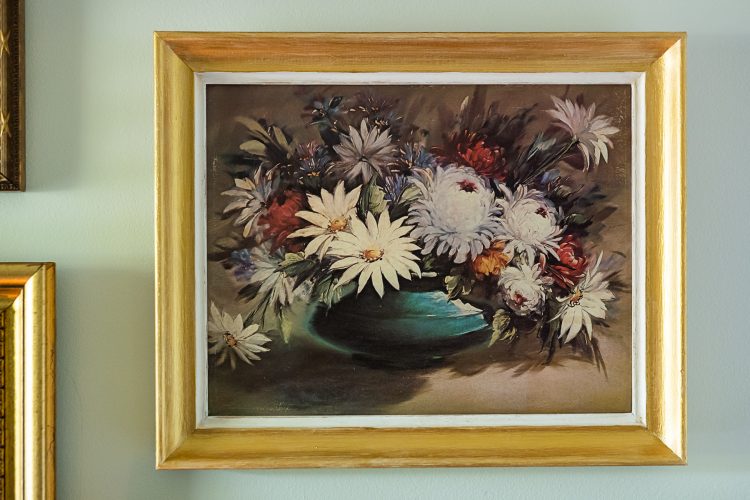
(Am I leaving space in the center of my gallery wall to swap a large floral still life with a giant smiling picture of Lil Wayne? You bet your bottom dollar I am.)
DIY Gallery Wall Theme Ideas
If my “glam granny” collection of moody bouquets (and hopefully someday a bedazzled rap star) is not for you, I totally get it. Here are some other gallery wall ideas that you could easily assemble from thrift store finds:
- Coastal chic: beach scenes or sailboat paintings in white frames for a sunroom
- French country: vintage-style herb, fruit, and vegetable illustrations in distressed wood frames for a kitchen or dinette
- Masculine decor: waterfowl oil paintings for a library or office
- Contemporary: gold mirrors for an entryway
- Boho: songbird paintings and prints for a nursery or guest room
- Eclectic traveler: oil paintings of cityscapes for a bedroom or office
The possibilities and combinations are truly endless when creating a gallery wall! However, the more unusual your subject matter (say, only drawings of tennis rackets or something), the harder it will be to find enough pieces to finish your wall in a reasonable timeframe.

Creating a Gallery Wall: Budget and Things
There’s a Venn diagram of optimization when it comes to creating a gallery wall: speed, price, and consistency. It’s hard to have them all at once.
Speed | Are you looking to put together your gallery wall quickly?
In addition to thrift store finds, you can find a lot of options on Nextdoor, Facebook, Letgo, eBay, and antique malls (keep an eye out for booths with sales), but it may cost you a bit more money.
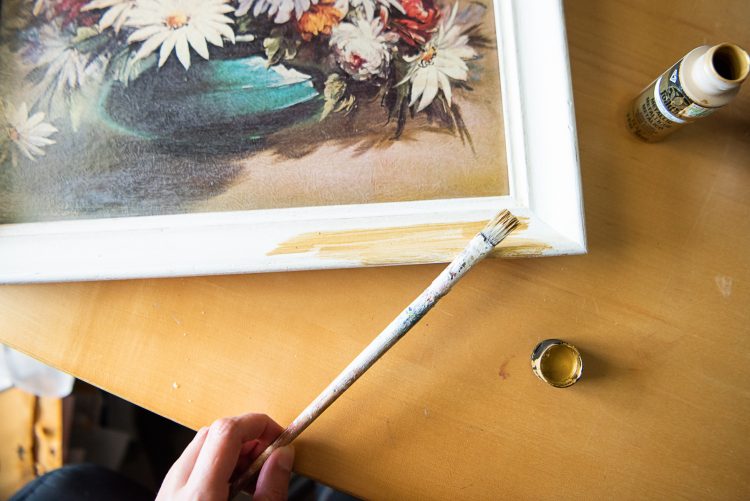
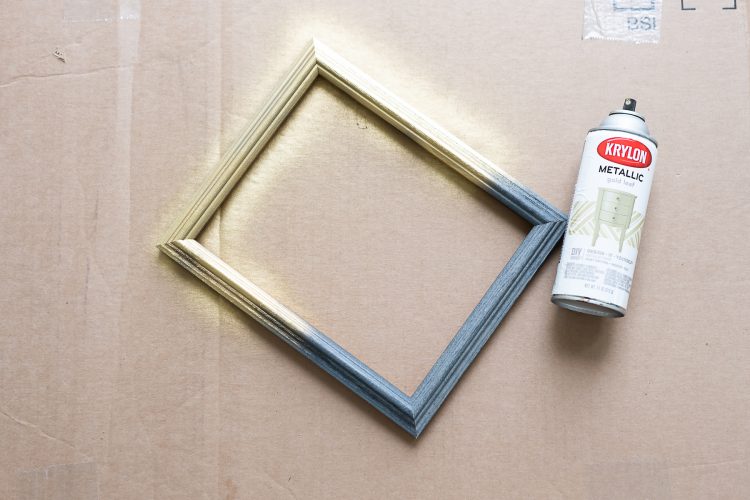
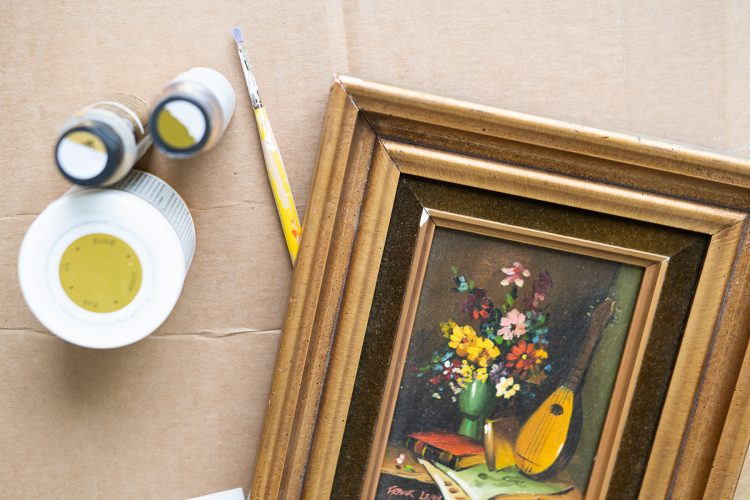
Additionally, if you like the art and the frame, but the frame is the wrong color, you can always pop the artwork out and paint the frame. I painted four of mine with leftover gold paint from a previous craft.
Price | Are you creating a gallery wall on a budget?
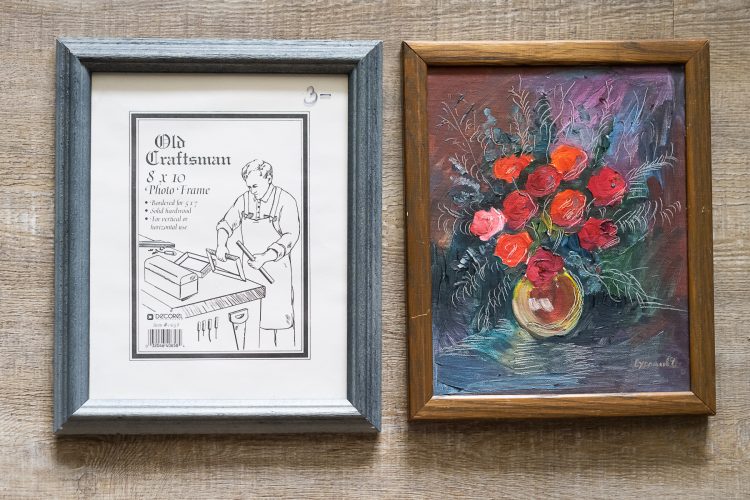
Empty frames are substantially cheaper than framed art. You can find frames for less than a dollar in some of the thrift stores in our town. With a little patience, you can pick up your pieces and frames separately and save some cash, but it may take more time and effort.
You can also opt for framed prints versus framed art. I picked up several large pieces for $5-$10 each, and I even found a small, adorable print for $2.
If you have your heart set on original art, illustrations, watercolors or acrylic can be cheaper than oil paintings.
Finally, you’ll spend less if you purchase large pieces to cover more space quickly. My largest pieces measured several feet across, and they cost the exact same amount as some of the 8”x10” pieces.
Consistency | Do you have a really clear idea of what you want for your gallery wall?
The more narrow your criteria are for the concept of your wall, the longer it may take you to source your pieces. I personally love the hunt, so I was comfortable spending several weekends wandering my favorite secondhand stores. If you have a really clear idea of what you want, and you want to put it together quickly, you’ll likely have to spend a bit more money.
DIY: How to Make a Gallery Wall from Thrift Store Finds
Note: I am NOT a “math” person. To me, getting overly hung up on measuring the dimensions of the wall and trying to divide that by the size of hypothetical pieces you haven’t found yet… totally sucks the joy out of the process.
The fun and beauty of making your own gallery wall from thrift store finds is watching the random, eclectic pieces come together into something cohesive and beautiful. Don’t get so hung up on the “little stuff” that it ruins the experience.
That being said, if you’ve never hung artwork before or you ARE a little more particular about spacing, you’ll want to watch the video in step one below.
Materials for a DIY Gallery Wall
- Artwork that meets the tips mentioned above (The number of pieces will be determined firstly by the size of your wall and secondly by what you find, but more on that below.)
- Possibly craft paint that matches your chosen frame color
- Possibly a paint pen that roughly matches your chosen frame color
- Glass cleaner
- A dry brush, damp cloth, and a dry cloth for removing dust
- Stud finder
- Hanging wire, picture hanging hardware, nails, etc. (Be sure it’s strong enough to hold the weight of your pieces. Wire and hardware come in different sizes and strengths.)
- A hammer and likely a drill for larger pieces
- A level
- A ruler or measuring tape
- A pencil for marking measurements on drywall
DIY Gallery Wall Instructions
When you’re ready to create your own DIY gallery wall from thrifted and secondhand artwork, follow these instructions to make your own thrifted magic at home.
If You’re New To Hanging Artwork
If you haven’t hung artwork before, watch this video on how to hang artwork. There are definitely some nuances and tips to make it easier and more effective.
Plan Your Gallery Wall
Conceptualize your gallery wall using the tips mentioned above. It may help to write down your ideas or create a Pinterest board to begin to visualize the gallery wall theme.
Gather Your Artwork
Acquire several of the largest pieces or your centerpieces first. Then find your smaller “filler” pieces, keeping in mind that you may need to pick up a few extra once you’ve assembled your gallery wall. (See purchasing tips above.)
Clean & Prepare Your Pieces
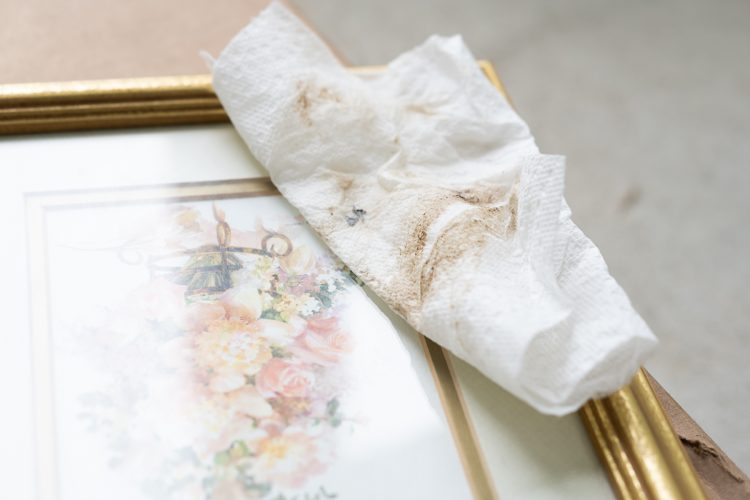
Clean your pieces. Use a damp cloth to tidy up your frames or a dry brush for intricate patterns, and use the cleaner to remove any smudges or dust from the glass. Once these have dried completely, touch up any frames as needed using the paint pen or craft paint, whichever matches most closely. Because this is a low-touch surface, you can be flexible about the type of paint that you use. It’s not particularly important that the paint is waterproof or especially durable.
If you’re painting any frames, remove the artwork and set it aside. Spread protective cardboard (such as a deconstructed box) over the ground in a well-ventilated area, and paint your frames. Let them dry completely.
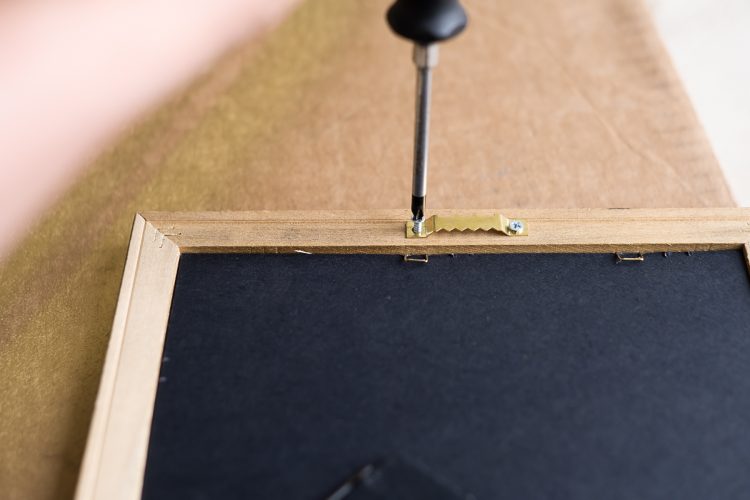
Add Hardware & Wire To Hang Artwork
Add hanging hardware or picture wire to any artwork or frames that don’t have anything on the back, remembering that the weight of the piece should determine the strength of the framing device used. (For example, you’ll want to hang a heavy piece using picture wire or Hangman Hanger, not a tooth hanger.)
Layout Your Pieces Before Hanging
Lay your thrift store finds out on the floor in front of your future gallery wall to get an idea of what you’d like to go where. You can also trace their outlines on craft paper and tape them to the wall with removable painter’s tape to get an idea of what configuration works best.
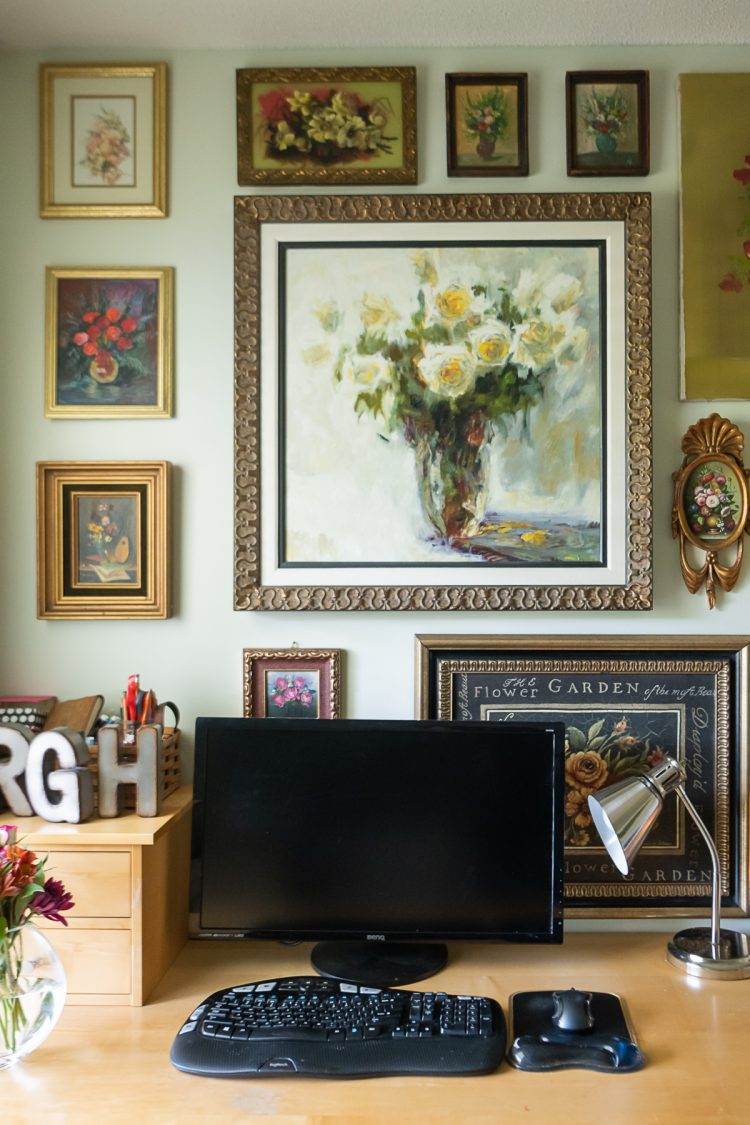
Note: In general, it’s easiest to start by lining your largest pieces up with where you’ll be starting your wall. My gallery wall starts at the height of my desk and bookshelf and goes to the ceiling, but you can extend yours to the floor if you’re so inclined. Put your largest pieces at eye level if you’re extending to the floor.
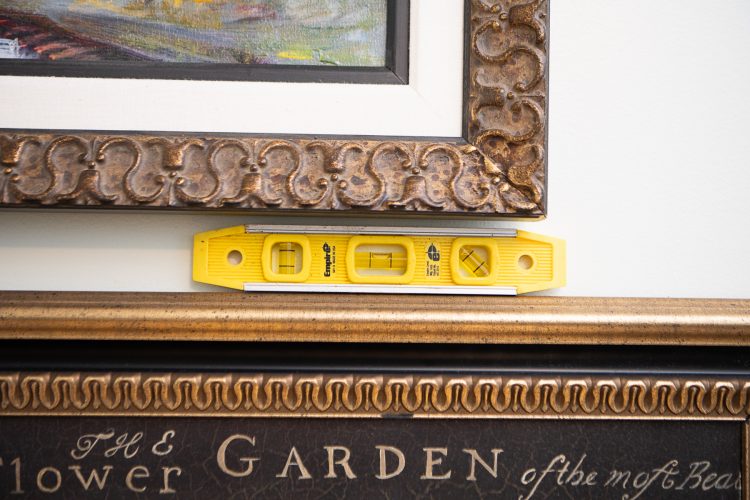
You’ll save yourself a lot of angst if you leave at least 3 inches of space between the bottom of one piece and the top of the one below it. Otherwise, you won’t be able to easily fit a standard level on the top of each piece, and you risk your gallery wall looking like an earthquake just hit.
My recommendation is then to use a stud finder to pick the best spots for your largest piece, but put your favorite large piece in the center at eye level. Either place the large pieces next to each other with several inches of “breathing room” between them (somewhere between 2 to 5 inches, depending on the size of your artwork and how much wall space you have to cover) or leave enough space to hang your smaller pieces between them (I left 12 inches for my one oval piece, making it a focal point instead of a random one-off that disrupted the flow.).
Hang Your Artwork & Admire Your Gallery Wall
Hang your large pieces. Again, you may find this video helpful on hanging artwork if this is your first time. Fill in the blank spaces and spaces between the large pieces with the smaller artwork.
Finally, carefully rest your level on the top of each painting, canvas, or frame and gently adjust your pieces as needed.
Invite your friends over to admire your handiwork!
If you make a gallery wall, let us know how it goes. Leave a comment or share a photo on Instagram and tag @honestlymodern so we can check it out!
A Note on Buying and Borrowing Supplies
Note from the Editor: We’ve included affiliate links to some of the products used in this project. If you purchase through one of these links, Honestly Modern earns a small commission that has no impact on your purchase price.
Overconsumption is one of the key contributors to the climate crisis. With a focus on eco-friendly living, reducing consumption is an important principle of our content. We encourage you to use supplies you already have on hand, borrow tools or materials from friends, and shop secondhand when possible. We love Buy Nothing groups for lending requests, shared a bunch of ways to get sustainable craft supplies, and we have a full guide on all things secondhand shopping.
For ease of knowing which products to use in tutorials, we have included affiliate links to specific product recommendations. Despite a preference to support other retailers besides Amazon, we do include links to Amazon products at times when other links are not reasonable or useful for readers. Sustainability requires finding a balance that works and is sustainable itself. Gather supplies in the way that is most accessible to you.
As you set out to complete your project, we encourage you to remember the many R’s of sustainable living like reuse, reduce, recycle, repair, and more.
All photos via Reese Moore Photography
DIY Gallery Wall From Thrifted Finds
Are you interested in learning how to create a gallery wall from thrift store finds? You’ll love this simple DIY for a fun sustainable home decor project!
Materials
- Artwork that meets the tips mentioned above (The number of pieces will be determined firstly by the size of your wall and secondly by what you find, but more on that below.)
- Possibly craft paint that matches your chosen frame color
- Possibly a paint pen that roughly matches your chosen frame color
- Glass cleaner
Tools
- A dry brush, damp cloth, and a dry cloth for removing dust
- Stud finder
- Hanging wire, picture hanging hardware, nails, etc. (Be sure it's strong enough to hold the weight of your pieces. Wire and hardware come in different sizes and strengths.)
- A hammer and likely a drill for larger pieces
- A level
- A ruler or measuring tape
- A pencil for marking measurements on drywall
Instructions
- Watch this video on how to hang artwork if you’re unfamiliar.
- Conceptualize your gallery wall using the tips mentioned above. It may help to write down your ideas or create a Pinterest board to begin to visualize the gallery wall theme.
- Acquire several of the largest pieces or your centerpieces first.
- Find your smaller “filler” pieces, keeping in mind that you may need to pick up a few extra once you’ve assembled your gallery wall. (See purchasing tips above.)
- Clean your pieces. Use a damp cloth to tidy up your frames or a dry brush for intricate patterns, and use the cleaner to remove any smudges or dust from the glass. Once these have dried completely, touch up any frames as needed using the paint pen or craft paint, whichever matches most closely. Because this is a low-touch surface, you can be flexible about the type of paint that you use. It's not particularly important that the paint is waterproof or especially durable.
- If you’re painting any frames, remove the artwork and set it aside. Spread protective cardboard (such as a deconstructed box) over the ground in a well-ventilated area, and paint your frames. Let them dry completely.
- Add hanging hardware or picture wire to any artwork or frames that don’t have anything on the back, remembering that the weight of the piece should determine the strength of the framing device used. (For example, you’ll want to hang a heavy piece using picture wire or Hangman Hanger, not a tooth hanger.)
- Lay your thrift store finds out on the floor in front of your future gallery wall to get an idea of what you’d like to go where. You can also trace their outlines on craft paper and tape them to the wall with removable painter's tape to get an idea of what configuration works best. Note: In general, it’s easiest to start by lining your largest pieces up with where you’ll be starting your wall. My gallery wall starts at the height of my desk and bookshelf and goes to the ceiling, but you can extend yours to the floor if you’re so inclined. Put your largest pieces at eye level if you’re extending to the floor.
- You’ll save yourself a lot of angst if you leave at least 3 inches of space between the bottom of one piece and the top of the one below it. Otherwise, you won’t be able to easily fit a standard level on the top of each piece, and you risk your gallery wall looking like an earthquake just hit.
- My recommendation is then to use a stud finder to pick the best spots for your largest piece, but put your favorite large piece in the center at eye level. Either place the large pieces next to each other with several inches of “breathing room” between them (somewhere between 2 to 5 inches, depending on the size of your artwork and how much wall space you have to cover) or leave enough space to hang your smaller pieces between them (I left 12 inches for my one oval piece, making it a focal point instead of a random one-off that disrupted the flow.).
- Hang your large pieces. Again, you may find this video helpful on hanging artwork if this is your first time.
- Fill in the blank spaces and spaces between the large pieces with the smaller artwork.
- Finally, carefully rest your level on the top of each painting, canvas, or frame and gently adjust your pieces as needed.
- Invite your friends over to admire your handiwork!
Notes
Note on time to complete: The amount of time it takes to source the pieces will vary greatly depending on your preferences. But it took about 30 minutes to install the gallery once I had all the artwork and had painted a few of the frames to match the color scheme.
If You Liked How to Make a Gallery Wall From Thrift Store Finds, You May Enjoy:
8 Important Reasons To Buy Gifts Secondhand
10 Types of Secondhand Stores and Why We Love Them
Why Secondhand Isn’t Second-rate
About the Author

Reese Moore
Reese Moore is a photographer, content creator, and pickle connoisseur who divides time between Charleston and Lake Lure. When she’s not behind the lens shooting stunning images for Reese Moore Photography, Reese loves to spend her time wandering the woods with her dog Gatsby or adventuring with her husband Logan in their Airstream Basecamp.
Hi Reese,
2 Things…
1st you’re gallery wall is absolutely Stunning!!!
2nd your blog is such a goldmine of tips! I love how you balance creativity with practicality—especially the advice on setting a theme while staying open to unique finds (Which I wanted to do, but thought it would mess with the aesthetic of it all). Definitely feeling inspired to hit up my local thrift stores now—thank you for sharing your process in such a fun and helpful way!