Elegant Halloween Tablescape with Upcycled Decorations
Are you looking to create an elegant Halloween tablescape? Are you looking for inspired eco-friendly Halloween decorations? Read on for details on how to make an elegant tablescape using DIY, upcycled decorations.
Halloween is such a big deal in my house. It starts absolutely no later than October 1. Every year we go ALL OUT, and you can see (and sometimes hear) our house from down the block. In my eyes, the house isn’t fully decorated until people come to a complete stop in front of it.
Like most people, we reuse our holiday decorations from year-to-year. I do, however, love to mix it up, which can be challenging if you’re trying to live a sustainable lifestyle.
Did you know that, according to this Buzzfeed article on the environmental impacts of Halloween, we trash 7 million Halloween costumes, equivalent to 83 million plastic bottles each year? And a whopping 1.3 billion rotting pumpkins are landfilled each year?
As an environmentalist, you don’t want to buy more heavily packaged, mostly plastic decor that was mass produced and shipped across the planet. As a reasonable human, you certainly don’t want to store even more holiday decorations. And as someone familiar with the zero waste movement, you don’t want to throw a ton of decor in the trash.
Fortunately, with a little creativity, you can create an elegant Halloween tablescape from upcycled waste materials, some gold paint, and a few compostable items. It’s a running joke in our house that I was a raccoon in a past life because most of my crafts start with a quick dumpster dive – and I will absolutely steal your food when you’re not looking.
So, roll up your sleeves, do a quick dive into your recycling bin, spread out some old newspaper, parchment paper, or a cardboard box, and let’s start making some magic.
Brainstorming Your Elegant Halloween Tablescape:
Whenever I’m making upcycled decorations or laying out a holiday tablescape, I gameplan. First, pick a theme. Second, choose a color palette.
For this Halloween centerpiece and table decor, I wanted an elegant, magical feel – like you’re invited to a starlight Halloween dinner at Glenda the Good Witch’s house. I also wanted it to be warm, soft, and approachable, so I narrowed it down to shades of gold, cream, orange, and coral. I find that laying out some criteria will help you make quick decisions for a cohesive, organized-looking Halloween tablescape.
How Much Time Do You Have?
As we move through this DIY Halloween table decor, I’m going to tell you how I did it and how it might be done more quickly. Remember that there are no set rules on how to create a beautiful table; this is just a guide. You can absolutely modify the Halloween centerpiece and upcycled decorations to fit your busy schedule.
Suggested Materials for an Elegant Halloween Tablescape
Materials For DIY Upcycled Candleholders:
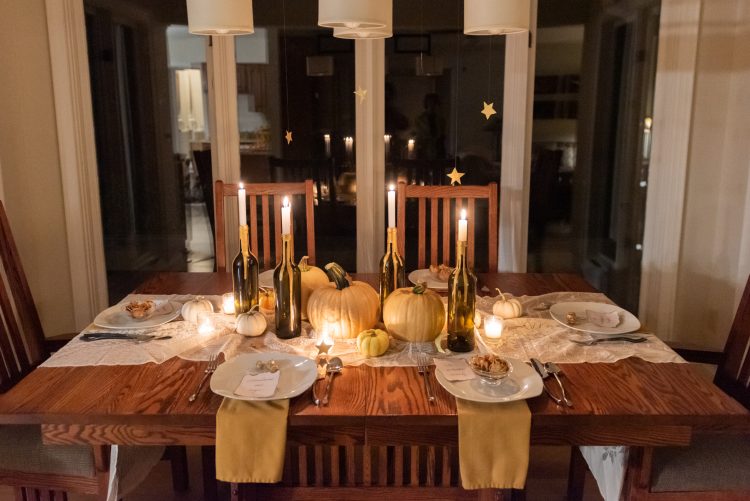
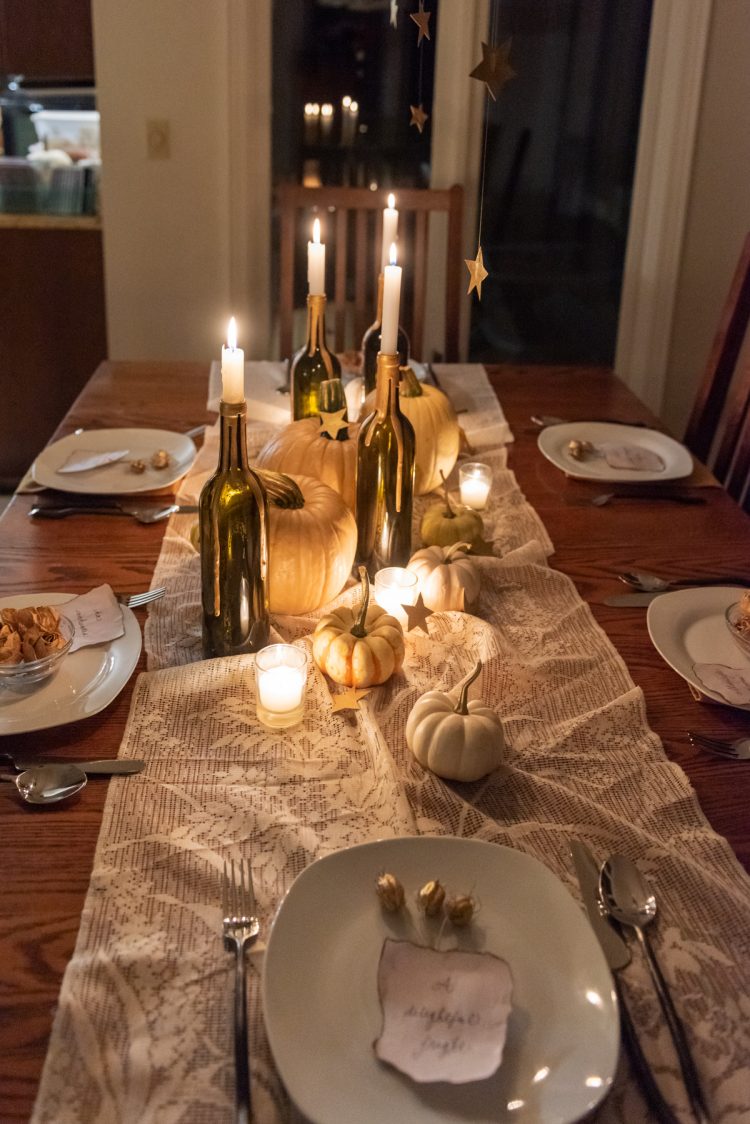
- 3-4 empty wine bottles or glass bottles with openings to fit your taper candles
- Half-sized taper candles (ours were leftover emergency candles from the last hurricane)
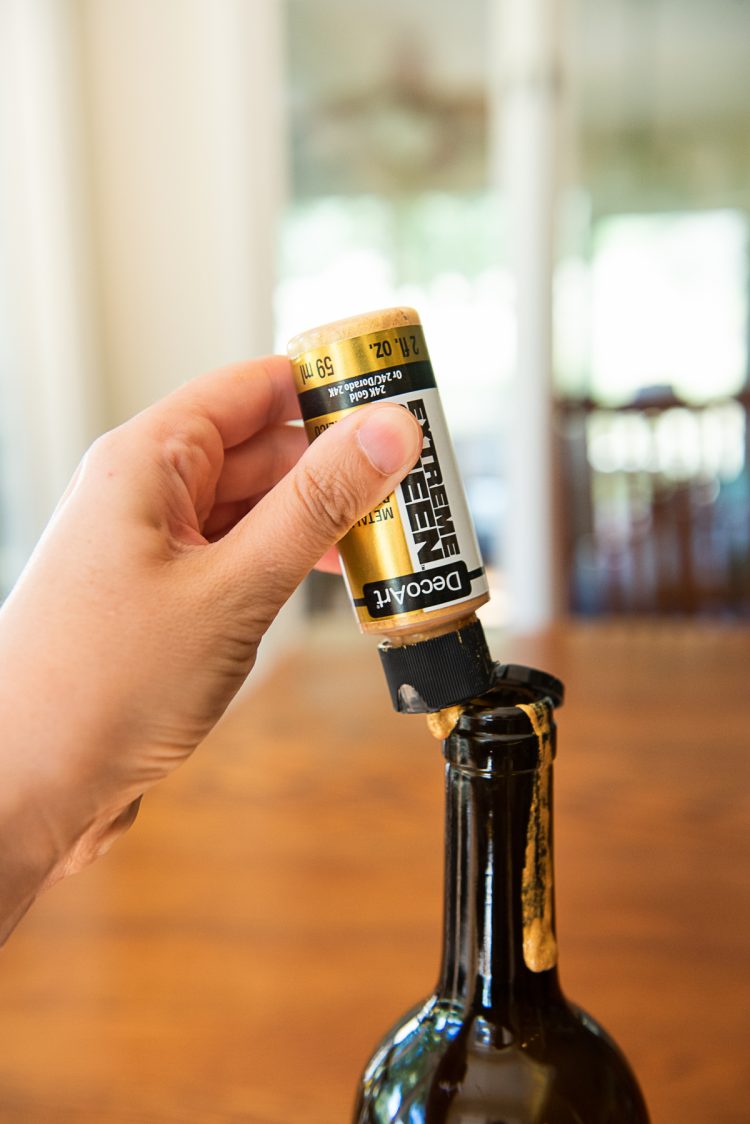
- Gold acrylic paint*
- Broken down box or parchment paper to protect your work surface
- A stock pot filled with hot water and scrubber*
*Note: If you’re in a hurry, use some Goo Gone to speed along the process of removing your labels, and spray paint your bottles solid gold or gold ombre in a well-ventilated area.

Materials For DIY Place Settings and Halloween Centerpiece
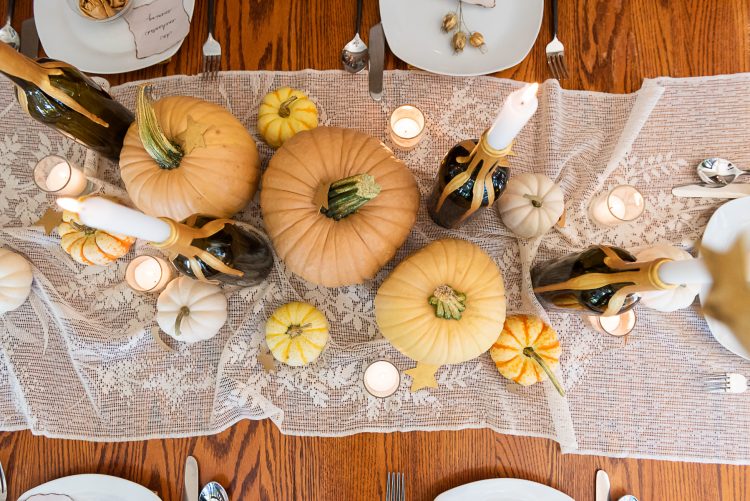
- Assorted small and medium pumpkins or gourds (mine came from a local u-pick farm)
- Cloth napkins
- White or cream plates or dust off Granny’s fine china!
- Dried flowers, ideally from a floral arrangement you’ve already enjoyed (I like to save a few and toss them on the dehydrator for future crafts)
- More of the gold acrylic paint from above
- Paintbrush
- Glass bowls
- Blank scrap paper (I used packing material from a set of plates)
- Matches and a candle
- A Sharpie
- A ruler
- Scissors*
- Cotton thread
- Broken down lightweight cardboard box, such as a cereal box
- Votives
- Vintage lace tablecloth or runner (ours is a gift from a friend’s mother’s estate)
*Note: If you’re in a hurry, use a decorative star and/or moon hole punch, and opt for lightweight cardboard that’s plain on both sides. You’ll likely only need one quick coat of paint. Lettering will take more work to cover.
Instructions for DIY Elegant Halloween Tablescape
- To make your DIY upcycled candleholders, rinse your wine bottles, fill them halfway with water, and sit them in your stock pot of hot water. After about 20 minutes, you should be able to start peeling off the labels. (Grab the Goo Gone if they’re stubborn.) Use the scrubber to remove any lingering adhesive. Towel dry.
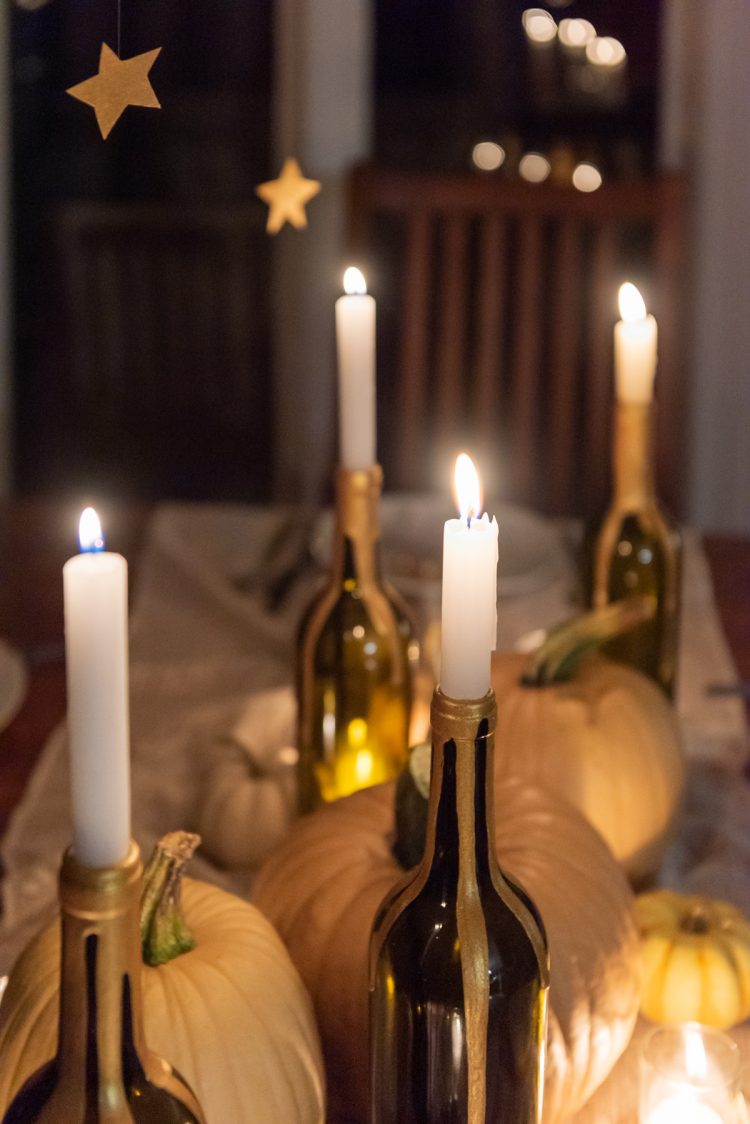
- Once the outside of each bottle is dry, run a line of acrylic paint around the lip of your bottle, lingering in a few places and squeezing the bottle to create longer drips against the outside of the bottle. The paint may run all the way down, so do this on a protective surface. Turn the ceiling fan on to speed the drying process (I did really thick drips, and it took about 2 hours to dry). Alternatively, you can spray paint your bottles in a well-ventilated area to save time. If there are weak spots in your drips, you can lightly touch up the paint with your paintbrush once everything has dried.
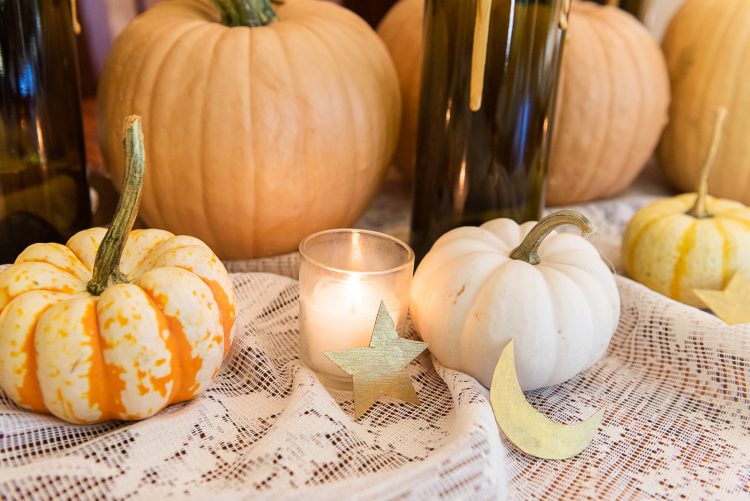
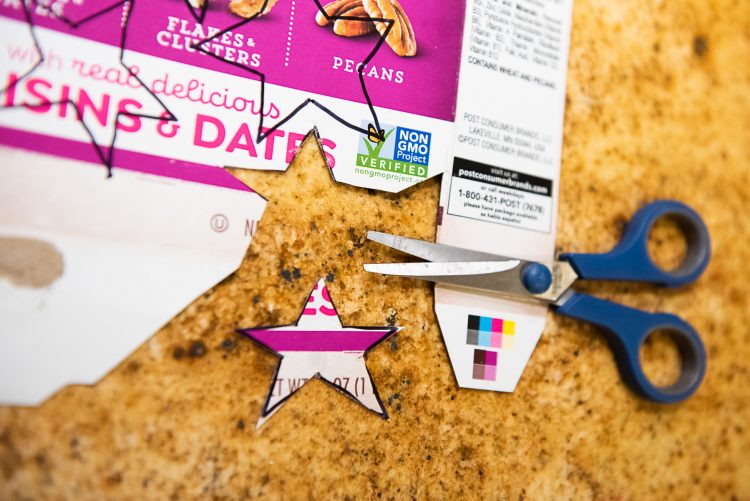
- While your bottles dry, use the Sharpie to draw stars and crescent moons on your lightweight cardboard. Cut the shapes out, and apply a quick coat of the gold acrylic paint. It should dry very rapidly. Apply coats of the acrylic until the desired level of opacity is reached. (I did one on the unfinished side and three on the logo side of my box.)
- While the stars and candleholders continue to dry, lightly dip your paintbrush in the residual gold paint and run it along the edges of your dried flowers. Add as much or as little as you like in thin coats, and let dry. You can also lightly skim the stems of your pumpkins if you want some extra sparkle. It will take about 5-10 minutes to dry, so move on to the next steps while you wait.
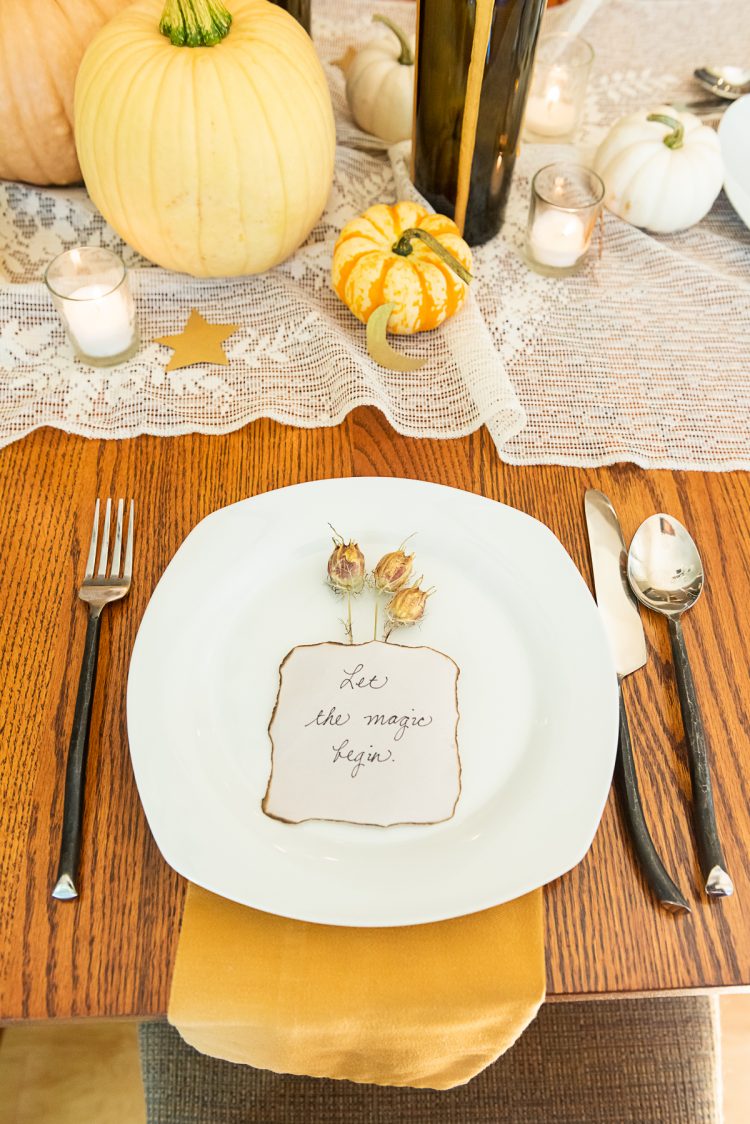
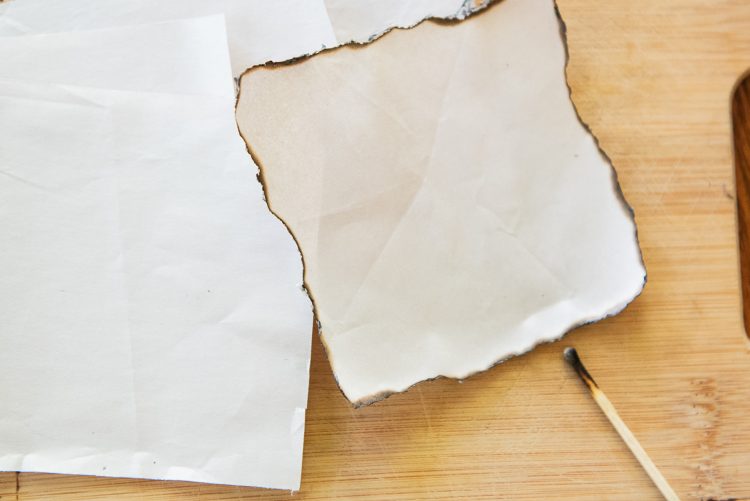
- Iron your scrap paper if needed to remove the wrinkles. Then, cut your scrap paper into sections for the place settings. Mine were about 4 inches by 4 inches.
- Working quickly and carefully, light a candle and lightly singe the edges of your paper squares. I quickly lit the edges on fire and immediately blew them out over our sink – it really wasn’t as complex or dangerous as it might sound. Then use your Sharpie to write your guests’ names, spooky or playful sayings, or Halloween greetings on the singed cards.
- Lightly rinse and scrub your pumpkins, especially if you picked them directly on the farm. Pat dry.
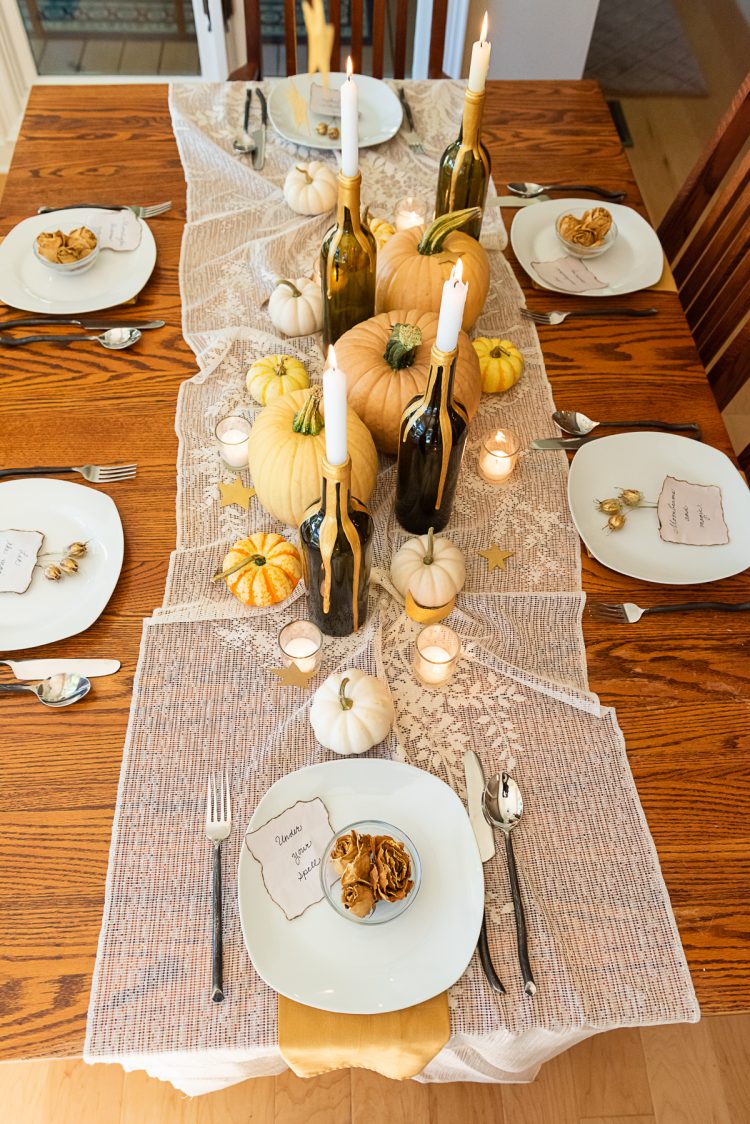
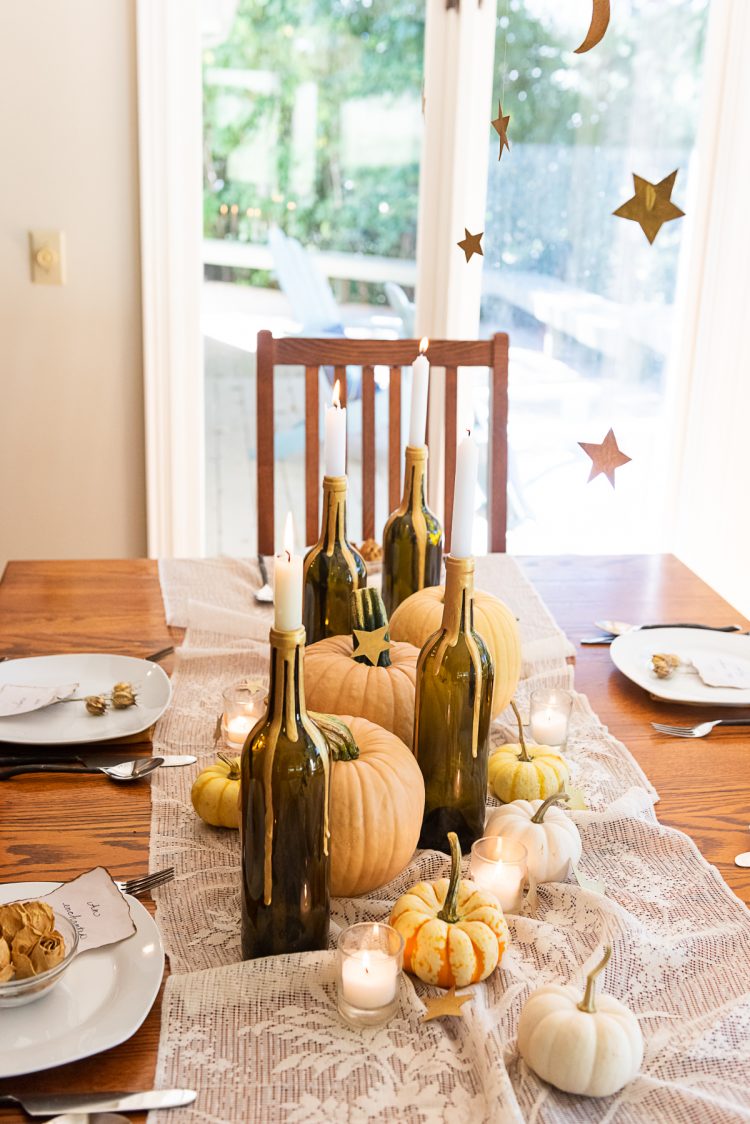
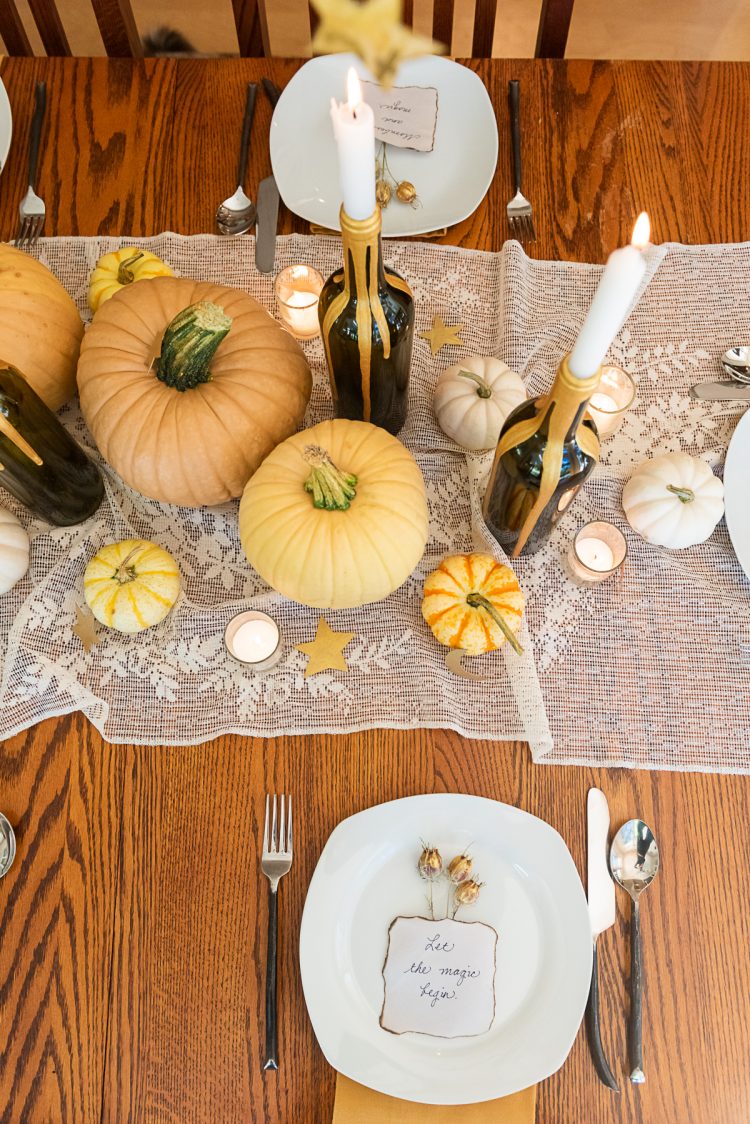
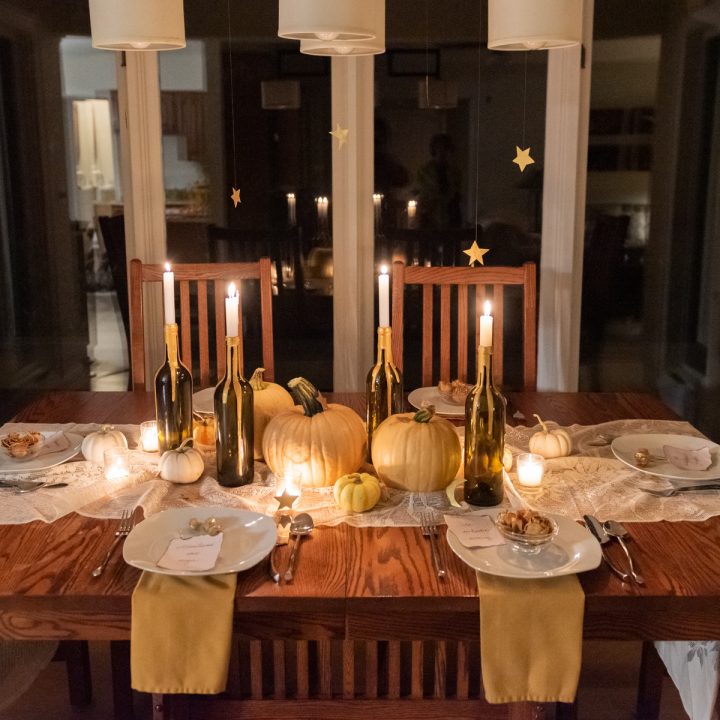
- Lay out your lace tablecloth or table runner, then add your biggest pumpkins to the center of your Halloween tablescape. To add some whimsy and a spooky texture, you can bunch the fabric and rest the pumpkins on it to secure the raised portions. Then add your upcycled candleholders with the taper candles.
- Add your smaller pumpkins and votives, then sprinkle your cardboard stars and moons over the Halloween centerpiece, reserving a few to hang, if desired. Make sure none of the cardboard has landed inside the votives, which hopefully goes without saying.
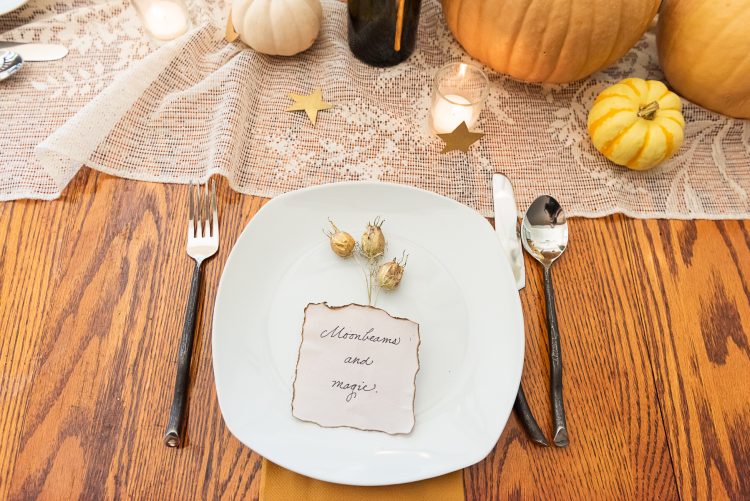
- Set the table, and then style your gold-tipped dried flowers on each place setting. I tucked the roses into condiment bowls and left the longer-stemmed flowers loose on the plate. Add your place cards.
- Finally, and optionally, lightly glue or tape the thread to your reserved cardboard stars and crescent moons. Secure the free end to your chandelier, taking time to make sure that none of the cardboard is positioned over the top of or close to the taper candles. We are not trying to burn the house down, y’all.
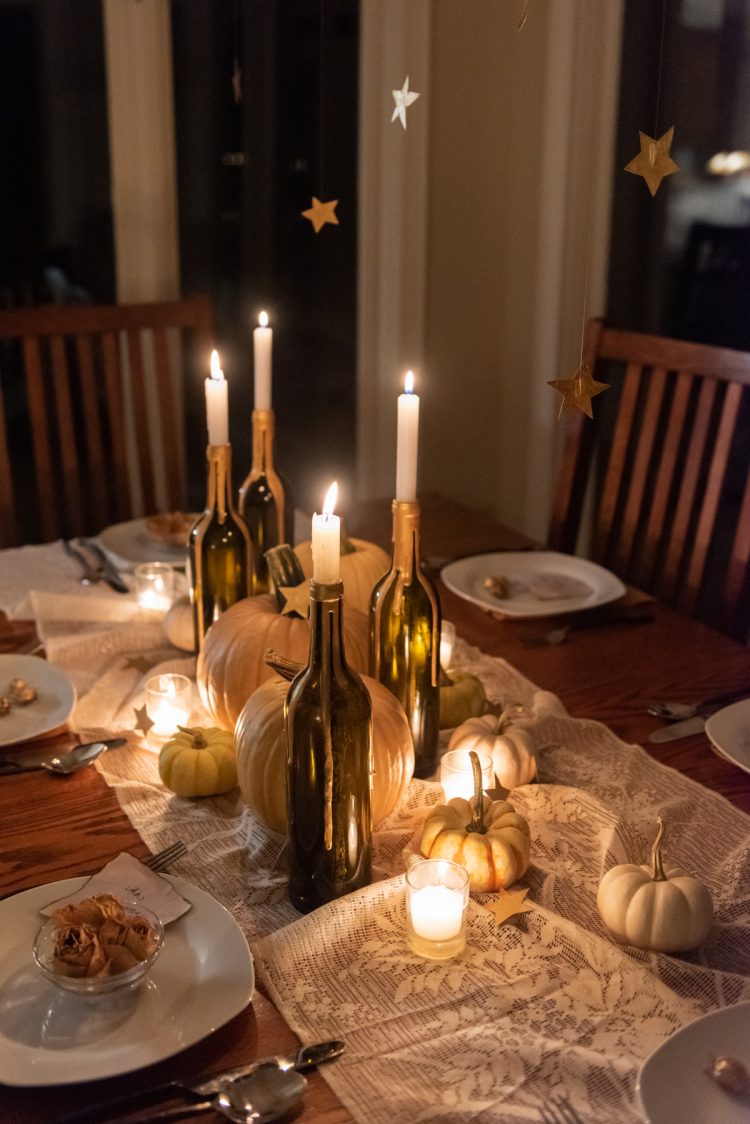
- Light your candles, and let the magic begin!

Disposing of your Elegant Halloween Tablescape
Once the party is over, you can enjoy your pumpkins for the rest of the fall season. Arrange them on your mantle or porch with a pot of mums. When they begin to turn into squash zombies, you can compost or donate them. Read all about how to responsibly dispose of decorative pumpkins.
You can continue to enjoy your DIY candleholders, or you can scrub off the acrylic paint and recycle them. The paper place cards can be recycled, composted, or tied around your Halloween candy for a spooky surprise.
You can repurpose the gold stars as gift tags during the holiday season or string them together as a Christmas garland for your mantle. The gold-tipped flowers will need to go into the garbage at the end of their useful life if you’re unable to remove the painted portions. Any parts without paint can go into the compost.
All photos via Reese Moore Photography
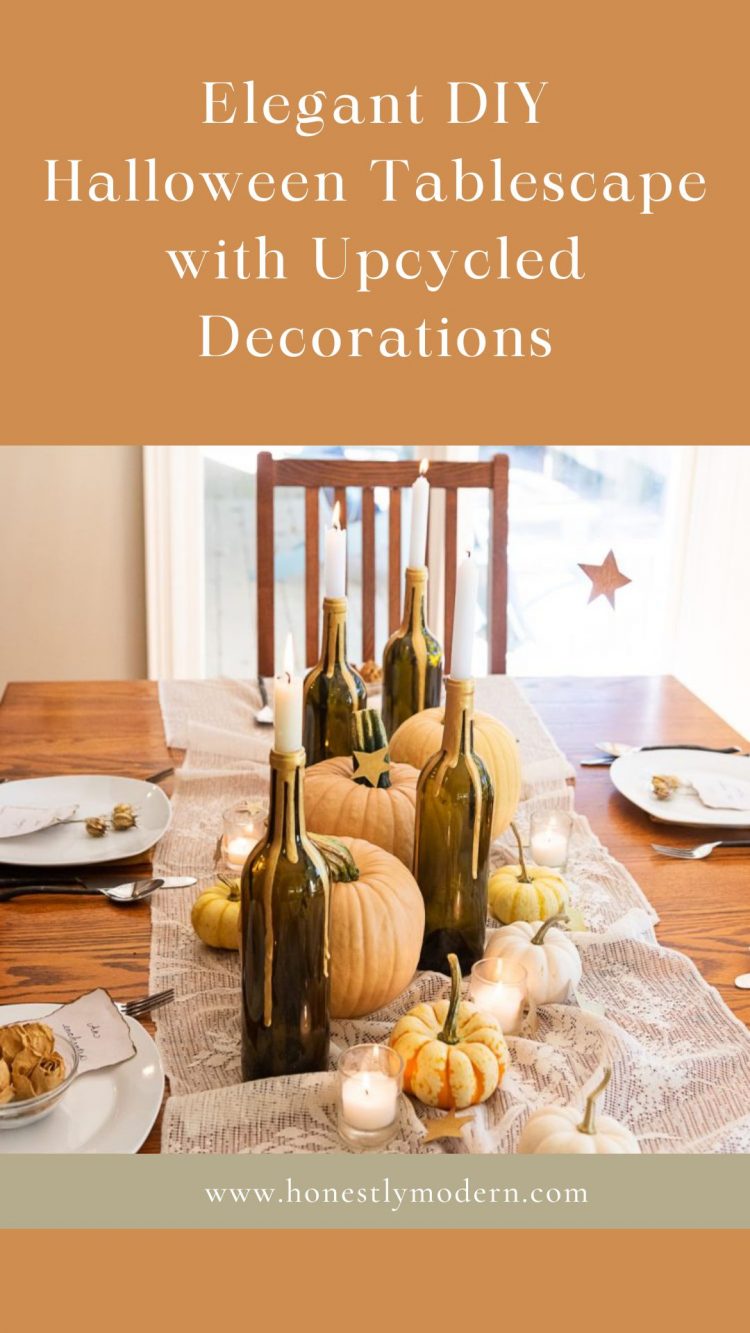
DIY Elegant Halloween Tablescape
Create a low-waste and simple DIY elegant Halloween tablescape with just a few materials, most of which you probably already have on hand and can be reused or composted after the holiday.
Materials
- 3-4 empty wine bottles or glass bottles with openings to fit your taper candles
- Half-sized taper candles (ours were leftover emergency candles from the last hurricane)
- Gold acrylic paint*
- Broken down box or parchment paper to protect your work surface
- Assorted small and medium pumpkins or gourds (mine came from a local u-pick farm)
- Cloth napkins
- White or cream plates or dust off Granny's fine china!
- Dried flowers, ideally from a floral arrangement you've already enjoyed (I like to save a few and toss them on the dehydrator for future crafts)
- More of the gold acrylic paint from above
- Blank scrap paper (I used packing material from a set of plates)
- Cotton thread
- Broken down lightweight cardboard box, such as a cereal box
- Votives
- Vintage lace tablecloth or runner (ours is a gift from a friend's mother's estate)
Tools
- A stock pot filled with hot water and scrubber*
- Paintbrush
- Glass bowls
- Matches and a candle
- A Sharpie
- A ruler
- Scissors**
Instructions
- To make your DIY upcycled candleholders, rinse your wine bottles, fill them halfway with water, and sit them in your stock pot of hot water. After about 20 minutes, you should be able to start peeling off the labels. (Grab the Goo Gone if they're stubborn.) Use the scrubber to remove any lingering adhesive. Towel dry.
- Once the outside of each bottle is dry, run a line of acrylic paint around the lip of your bottle, lingering in a few places and squeezing the bottle to create longer drips against the outside of the bottle. The paint may run all the way down, so do this on a protective surface. Turn the ceiling fan on to speed the drying process (I did really thick drips, and it took about 2 hours to dry). Alternatively, you can spray paint your bottles in a well-ventilated area to save time. If there are weak spots in your drips, you can lightly touch up the paint with your paintbrush once everything has dried.
- While your bottles dry, use the Sharpie to draw stars and crescent moons on your lightweight cardboard. Cut the shapes out, and apply a quick coat of the gold acrylic paint. It should dry very rapidly. Apply coats of the acrylic until the desired level of opacity is reached. (I did one on the unfinished side and three on the logo side of my box.)
- While the stars and candleholders continue to dry, lightly dip your paintbrush in the residual gold paint and run it along the edges of your dried flowers. Add as much or as little as you like in thin coats, and let dry. You can also lightly skim the stems of your pumpkins if you want some extra sparkle. It will take about 5-10 minutes to dry, so move on to the next steps while you wait.
- Iron your scrap paper if needed to remove the wrinkles. Then, cut your scrap paper into sections for the place settings. Mine were about 4 inches by 4 inches.
- Working quickly and carefully, light a candle and lightly singe the edges of your paper squares. I quickly lit the edges on fire and immediately blew them out over our sink - it really wasn't as complex or dangerous as it might sound. Then use your Sharpie to write your guests' names, spooky or playful sayings, or Halloween greetings on the singed cards.
- Lightly rinse and scrub your pumpkins, especially if you picked them directly on the farm. Pat dry.
- Lay out your lace tablecloth or table runner, then add your biggest pumpkins to the center of your Halloween tablescape. To add some whimsy and a spooky texture, you can bunch the fabric and rest the pumpkins on it to secure the raised portions. Then add your upcycled candleholders with the taper candles.
- Add your smaller pumpkins and votives, then sprinkle your cardboard stars and moons over the Halloween centerpiece, reserving a few to hang, if desired. Make sure none of the cardboard has landed inside the votives, which hopefully goes without saying.
- Set the table, and then style your gold-tipped dried flowers on each place setting. I tucked the roses into condiment bowls and left the longer-stemmed flowers loose on the plate. Add your place cards.
- Finally, and optionally, lightly glue or tape the thread to your reserved cardboard stars and crescent moons. Secure the free end to your chandelier, taking time to make sure that none of the cardboard is positioned over the top of or close to the taper candles. We are not trying to burn the house down, y'all.
- Light your candles, and let the magic begin!
Notes
* If you're in a hurry, use some Goo Gone to speed along the process of removing your labels, and spray paint your bottles solid gold or gold ombre in a well-ventilated area.
** If you're in a hurry, use a decorative star and/or moon hole punch, and opt for lightweight cardboard that's plain on both sides. You'll likely only need one quick coat of paint. Lettering will take more work to cover.
If you enjoyed Elegant Halloween Tablescape with Upcycled Decorations, you might also enjoy:
20 Zero Waste Halloween Decoration Ideas
What Can I Compost From Halloween?
Fun & Low Waste Halloween Trick-or-Treating
About the Author

Reese Moore
Reese Moore is a photographer, content creator, and pickle connoisseur who divides time between Charleston and Lake Lure. When she’s not behind the lens shooting stunning images for Reese Moore Photography, Reese loves to spend her time wandering the woods with her dog Gatsby or adventuring with her husband Logan in their Airstream Basecamp.