Easy DIY Christmas Table Decorations: Upcycling Ideas for an Eco-friendly Holiday
Looking for an eco-friendly and low waste DIY Christmas tablescape? Check out these amazing yet achievable DIY Christmas table decorations that you can recreate with things you probably already have at home. It’s simple yet gorgeous and perfect for a stress-free, eco-friendly holiday.
Raise your hand if you’re forever feeling both short on time and waging war against clutter. Hello, it is me, your favorite hot mess express.
As I write this, I’m eyeing a pile of Halloween decorations that are now actively haunting our home and somehow have not quite made it back up into the attic despite the fact that we’re now well into November. Sigh. We are those neighbors.
I absolutely love holidays, and I obsessively and enthusiastically throw myself into decorating for all of them. I love entertaining family, creating a little magic for the kids, and just generally spreading cheer. However, I loathe the time it takes to take everything down and cram it back into whatever cringe-worthy heap of clutter from whence it came.
Fun & Simple DIY Christmas Table Decorations
I set out to create DIY Christmas table decorations that would tick off several key boxes for me:
- Affordable | I wanted to come up with some creative upcycling ideas for anyone short on cash or time.
- Easy | They must also be easy Christmas table decorations; life is complicated enough without an 80-step Martha Stewart DIY that first requires growing an entire citrus tree from heirloom seeds harvested by elves or some such nonsense.
- Free From Clutter | This eco-friendly holiday tablescape must not create more clutter. I wanted to reuse, regift, or responsibly dispose of almost every item.
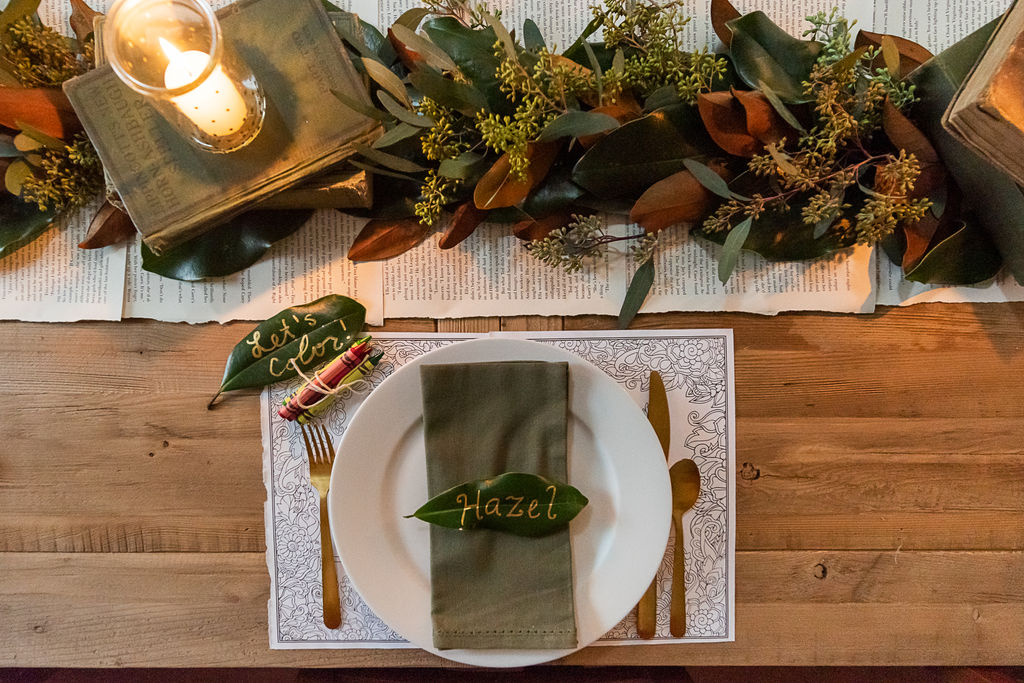
- Fun For Kids | I wanted these DIY Christmas table decorations to include an engaging, experiential element for kids.
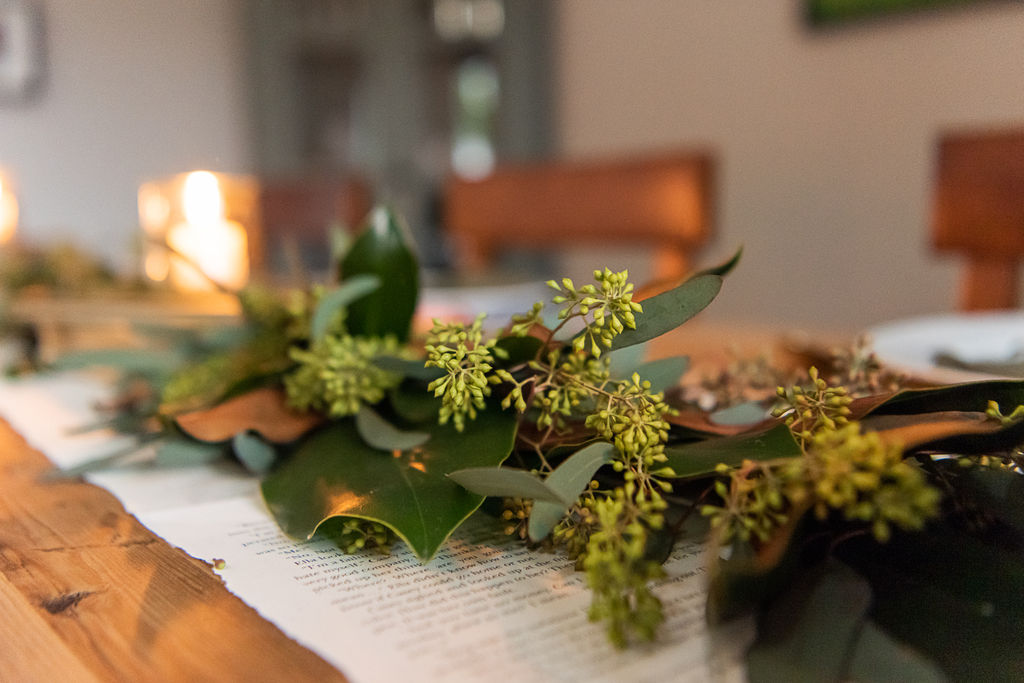
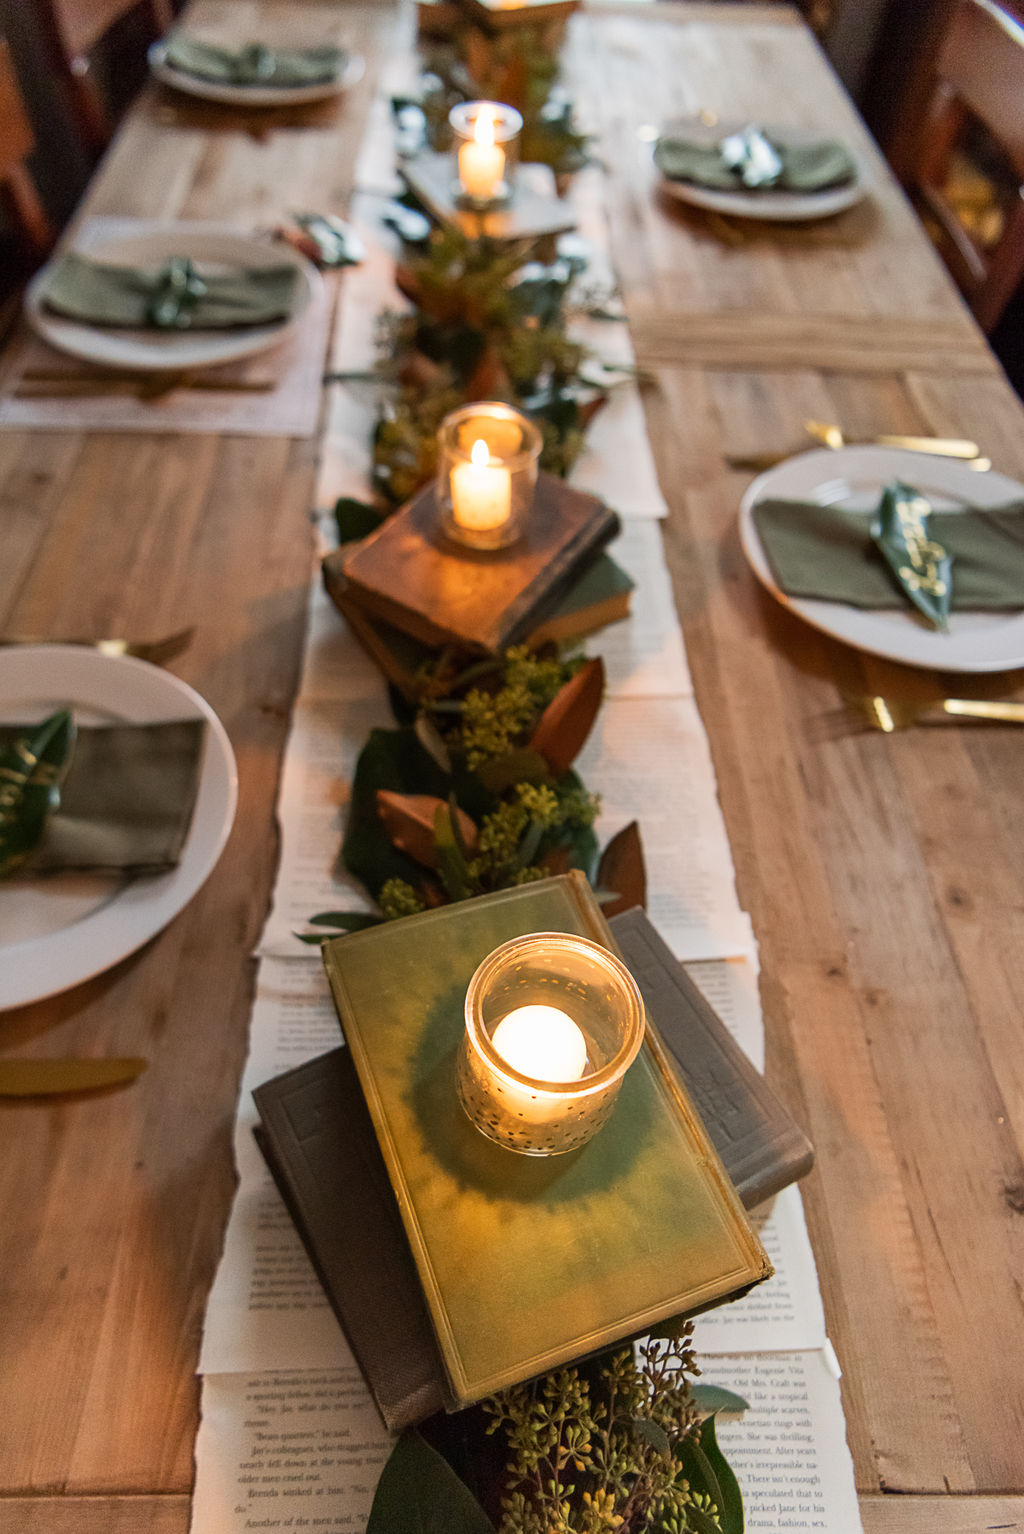
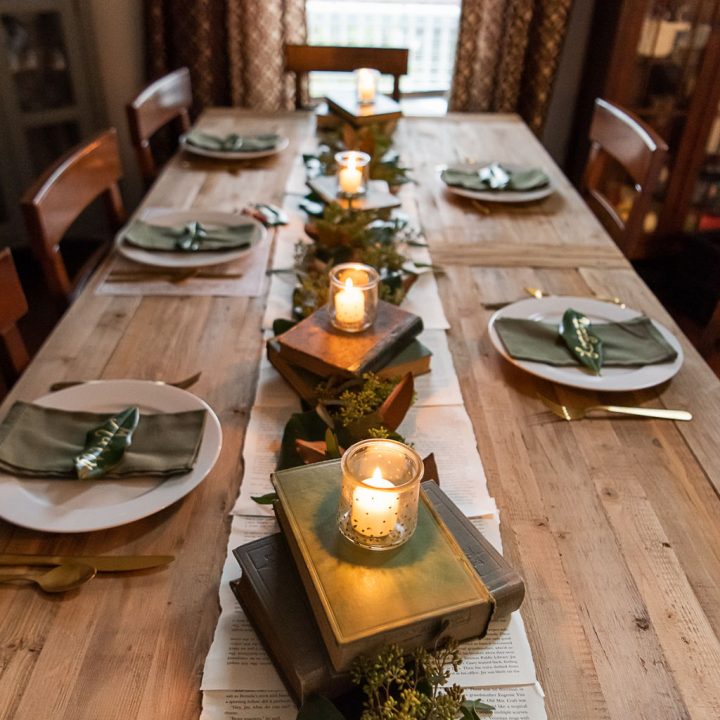
Inspiration struck pretty much immediately as I carried groceries into the house. We live in Charleston, South Carolina, and we have a magnolia tree in the front yard. Magnolia trees have broad, glossy green leaves with a velvety rust-colored underside that makes them a favorite Southern decor material for weddings and holiday garlands in the Lowcountry. Why not integrate something from the front yard for a show-stopping garland?

Don’t Have Magnolias In Your Area?
I love foraging and using materials that are local to my area, but you could absolutely recreate these DIY Christmas table decorations with different plants that thrive wherever you live. Loquat leaves are a similar size and would also work well for the place cards. Boxwood and pine would make equally beautiful garlands. And a variegated pittosporum (a popular hedge choice) would be stunning.
If you need to supplement your garland material (don’t harvest so much you kill your magnolia tree, y’all), try to choose something that can be repurposed or dried easily, such as baby’s breath or eucalyptus.
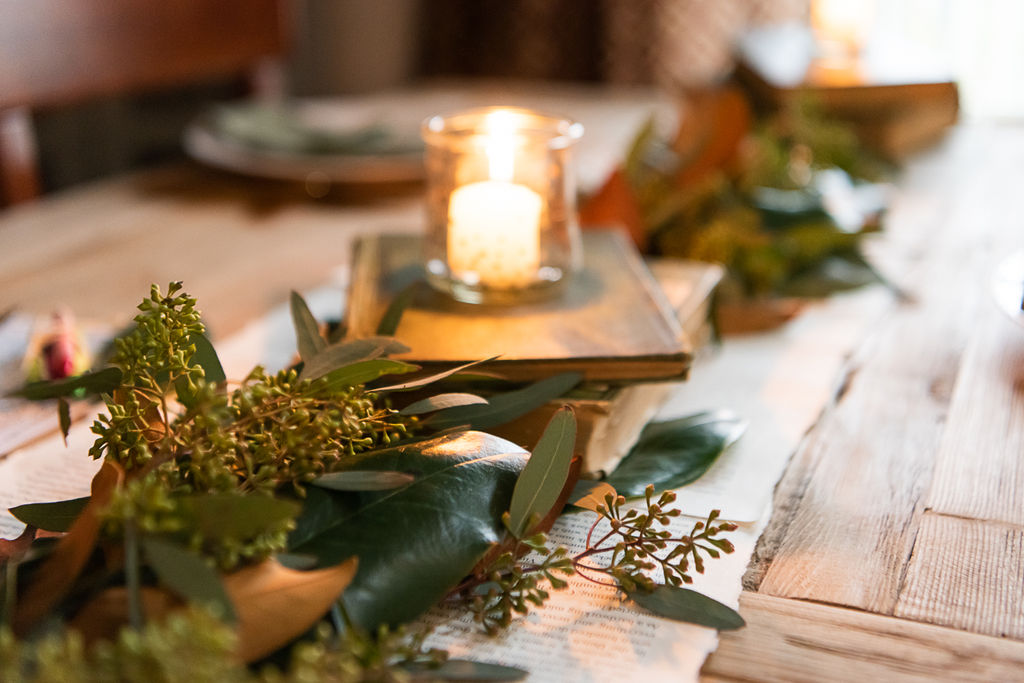
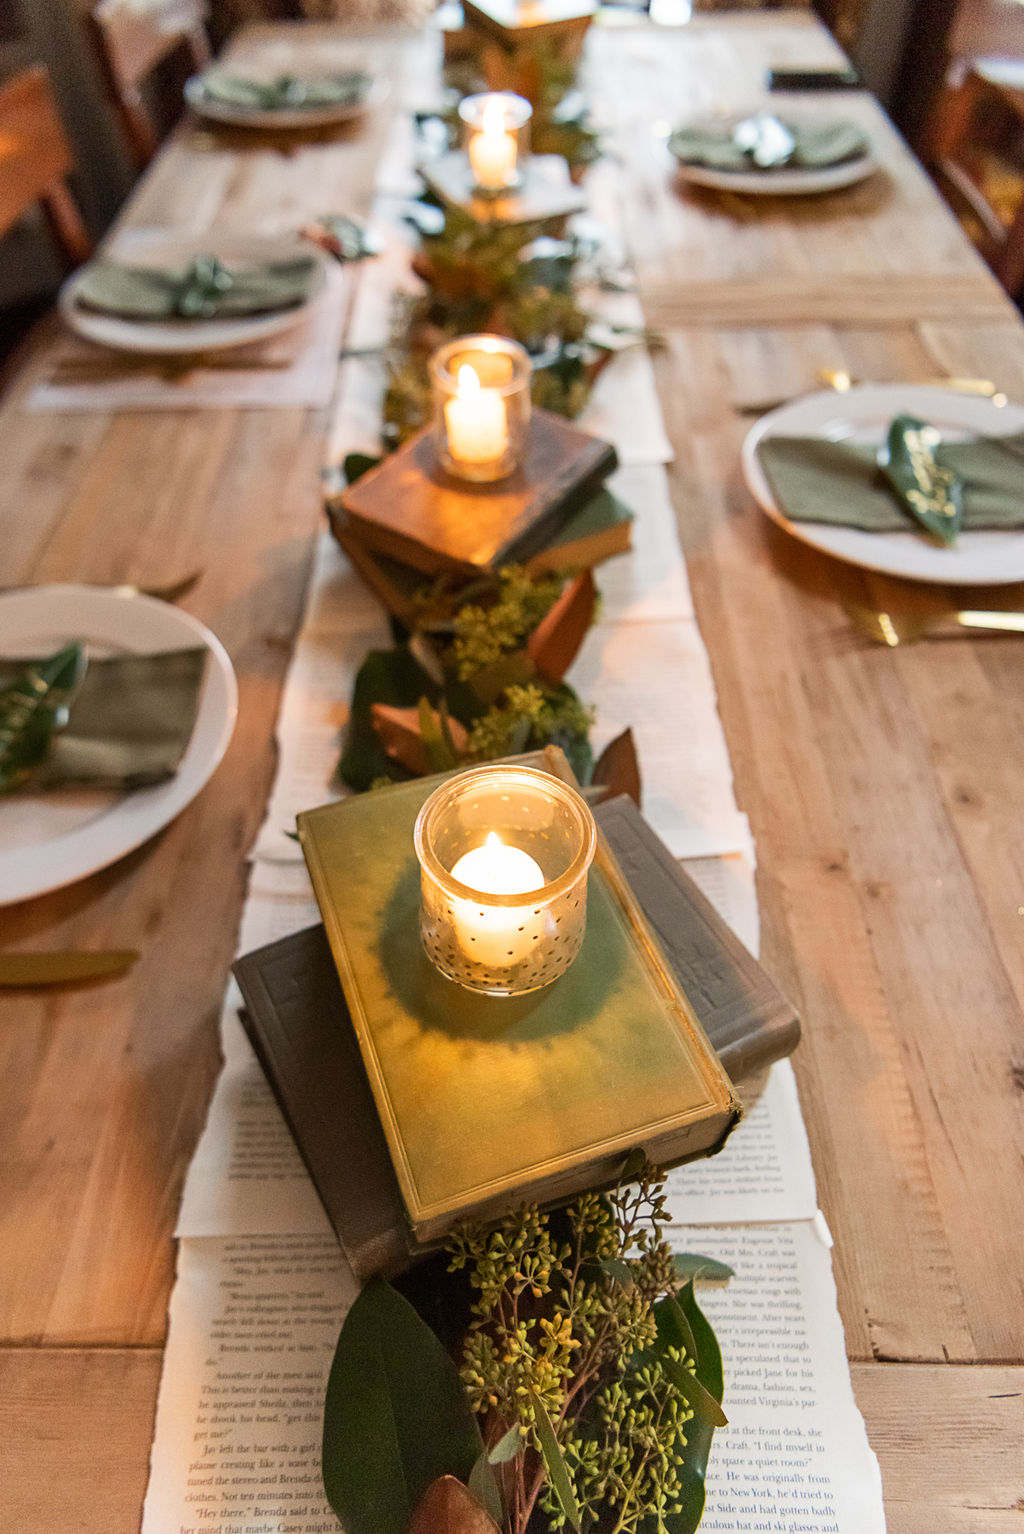
Repurposing Books For a DIY Christmas Tablescape
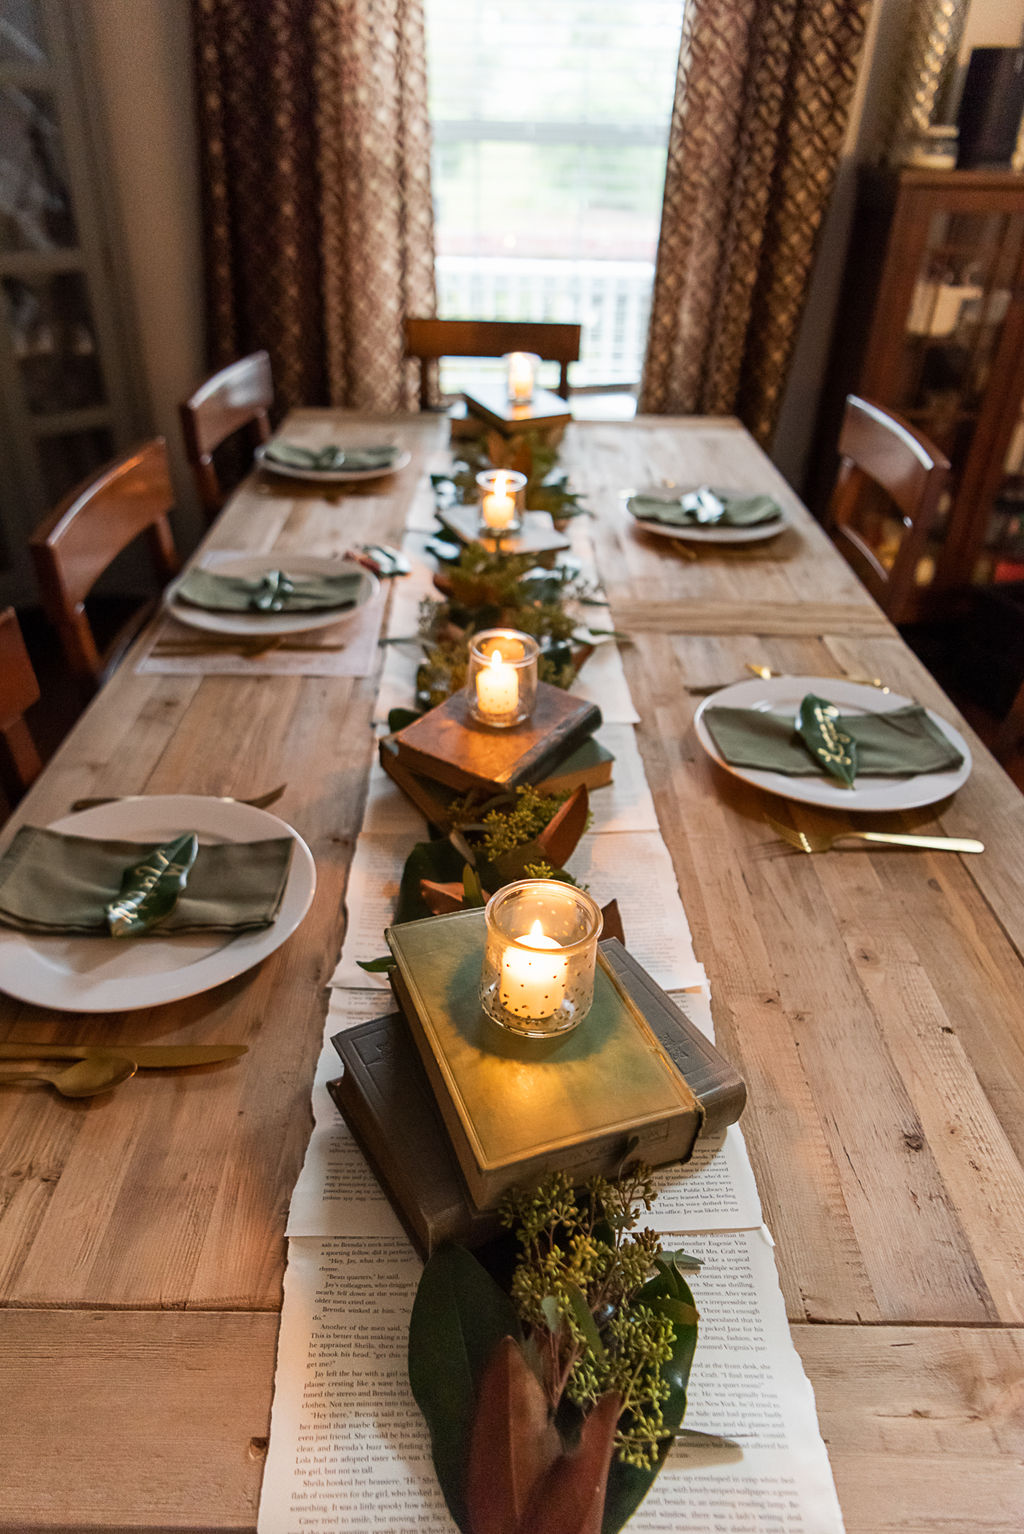
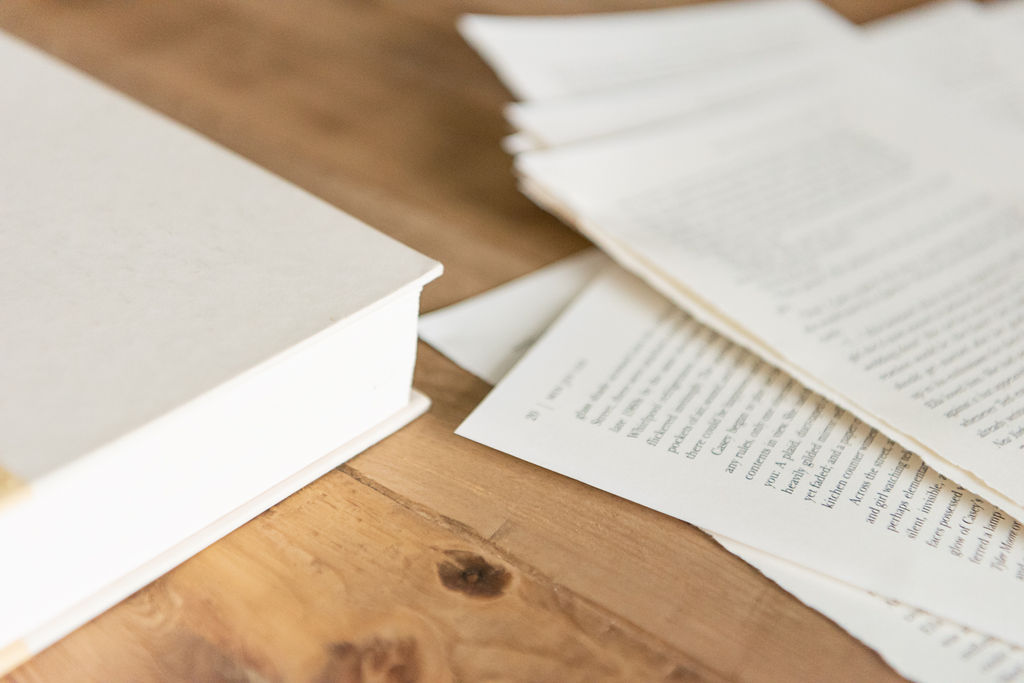
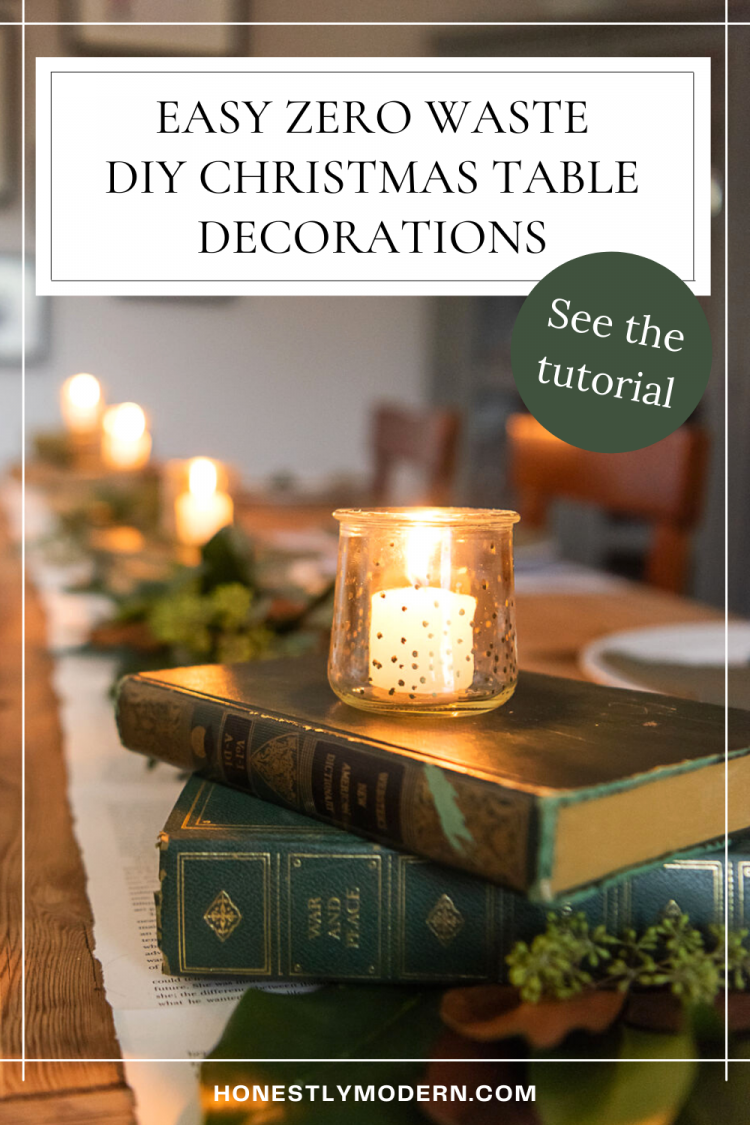
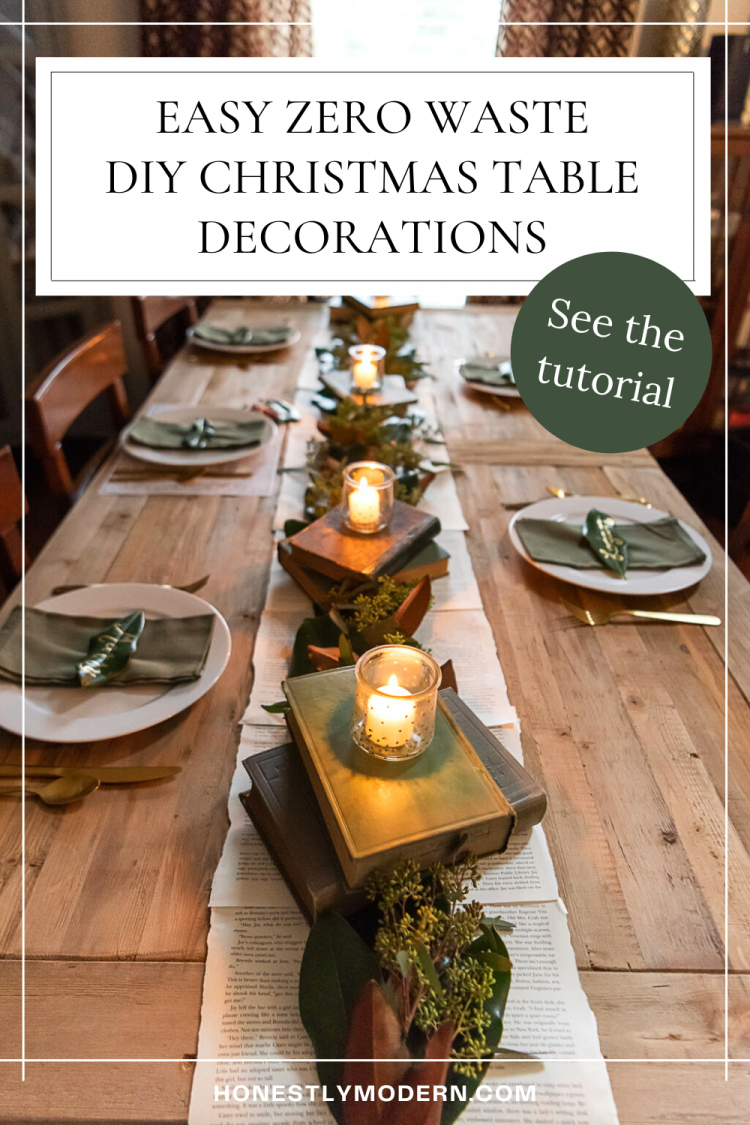
I’ve also been fixating on how many books are thrown away each year and piling up in thrift stores, so I’ve been itching to utilize some unwanted novels as creative crafting material. For this Christmas tablescape, I used vintage books to create depth and individual book pages as a DIY table runner.
Note: I highly recommend making sure your table runner book pages do not contain racy love scenes. The first book I picked for this DIY would have made for quite a scandalous and awkward conversation starter.
Let’s dive into the details.
Recommended Items for DIY Christmas Table Decorations
There are so many options to create DIY Christmas table decorations. Here are a few of my favorites and the ones I used for this DIY Christmas tablescape.
This post contains affiliate links.
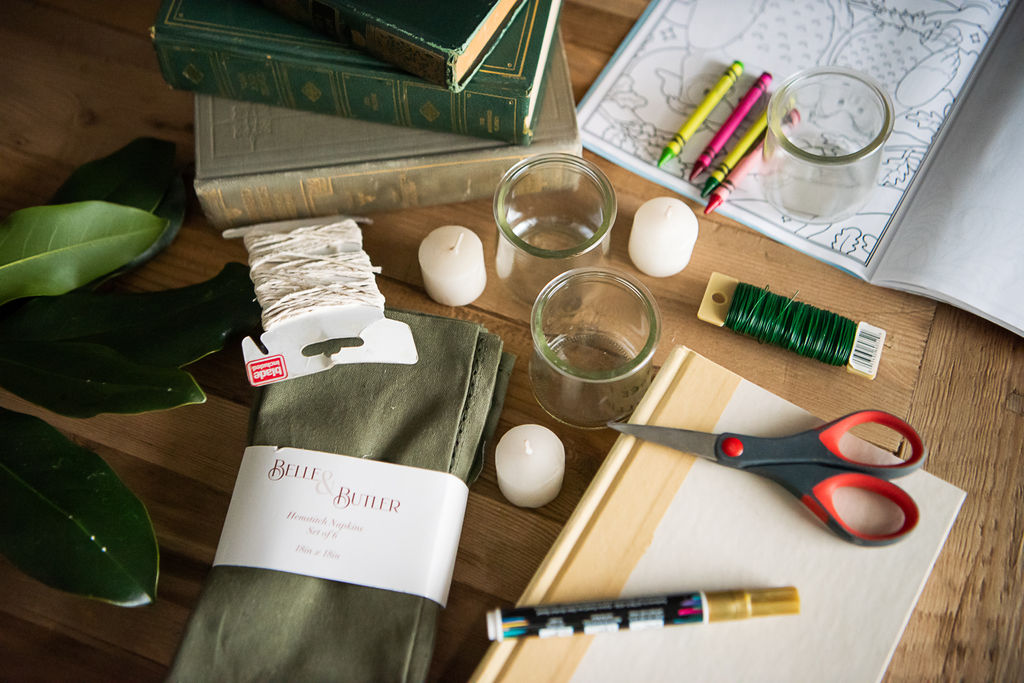
Crafting Materials
- Goo Gone
- Floral wire (or any stiffer but easily trimmed wire)
- Cotton or hemp twine
- Tape
- Gold paint pen
- Crayons, markers, or colored pencils for kids’ place settings
Upcycling Ideas
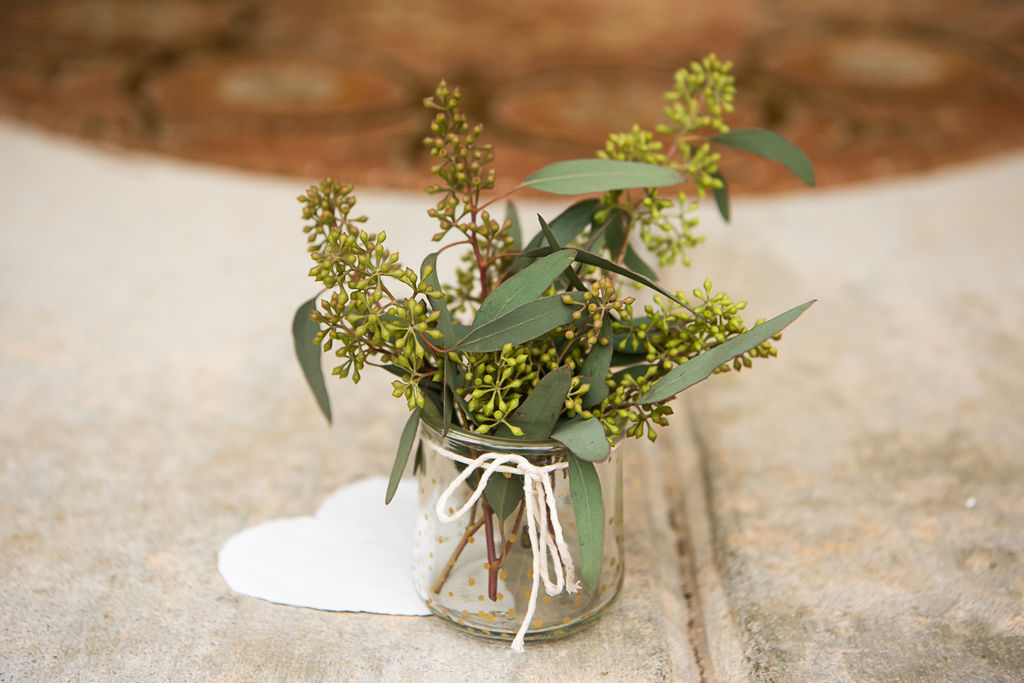
- Glass jars or Oui Yoplait Pots
- Vintage books from the thrift store (or any books covered with decorative paper, tissue paper, or upcycled wrapping paper)
- One larger book to disassemble for table runner
- Coloring book pages
- Clusters of greenery (with stems) for garland centerpiece
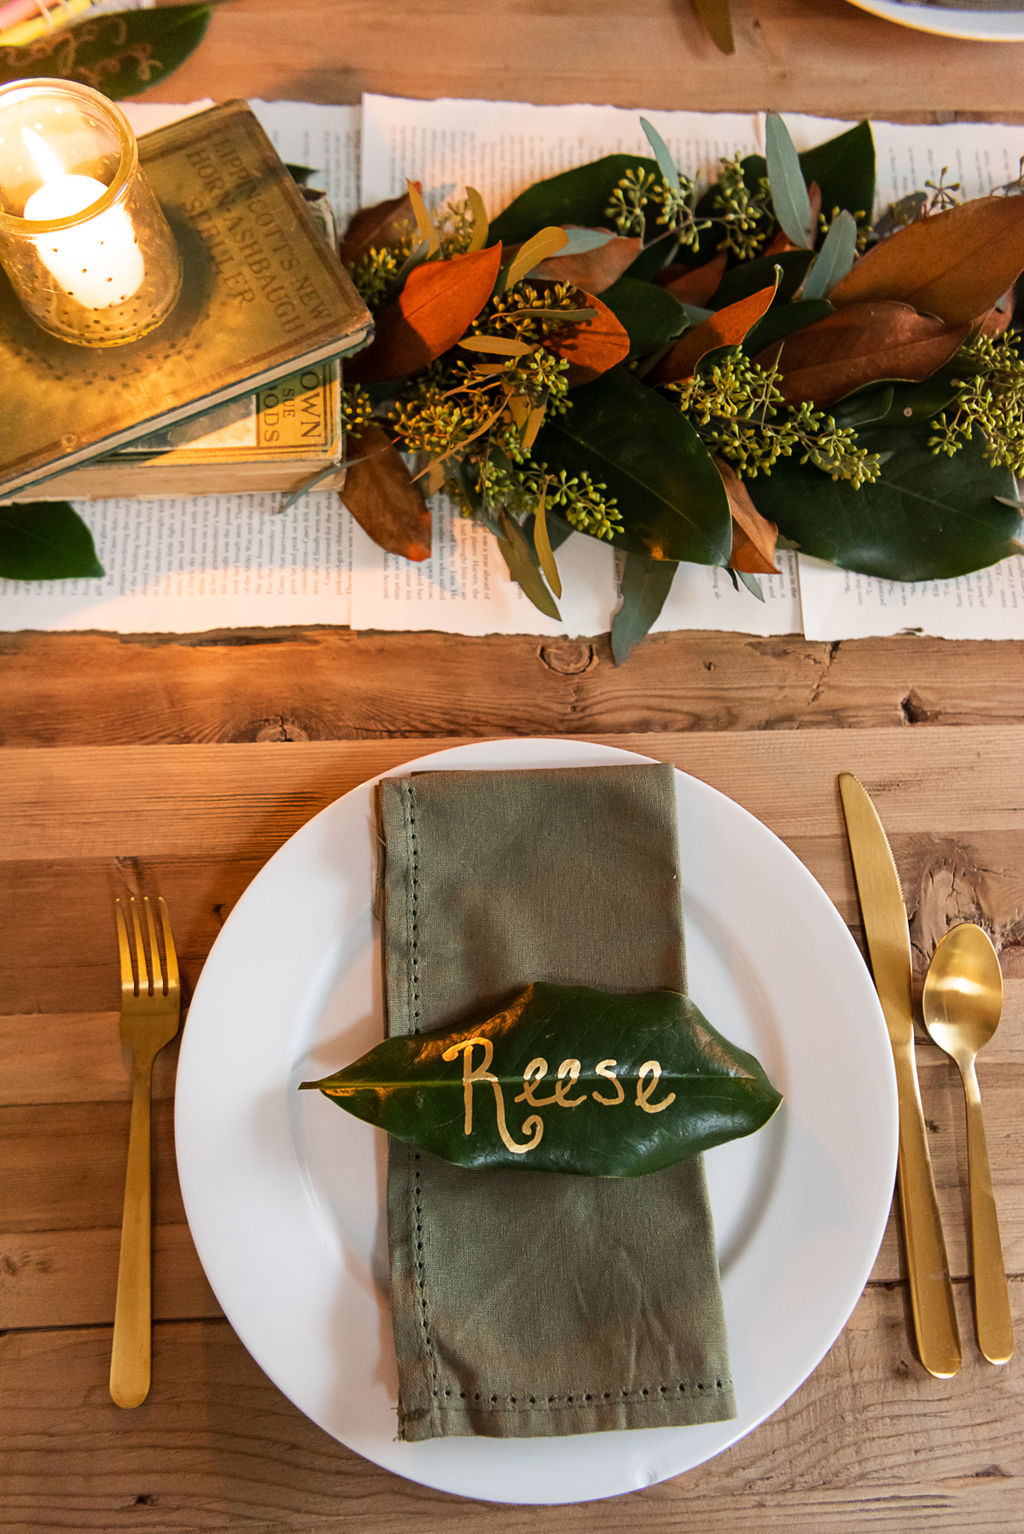
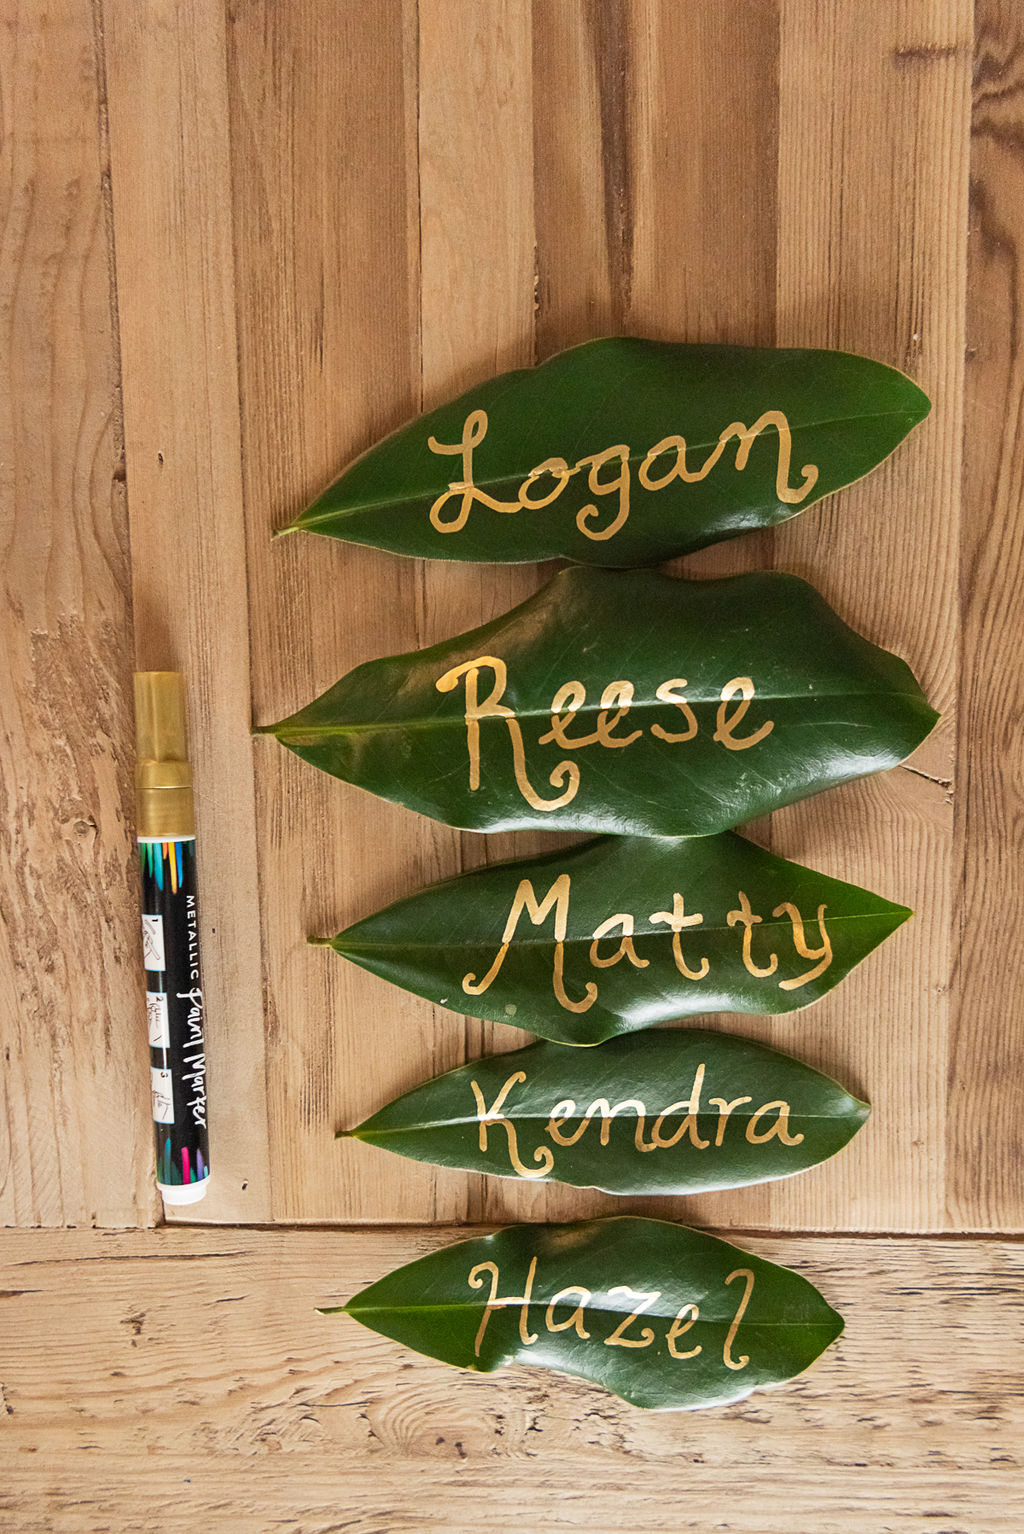
- Large leaves for place cards
Place Setting Items
- Tea light candles (without tins or cups to create less trash, if you can find them)
- Cloth napkins
- Dinner plates or china (you can often buy an entire set of fancy china for a few dollars at a thrift store, which you can keep or donate afterward)
- Silverware
Creating Your DIY Christmas Table Decorations from Upcycled Items
I’ve laid out the steps I took to prepare this DIY Christmas tablescape. Use it as a guideline if you’d like, but always feel free to make it your own with things you already have on hand.
Prepare Upcycled Votive Jars
Remove any labels from your jars or yogurt pots using the Goo Gone. Then wash and let dry, or use a hairdryer to speed this part along.
Decorate Upcycled Votive Jars
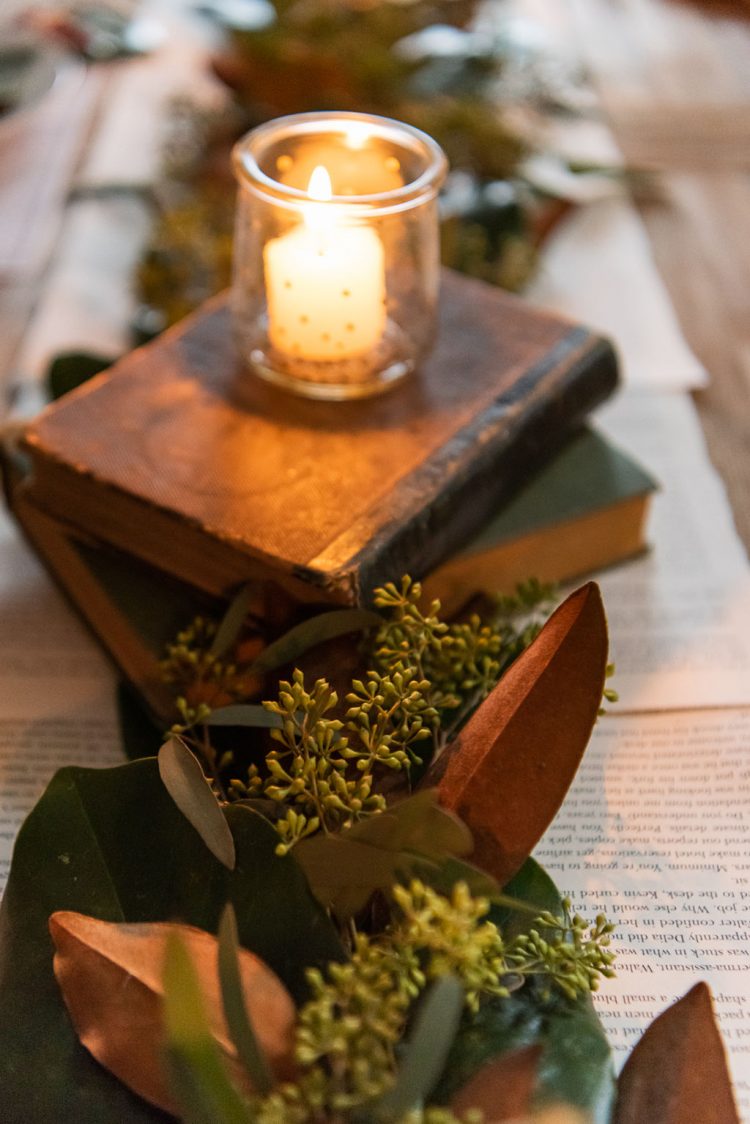
Once your jars are dry, decorate them as desired with your gold paint pen. You can also tie a ribbon around them, spray paint them, or etch the glass if you’re so inclined. When the paint has dried, place a votive candle in each jar and set it aside.
Plan Your Table Runner
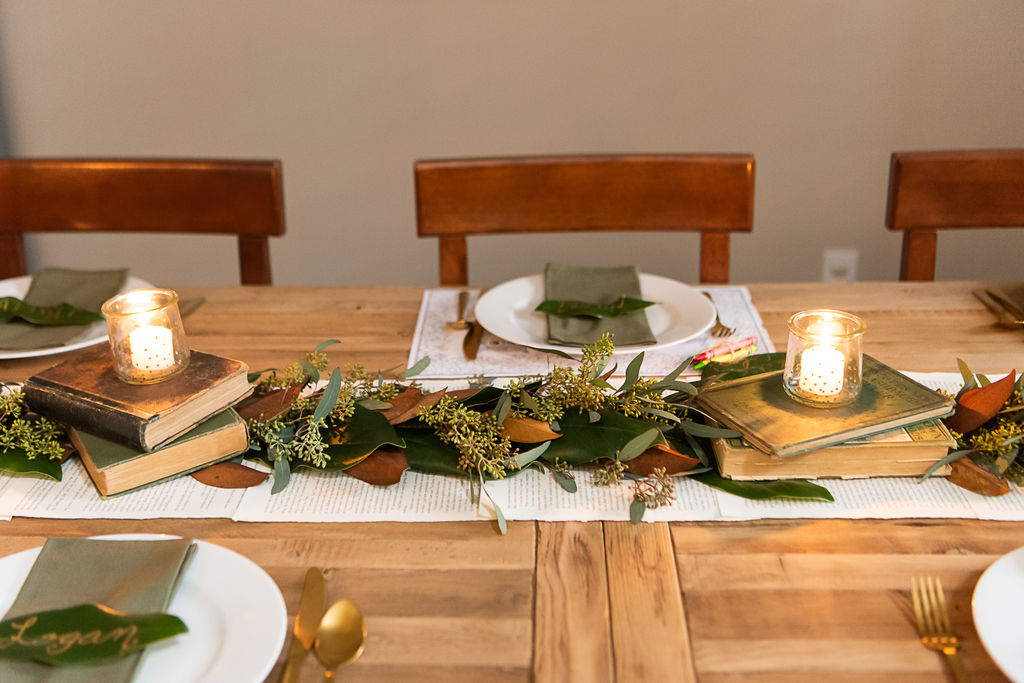
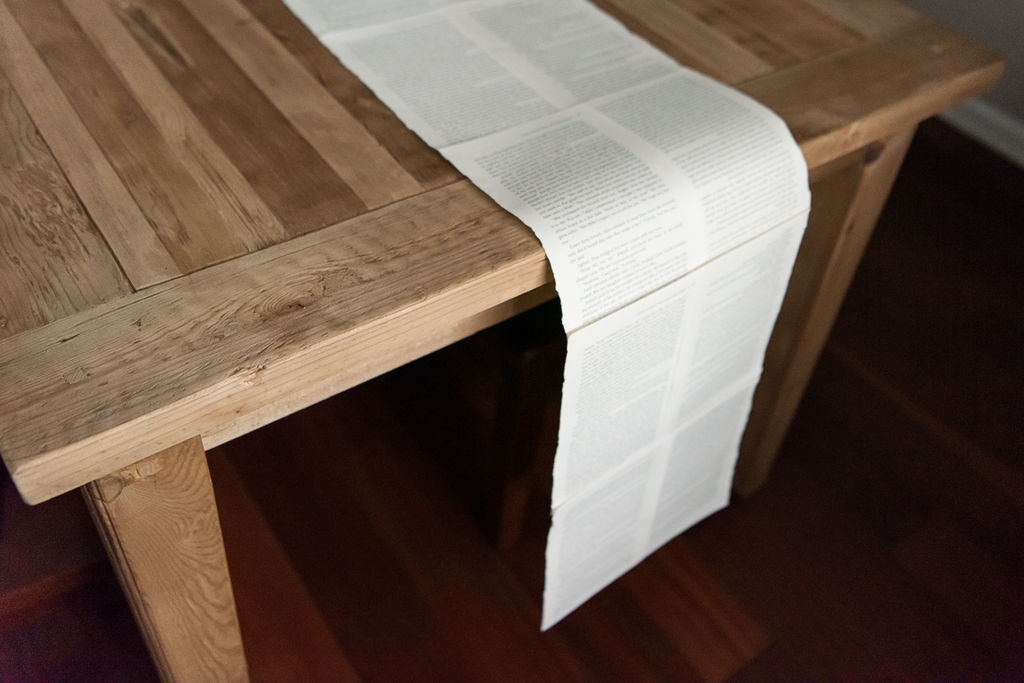
Rip some pages out of the book you’ve designated for the table runner. Lay the pages out in the center of your table to decide the best configuration for its width, remembering that you’ll need to account for the plates and place settings as well.
Mine was a farm table, so two pages placed side by side lengthwise was the ideal width. I chose to arrange them with the torn edges to the outside for a softer look. Then decide if you’d like your table runner to drape out over the sides of your table or fit the tabletop’s length.
Create Your Table Runner
Tape your book pages together to make your table runner, remembering you’ll flip it over so that the tape side doesn’t show. (If your table runner is not draping over the sides, you may not need much tape, if at all.) This will take you only a few minutes.

Prepare Leaf Name Cards
Use a damp cloth to wipe the leaves you’ll be using for your place cards. Let dry for a moment, then use the paint pen to write your guests’ names.
Create The Garland
Time to make your garland! This is going to be the most time-intensive part of this DIY. Measure your string or twine out to the desired length of your garland. If you’re short on time, remember that you can easily do shorter lengths of garland to fit between the artfully arranged vintage books instead of one that runs the full table.
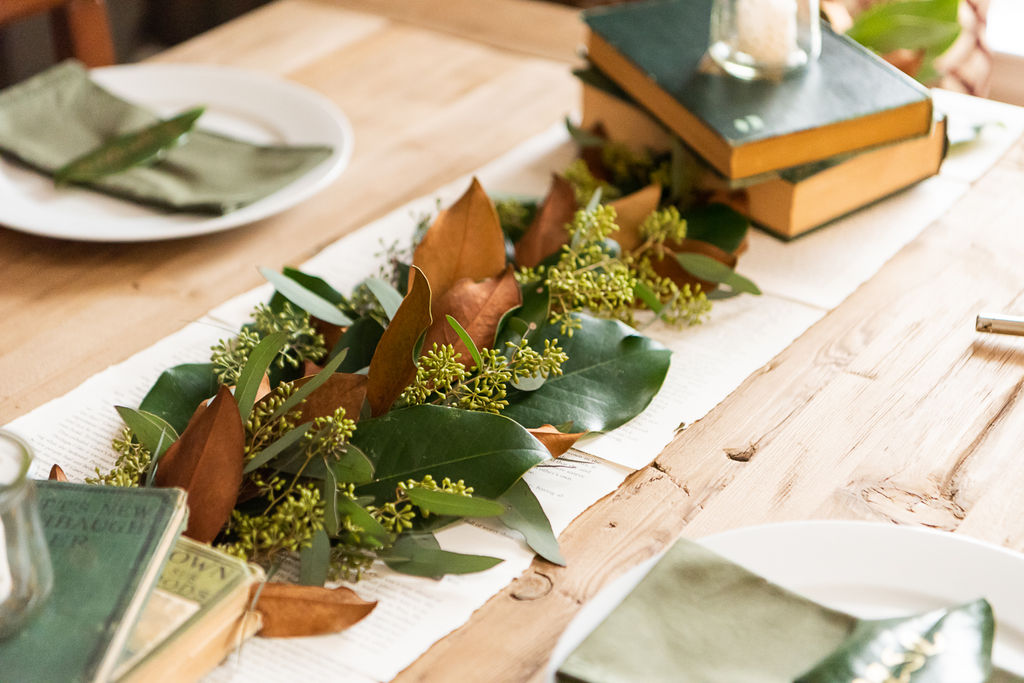
Gather small sections of greenery by the stems and secure them by twisting the wire around the stems and then wrapping it around the twine. Layer each section over the section before it to hide any exposed wire or twine. Repeat this process until you’ve made your garland the desired length, remembering that you can always camouflage any bare spots when the tablescape is done. (Don’t obsess over this step.)
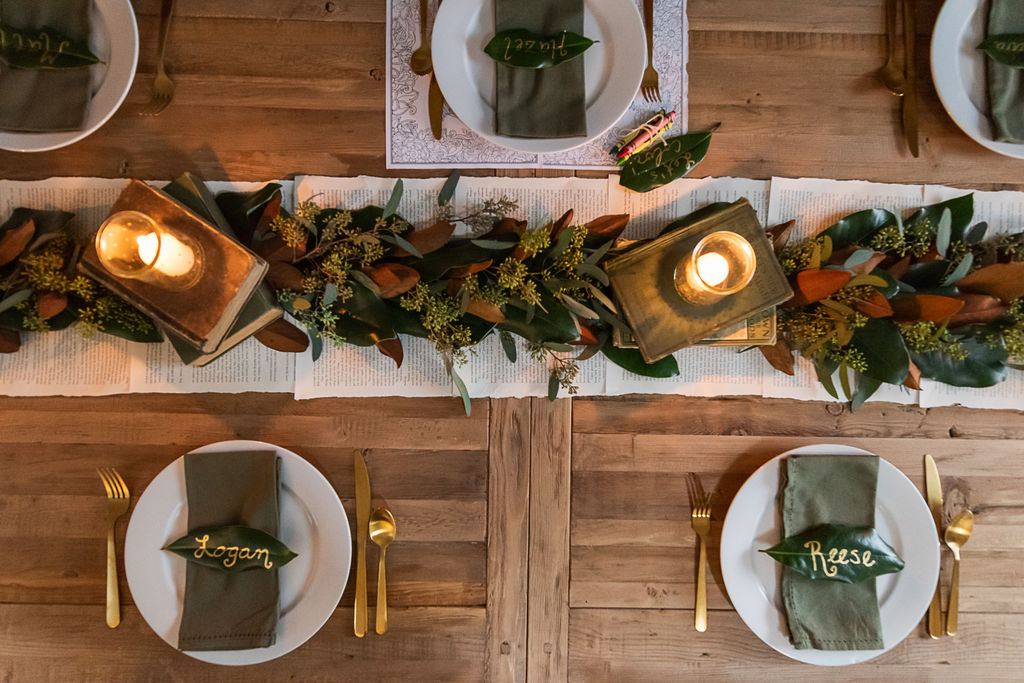
Arrange Vintage Books
Add your vintage books or recovered books from your private library in artful piles along your table, keeping in mind that people will likely want to be able to easily see over your centerpieces and converse.
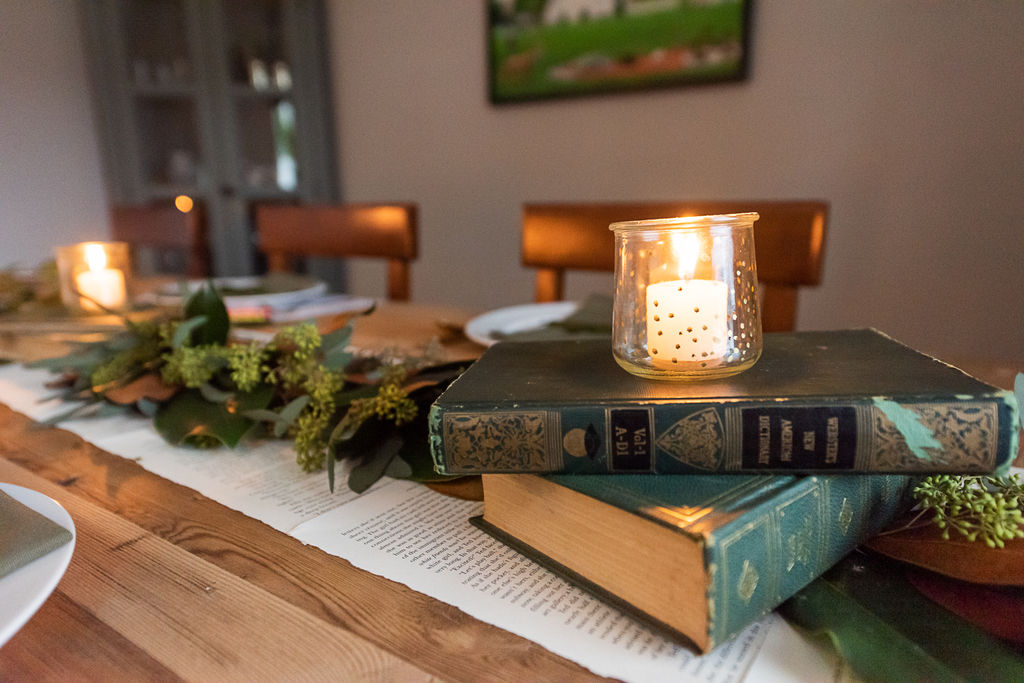
Place Votive Holders
Place your glass votive holders on your books, and fill in any bare or weak spots on your garland by tucking in extra leaves.
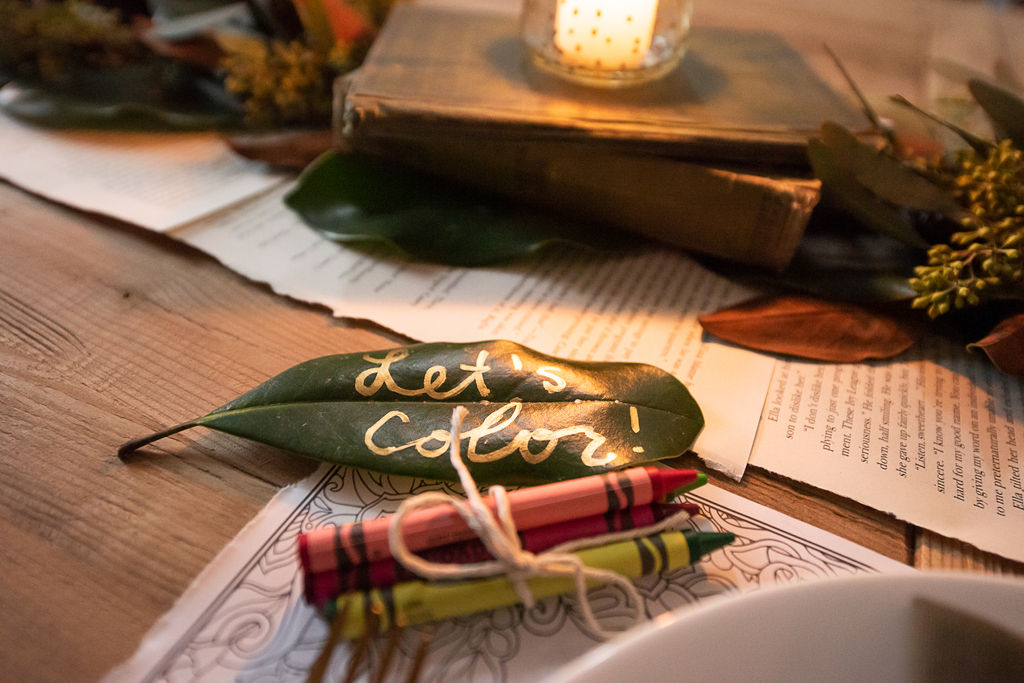
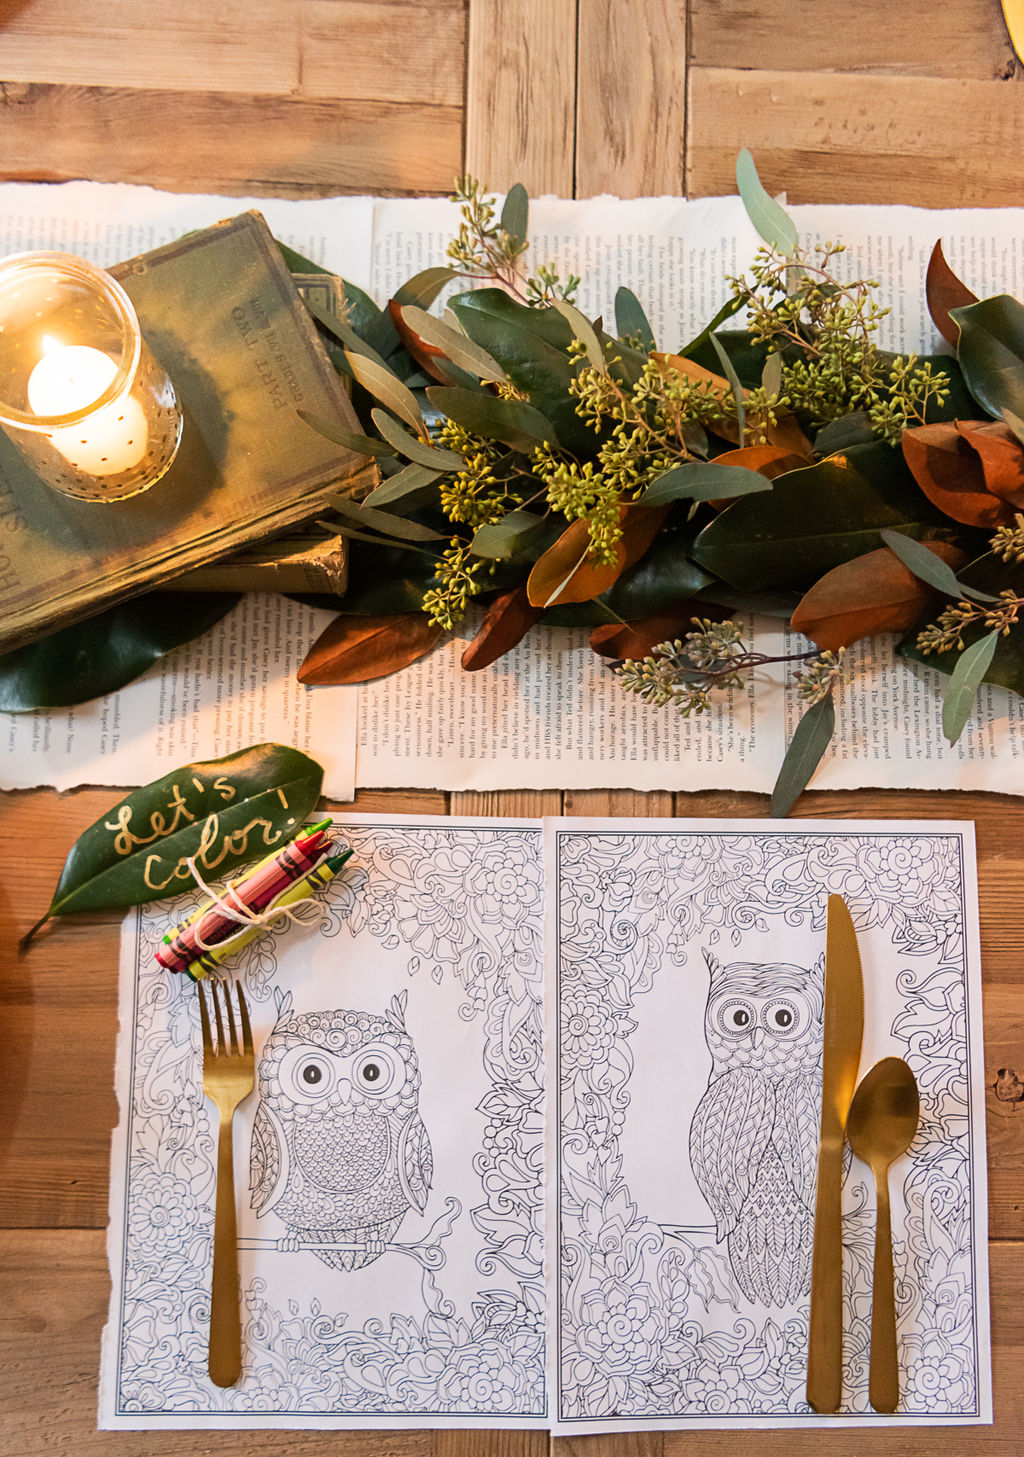
Create Kids’ Coloring Placemats
Tape together the coloring book pages for the kids’ placemats and add the crayons in a bundle of twine or extra glass yogurt pot.
Set the Table
Last but certainly not least, set your table. Add the place cards, light your candles, and pour yourself a glass of wine. You did it!

Eco-Friendly Tips to Dispose of Your DIY Christmas Table Decorations
After your evening of festive holiday fun, it’s time to responsibly dispose of your DIY Christmas table decorations (or store what you can use again in the future).
Blow out the candles and reserve them for another use. Add the book pages to the recycling bin or the compost pile. So long as you didn’t tear out any pages from the vintage books, use them for decorations elsewhere or donate them to a thrift shop for another collector or DIY’er to cherish.
Save the silverware for another party or lend them to a neighbor who can use them for their gathering. You could also donate these back to a thrift shop or even offer them up in a Buy Nothing group. I bet they would get scooped up quickly, especially if you showed them the photos of the tablescape you created with them.
Reuse the jars at your next party, toss them in the recycling, or use them to organize office supplies. Alternatively, fill the jars with water and add some of the pre-wired sprigs of greenery and bows from your garland. Leave on your neighbors’ doorsteps for a random act of kindness.
Disassemble your garland and toss it in the compost, or enjoy it for a while by relocating it to your mantle or front entryway. If you used eucalyptus as filler, as I did, you can also make Eucalyptus Linen Spray or a Compostable Dried Eucalyptus Wreath.
Remove the tape from your table runner and toss it in the recycling. Return your vintage books to their shelves or donate them, toss the napkins in the laundry, and add the place cards to the compost pile. Add the coloring pages to your fridge or reuse them as wrapping paper for grandma’s gift. It’s as easy as that!
All photos from Reese Moore Photography.
About the Author

Reese Moore
Reese Moore is a photographer, content creator, and pickle connoisseur who divides time between Charleston and Lake Lure. When she’s not behind the lens shooting stunning images for Reese Moore Photography, Reese loves to spend her time wandering the woods with her dog Gatsby or adventuring with her husband Logan in their Airstream Basecamp.
Easy DIY Christmas Table Decorations
Create this easy and low waste DIY Christmas tablescape with things you likely already have at home. It's simple yet gorgeous and perfect for a stress-free, eco-friendly holiday.
Materials
- Glass jars or Oui Yoplait Pots
- Vintage books from the thrift store (or any books covered with decorative paper, tissue paper, or upcycled wrapping paper)
- One larger book to disassemble for table runner
- Coloring book pages
- Clusters of greenery (with stems) for garland centerpiece
- Large leaves for place cards
- Tea light candles without metal tins (to create less trash)
- Cloth napkins
- Dinner plates or china (you can often buy an entire set of fancy china for a few dollars at a thrift store, which you can keep or donate afterward)
- Silverware
Tools
- Goo Gone
- Floral wire (or any stiffer but easily trimmed wire)
- Cotton or hemp twine
- Tape
- Gold paint pen
- Crayons, markers, or colored pencils for kids’ place settings
Instructions
- Remove any labels from your jars or yogurt pots using the Goo Gone. Then wash and let dry, or use a hairdryer to speed this part along.
- Once your jars are dry, decorate them as desired with your gold paint pen. You can also tie a ribbon around them, spray paint them, or etch the glass if you’re so inclined. When the paint has dried, place a votive candle in each jar and set it aside.
- Plan your table runner. Rip some pages out of the book you’ve designated for this purpose. Lay the pages out in the center of your table to decide the best configuration for its width, remembering that you’ll need to account for the plates and place settings as well. Mine was a farm table, so two pages placed side by side lengthwise was the ideal width. I chose to arrange them with the torn edges to the outside for a softer look. Then decide if you’d like your table runner to drape out over the sides of your table or fit the tabletop’s length.
- Tape your book pages together to make your table runner, remembering you’ll flip it over so that the tape side doesn’t show. (If your table runner is not draping over the sides, you may not need much tape, if at all.) This will take you only a few minutes.
- Use a damp cloth to wipe the leaves you’ll be using for your place cards. Let dry for a moment, then use the paint pen to write your guests’ names.
- Time to make your garland! This is going to be the most time-intensive part of this DIY. Measure your string or twine out to the desired length of your garland. If you’re short on time, remember that you can easily do shorter lengths of garland to fit between the artfully arranged vintage books instead of one that runs the full table.
- Gather small sections of greenery by the stems and secure them by twisting the wire around the stems and then wrapping it around the twine. Layer each section over the section before it to hide any exposed wire or twine. Repeat this process until the desired length of your garland has been achieved, remembering that you can always camouflage any bare spots when the tablescape is done. (Don’t obsess over this step.)
- Add your vintage books or recovered books from your private library in artful piles along your table, keeping in mind that people will likely want to be able to easily see over your centerpieces and converse.
- Place your glass votive holders on your books, and fill in any bare or weak spots on your garland by tucking in extra leaves.
- Tape together the coloring book pages for the kids’ placemats and add the crayons in a bundle of twine or extra glass yogurt pot. Then set your table. Add the place cards, light your candles, and pour yourself a glass of wine. You did it!
Recommended Products
As an Amazon Associate and member of other affiliate programs, Honestly Modern earns from qualifying purchases.
-
 Goo Gone Adhesive Remover - 8 Ounce - Surface Safe Adhesive Remover Safely Removes Stickers Labels Decals Residue Tape Chewing Gum Grease Tar
 -
 Floral Wire, 110 Yards 22 Gauge Green Florist Wire, Flexible Green Wire Paddle Wire for Crafts, Christmas Wreaths Tree, Garland and Floral Flower Arrangements
 -
 Sharpie Oil-Based Paint Marker, Medium Point, 3-Count (Metallic Gold)