Simple DIY Macrame Easter Egg Bird Feeder
We love making the most of the things we already have at home, especially seasonal items that don’t get a lot of love much of the year. Bring out your plastic Easter eggs to make simple DIY macrame bird feeders with kids.
We haven’t yet put away our Easter eggs. They still have a few last jelly beans inside of them, and we plan to use them for these four super simple Easter egg DIY projects, including today’s little nugget.
Before we put them away, we decided to make our own DIY macrame Easter egg bird feeders. We have lots of birds in our yard making nests, eating all the bugs and worms, and soaking up some spring sun.
We made these DIY cardboard bird feeders a couple of years ago and saw so many cool birds grab a snack. It was really neat to see the wide variety of birds hanging out in our yard.

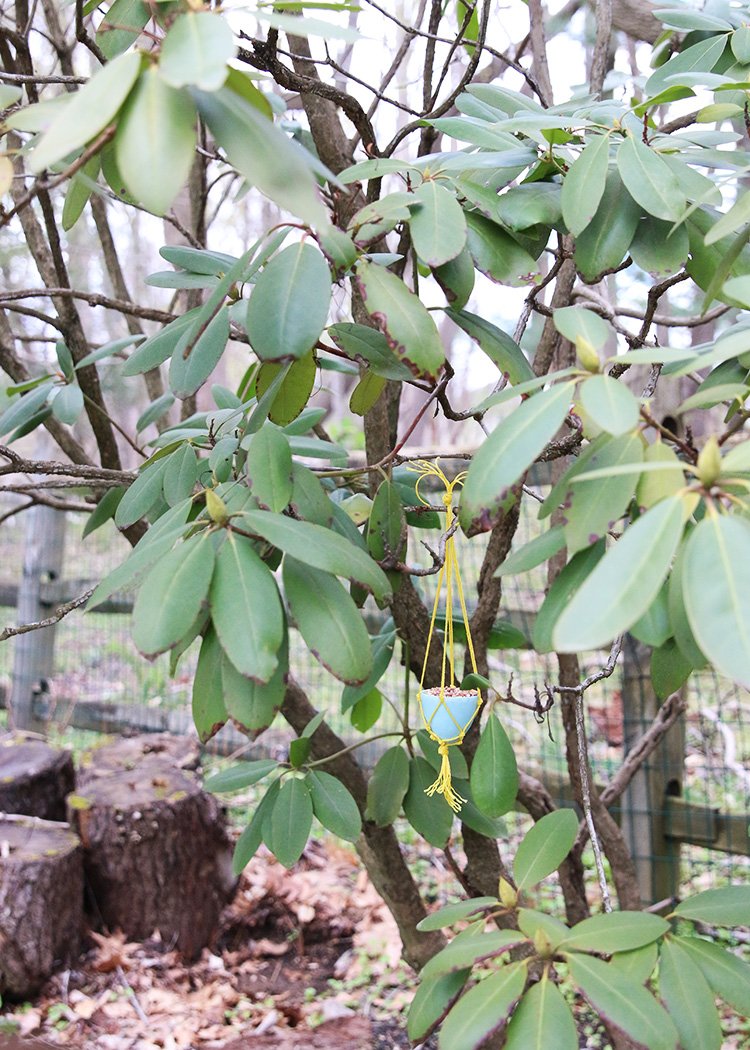
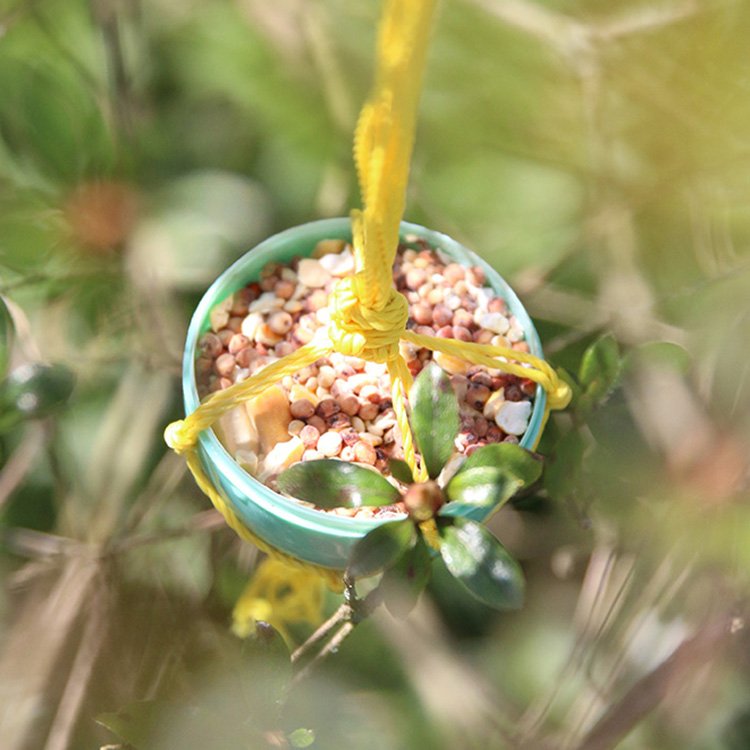
This year, we opted to make new bird feeders with the Easter eggs. We created really simple macrame hanging nets to hold each of the plastic Easter eggs. They truly are simple. I made each of these in under 10 minutes. The entire project may have taken 30 minutes from start to finish including gathering supplies and cleaning up.
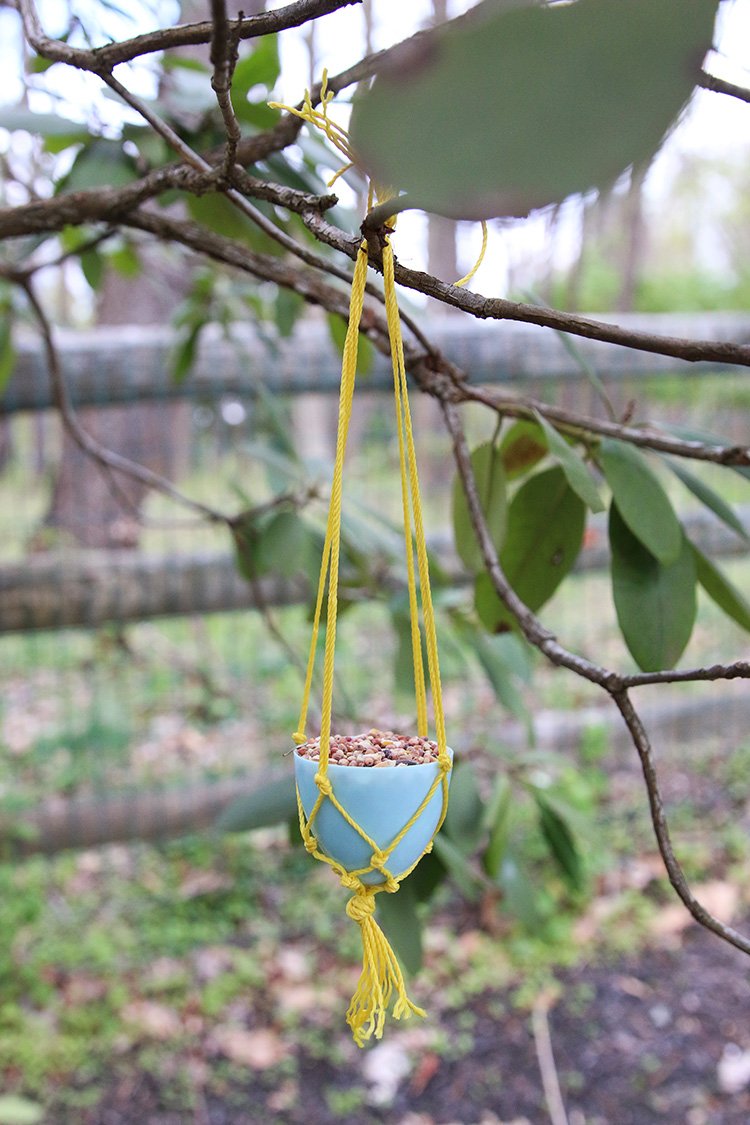
After we made our simple Easter egg bird feeders, we filled each egg with some bird seed and hung them around our yard. We chose a few of the smaller trees around our yard in which to hang each of our Easter egg bird feeders.
We also have lots of squirrel neighbors, so we tried to find places where the birds could get to the the feeders but they were not too accessible for the squirrels. Otherwise, the squirrels would certainly steal all those snacks before the birds had any chance of grabbing their fair share.
Spoiler Alert: Our first “secret hiding places” didn’t work out so well. We’re still looking for the right home for these little guys where squirrels won’t make a quick breakfast of them.

Macrame is a textile weaving technique that uses knots instead of stitches or knittings. It is an ancient art with deep roots in many different cultures. Macrame can be very intricate and complex, but our macrame DIY bird feeders have only 15 knots and are simple enough for many kids to do on their own. My five-year-old needed a little assistance tying the knots, but older elementary children can certainly complete this on their own.
These DIY macrame Easter egg bird feeders are super easy to make, and you probably already have all the supplies and tools you need at home. It’s a great projects to try with your kids while everyone is home under quarantine too!
I’ve included all the instructions below. If you try it, let me know how it goes! I love hearing how you bring our family ideas into your own homes.
Instructions To Make a Simple Macrame Easter Egg Bird Feeder
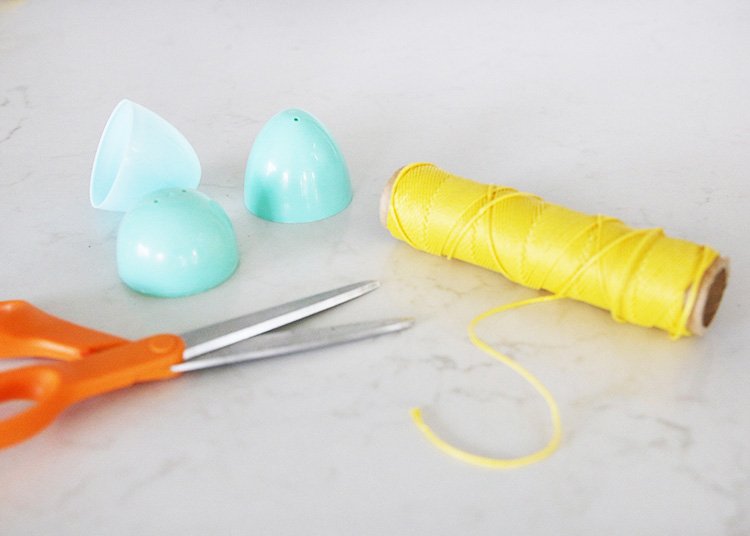
Step 1: Cut 8 pieces of twine or cord 18″ long each.
Step 2: Tie the 8 cords together in one big knot, about 1 inch from the end. Pull the knot tight to secure.
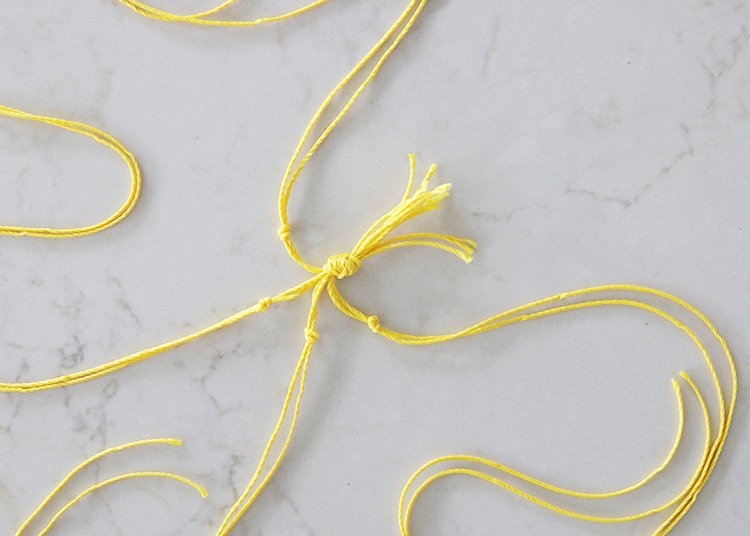
Step 3: Group the cords into 4 sets of 2 cords each. I tried to group them into cords that were side by side.
Step 4: Tie a knot in each set, 1/2″ inch from the big knot on the bottom.
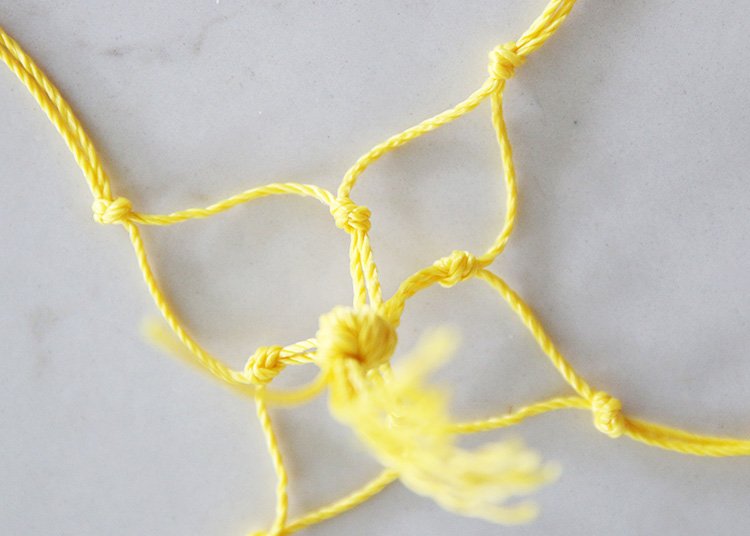
Step 5: Separate each set into new sets of 2, with cords that are next to each other. Tie them together approximately 1/2 inch above the first set of knots.
Step 6: Repeat for a third time (separating each set and tying side by side cords together to create new sets). Tie each new set of cords together about 1 inch away from the previous set of knots.
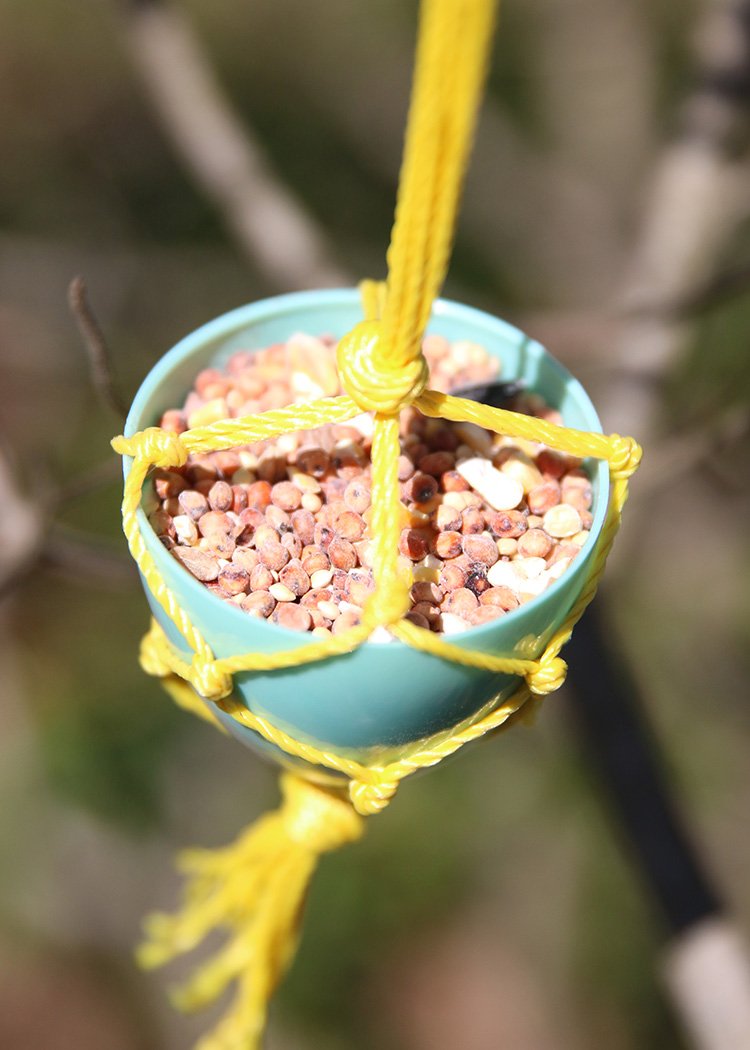
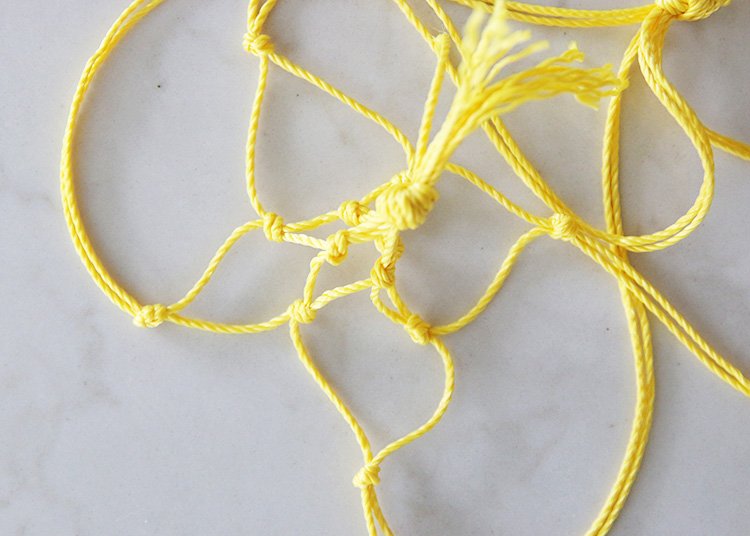
Step 7: Set the plastic Easter egg in the cupped net that was created by the sets of knots. Tie a knot with all eight cords just above the Easter egg to keep it secure inside the net.
Step 8: Tie all 8 cords together at the top to finish.
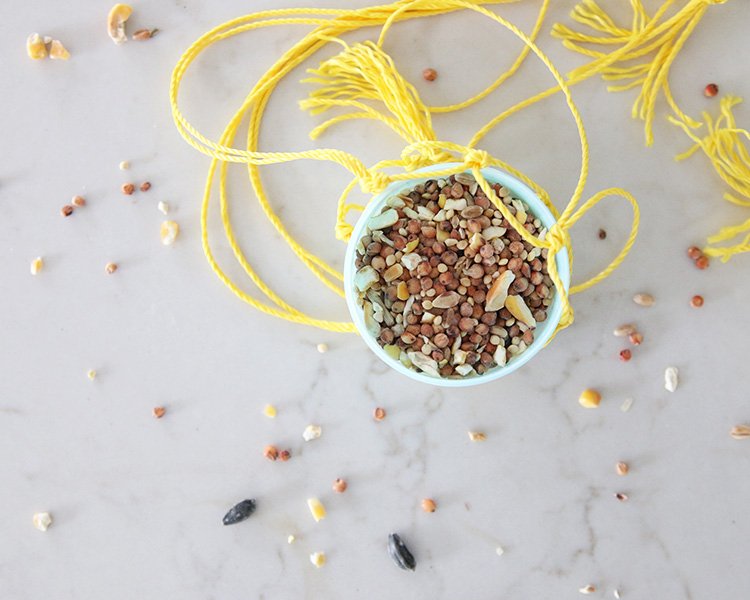
Step 9: Fill the Easter egg with bird seed and hang on a tree branch.
Step 10: Enjoy watching birds scarf down the snack!
Nothing about this DIY project needs to be particularly precise. We estimated lengths and distance between knots and did not measure specifically the first few times we made them. If knots are not in exactly the right places or not precisely the same distances apart, no worries. It will turn out just fine!
Also, this is not designed to be a bird feeder that will last for many months or years. This is just a fun project for families and kids to enjoy for a few days or a few weeks before putting the Easter eggs back in the closet until next season or trying one of these other fun Easter egg DIY projects.


Simple Macrame Easter Egg Bird Feeders
Materials
- Twine, string or thin rope to use as cords (about 144" of cords), cut into 8- 18" pieces
- 1 Plastic Easter Egg
- Tape Measure (optional)
Tools
- Scissors
Instructions
- Cut 8 pieces of twine/cord, 18" long each.
- Tie the 8 cords together in one big knot, about 1 inch from the end. Pull the knot tight to secure.
- Group the cords into 4 sets of 2 cords each. I tried to group them into cords that were side by side.
- Tie a knot in each set, 1/2" inch from the big knot on the bottom.
- Separate each set of cords into new sets of 2, with cords that are next to each other. Tie them together approximately 1/2 inch above the first set of knots.
- Repeat for a third time (separating each set and tying side by side cords together to create new sets). Tie each new set of cords together about 1 inch away from the previous set of knots.
- Set the plastic Easter egg in the cupped net that was created by the sets of knots.
- Tie all 8 cords together just above the egg to secure the egg inside the macrame net.
- Tie all 8 cords together at the top so you can hang on a branch in your yard
- Fill the Easter egg with bird seed and hang it on a tree branch.
- Enjoy watching birds scarf down the snack!
Notes
Note 1: Nothing about this DIY project needs to be particularly precise. We estimated lengths and distance between knots and did not measure specifically the first few times we made them. If knots are not in exactly the right places or not precisely the same distances apart, no worries. It will turn out just fine!
Note 2: This is not designed to be a bird feeder that will last for many months or years. This is just a fun project for families and kids to enjoy for a few days or a few weeks before putting the Easter eggs back in the closet until next season or trying one of these other fun Easter egg DIY projects.
Note 3: When hanging the bird feeders, do your best to keep them out of reach of squirrels. Otherwise, the squirrels will eat all the seeds before the birds have a chance to get near them.