3 Quick Fix Tutorials For Your Closet
While I have shared with you several of my DIY projects in the past, I occasionally make small mock-ups to things that don’t quite work for me that I haven’t shared with you. Today, I wanted to share with you three super simple quick fixes that might come in handy for those little issues with fit or function in your clothes. These are three very small (and easy!) changes (no sewing machine required) that might make the difference between a piece being fabulous or forgotten. For me, these changes took these clothes from barely wearable to wonderful. They helped me Get ReDressed!
Project 1

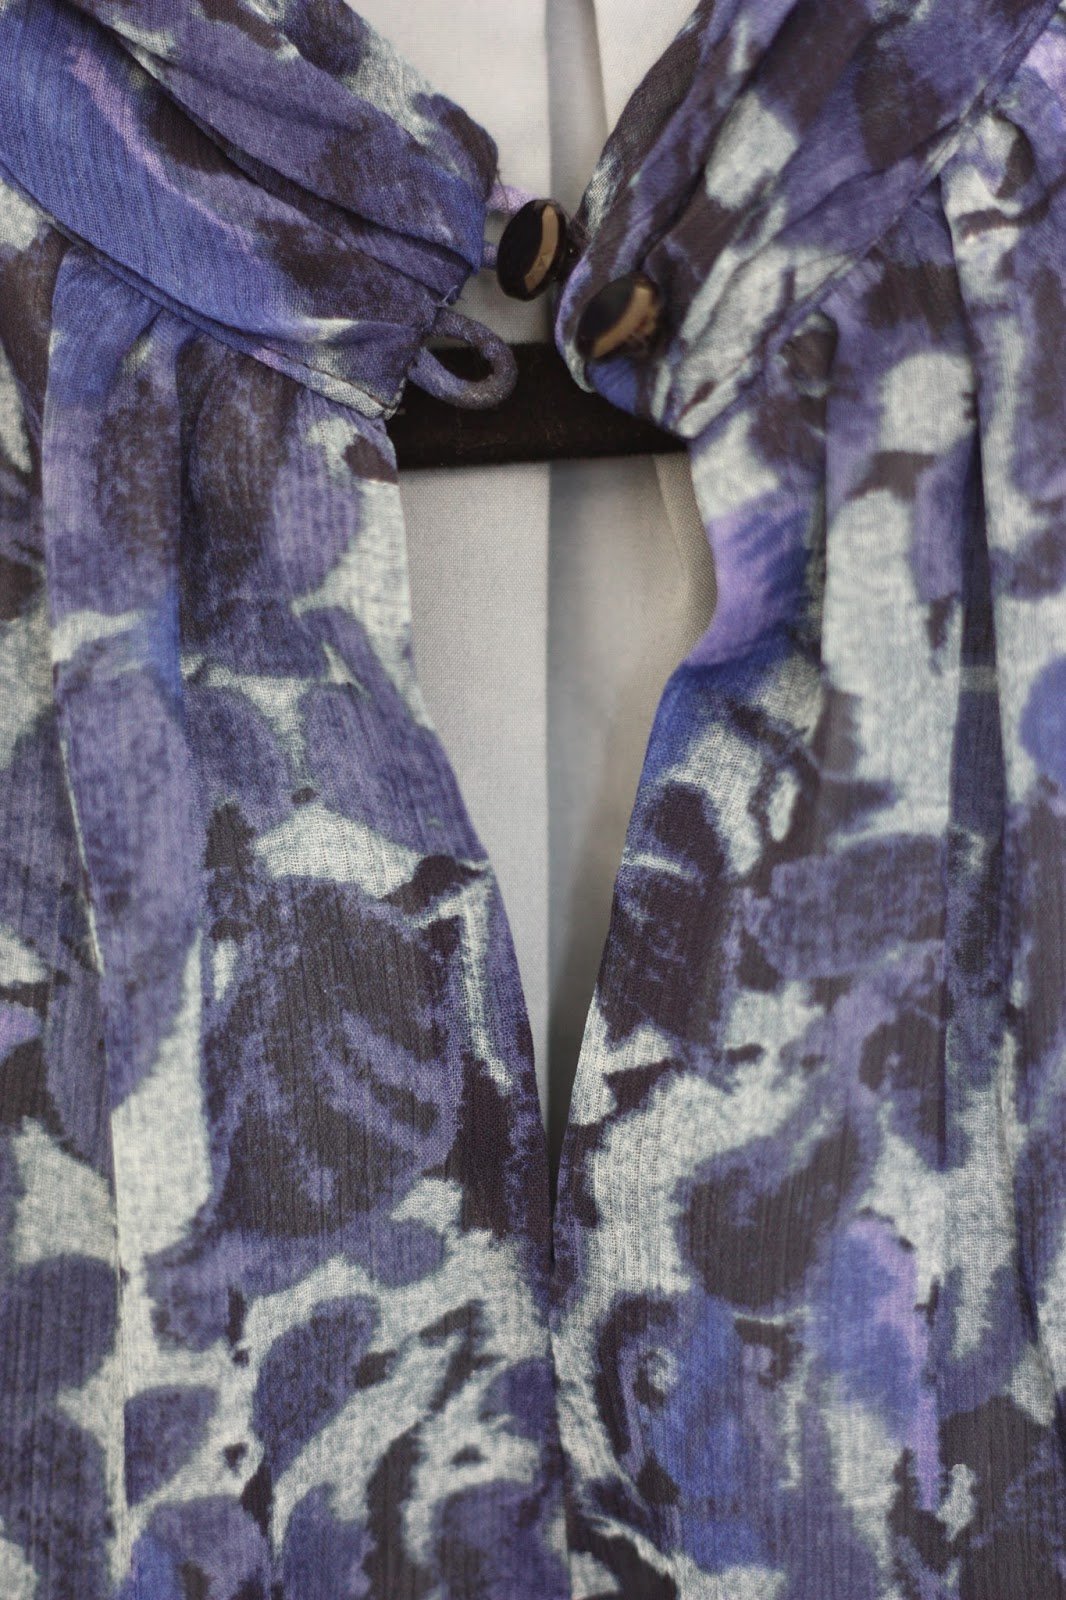
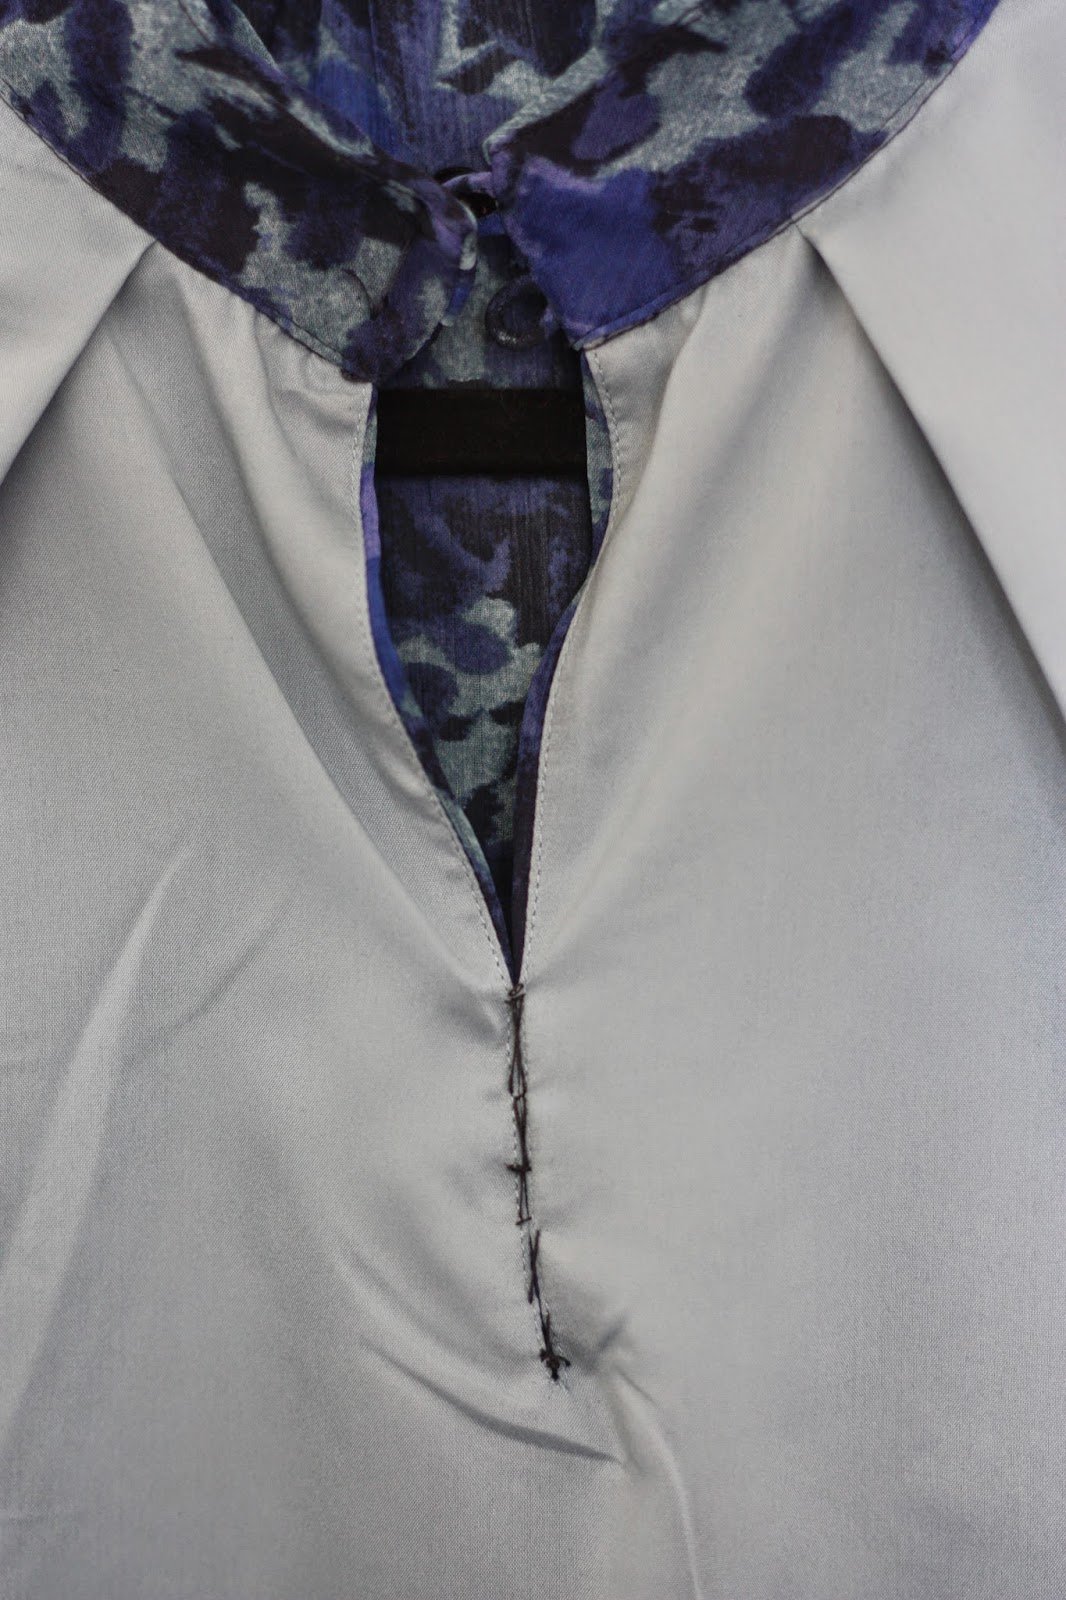
I loved this blouse in the store and must have been half asleep or in denial when I tried it on. The keyhole in the neckline (I made up “keyhole” because I’m not sure what it’s called) opened far too deep for me and left too little to the imagination. I should have noticed this in the fitting room, but I didn’t – live and learn. In this case, I learned how to fix my problem. Just a few hand-sewn stitches on the inside of the blouse, not visible when wearing it, cut the opening down a reasonable size that made me more comfortable and made the shirt suitable for the office. (I didn’t take any before photos, but you can see the outside and the inside of the shirt near the neckline down below.)
Quick Instructions
- Turn shirt inside out.
- Thread the needle through the edge of the opening at the bottom of the opening. Be sure to thread it from the inside so the tail of the thread is hidden.
- Using stitches that aren’t too tight, slowly align the opening closed as you desire and stitch up until the hole is closed enough for your taste. The stitches should be tight enough to keep the two sides of the opening together but no so tight that it pulls the fabric.
- Knot the end of the thread on the inside of the shirt (which is facing out, like in the photo on the right) and you’re done.
Outside Inside
I’ve worn the shirt a few times and you can see the Remix I completed wearing it a while back.

Project 2

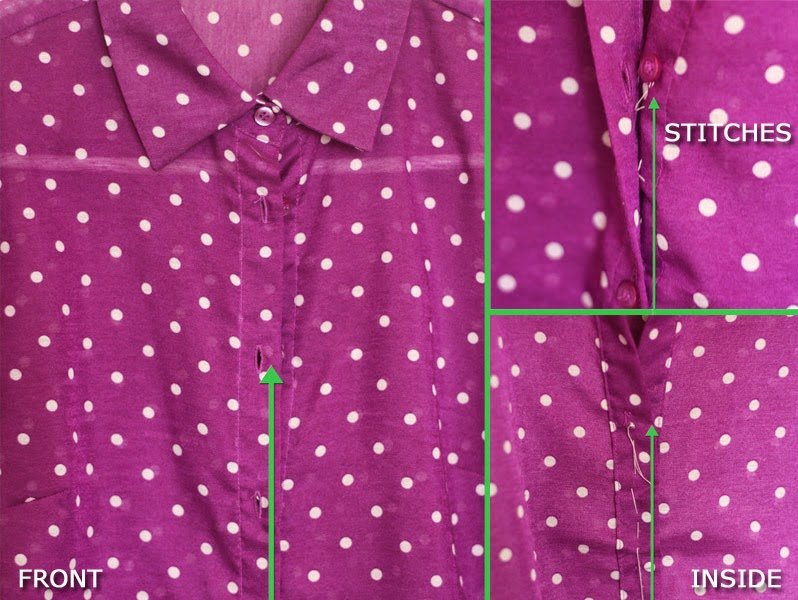
If you wear button-down shirts to work, to run errands, in bed, whatever suits your fancy, then you know the pucker problem to which I’m referring. Maybe it doesn’t plague everyone, but just about every such shirt I own puckers around the chest and it drives me crazy. I always wear a camisole under these shirts – a rule by which we should all live anyway (especially at work!). But a few hand-sewn stitches can also help eliminate this unsightly problem.
To solve this problem, I sew a few somewhat loose stitches to connect the shirt between the buttons along the “seam” where the two sides of the shirt come together and button up along the middle of the torso. These stitches will permanently close the shirt so it now pulls over your head, but it will also keep the space between buttons flat while you’re wearing it. The stitches are attaching the shirt itself and aren’t integrated with the button holes or buttons themselves.
Quick Instructions
- Put the shirt on to determine where the pucker problem plagues you (i.e. between which buttons it puckers). Make a mental note. Then take it off, obviously.
- Button up the shirt and turn the shirt inside out.
- Recall between which buttons the shirt puckers.
- Start stitching from the inside layer of the shirt (which is currently on the outside because the shirt is inside out, as shown in the bottom right photo below). This is the layer to which the buttons are generally stitched. Let’s call this Layer 1. Consider Layer 2 the piece of the shirt that is slightly under Layer 1 as your work but which would sit on top while wearing it and through which you’d push the buttons while wearing it.
- Thread through Layer 1.
- After pulling the thread through Layer 1, catch just a few threads of Layer 2. Catch just enough of Layer 2 to hold the two pieces together without allowing the thread
to show on the front of the shirt. - Thread the needle back through Layer 1. Assuming your started at the top of the area that puckers, travel down the shirt an inch or two, being sure the thread is hidden behind Layer 1. Repeat steps 4 – 7 until you’ve reached the bottom of the section that puckers.
I used the green arrows below, which align in the same spot on the shirt in all three photos from different angles, so you could see how the stitches look from the front outside, the side (“stitches”), and the inside.
Remember two things: 1) the shirt shouldn’t be tight enough that the stitches pull. If so, the shirt is too small and this fix won’t work and 2) you’ll need to be able to pull the shirt over your head so don’t stitch too close to the neckline. I started just under the third button from the top.
I’ve worn this shirt several times at work with a black skirt and with a pink skirt, with my gray “skinnyfied” pants, and out to dinner. All iterations were made possible by this little quick fix.
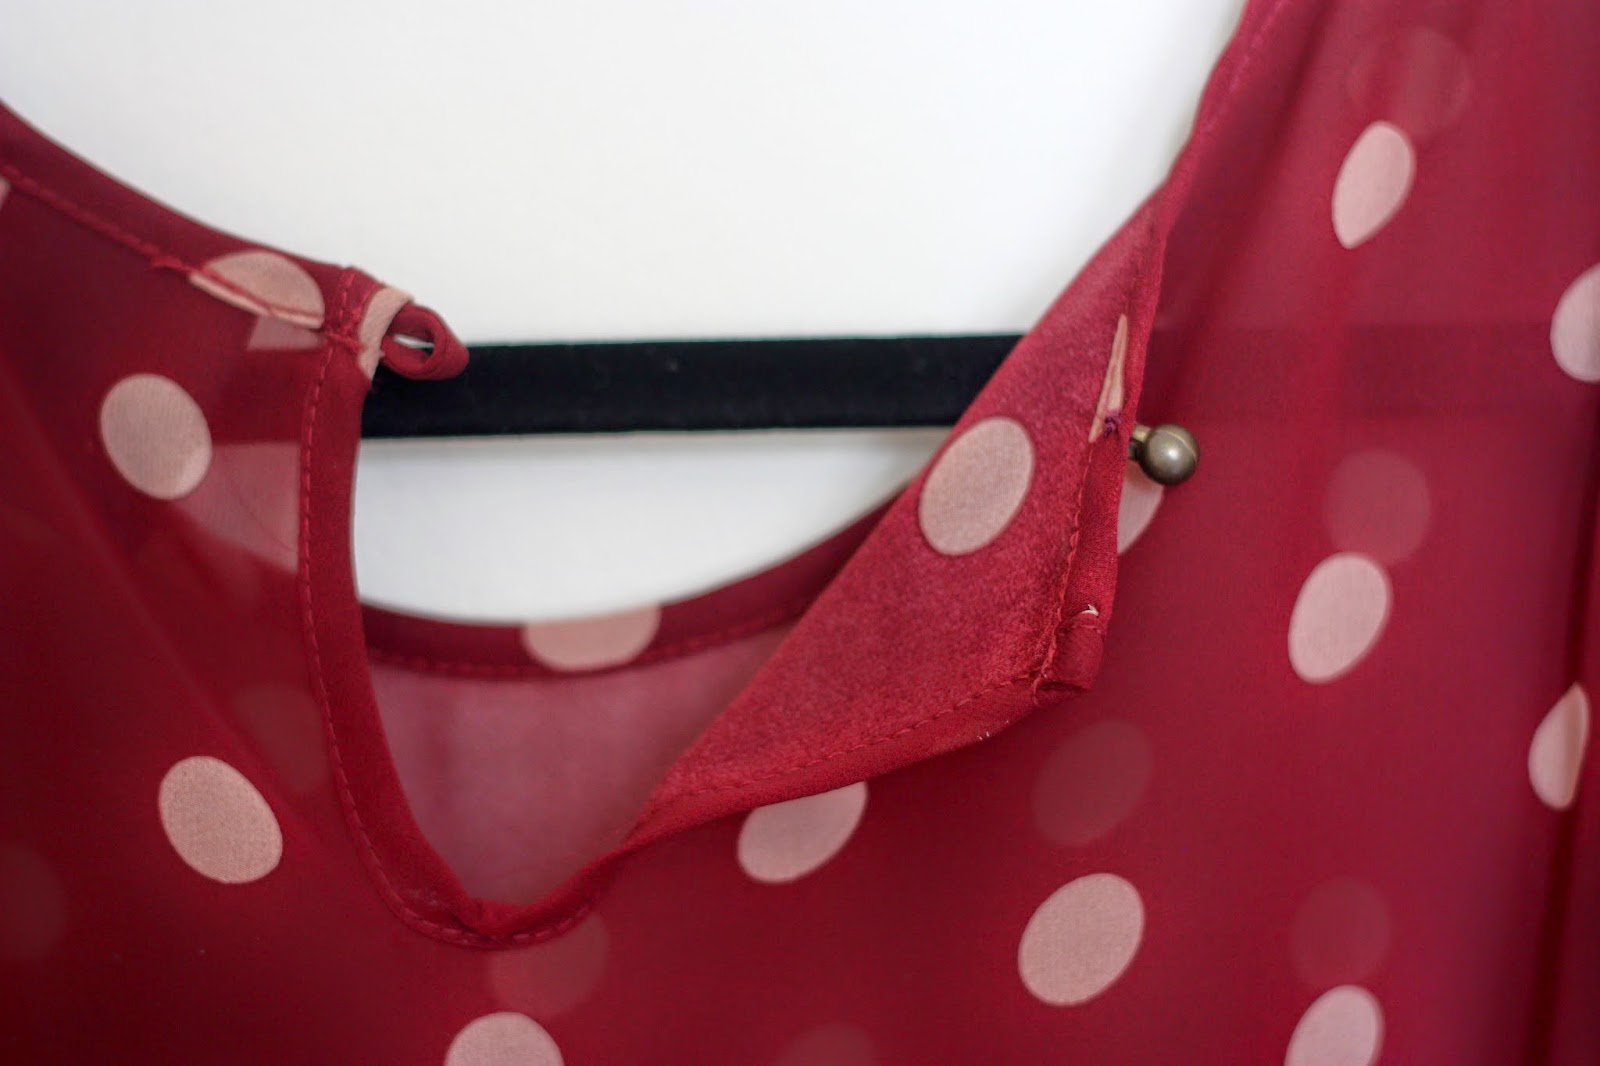
Project 3
This shirt seemed great until I constantly found
my bra straps sneaking out from under the shirt ~ not cool at work, thank you.
The back has a single button at the neckline. I moved the button just an inch
or two so the neckline closed a bit tighter and now the undergarments stay
where they belong. The button used to sit right on the edge of the fabric where you can see a small cream thread dot. I moved the button a bit closer to the shoulder so the boat neck was slightly smaller. So simple that even the most
novice of seamstresses could muster up the courage for this
reconstruction.

If I missed anything in my brief instructions, just let me know in the comments and I will be more than happy to clarify. Do you have any quick fix secrets? Share in the comments so we can all steak them!!
And If you have some items in your closet in need of just a tiny dose of TLC, go give it a shot! Aside from 30 minutes of your afternoon, what do you have to lose?! I’m rooting for you!


One Comment