The Hamburglar | DIY Statement Necklace


I have been looking forward to this post because I have lots to share with you about it.
First, thank you Mom! I told my mom I wanted this dress for my birthday, and she kindly ordered it for me ~ pretty sweet.
Wedding Guest Dress + Halloween Costume
I wore this dress to a friend’s wedding and took a cab home at the end of the night. (The Little Guy and The Man attended but left early to get him (or shall I say “them”) to bed at a reasonable hour, so I was on my own to get back home.
For those of you who know The Man, you know he loves a good early bedtime as much as The Little Guy. I live in a neighborhood filled with restaurants, bars, and clubs. So at midnight on a Saturday (when I jumped out of my cab), the streets were packed with busy cabs and the sidewalks with drunk yuppies and tourists.
A fairly intoxicated twenty-something guy walked by me and, with eyes half-open said, “You’re cute.. but you look like the Hamburglar.” I returned the comment with a large smile and said to myself Thanks! and OMG – I totally thought the same thing when I left my place this afternoon.
Despite my jailbird appearance, I loved the style of the dress and had been in the market for a black and white striped dress FOR YEARS! I could never find the right one… until now. And apparently, I have a snazzy Halloween costume all lined up for this fall. I can’t think of too many pieces that are suitable for weddings and Halloween.
DIY Statement Necklace
I have been on the hunt for a statement necklace (or two, or three, or four) and decided to make a couple myself after Pinterest let me in on the secret that it’s really not that hard if you’re just looking for a simple style. I whipped up this necklace in about an hour or two just before heading to the ceremony. And I felt it added just the right pop of color to dress this up wedding-style.
Do you have any pieces that can be transformed into great Halloween costumes? Tell me about them. I’d call that the ultimate in remixing.
Scroll through for instructions on creating your own simple statement necklace.

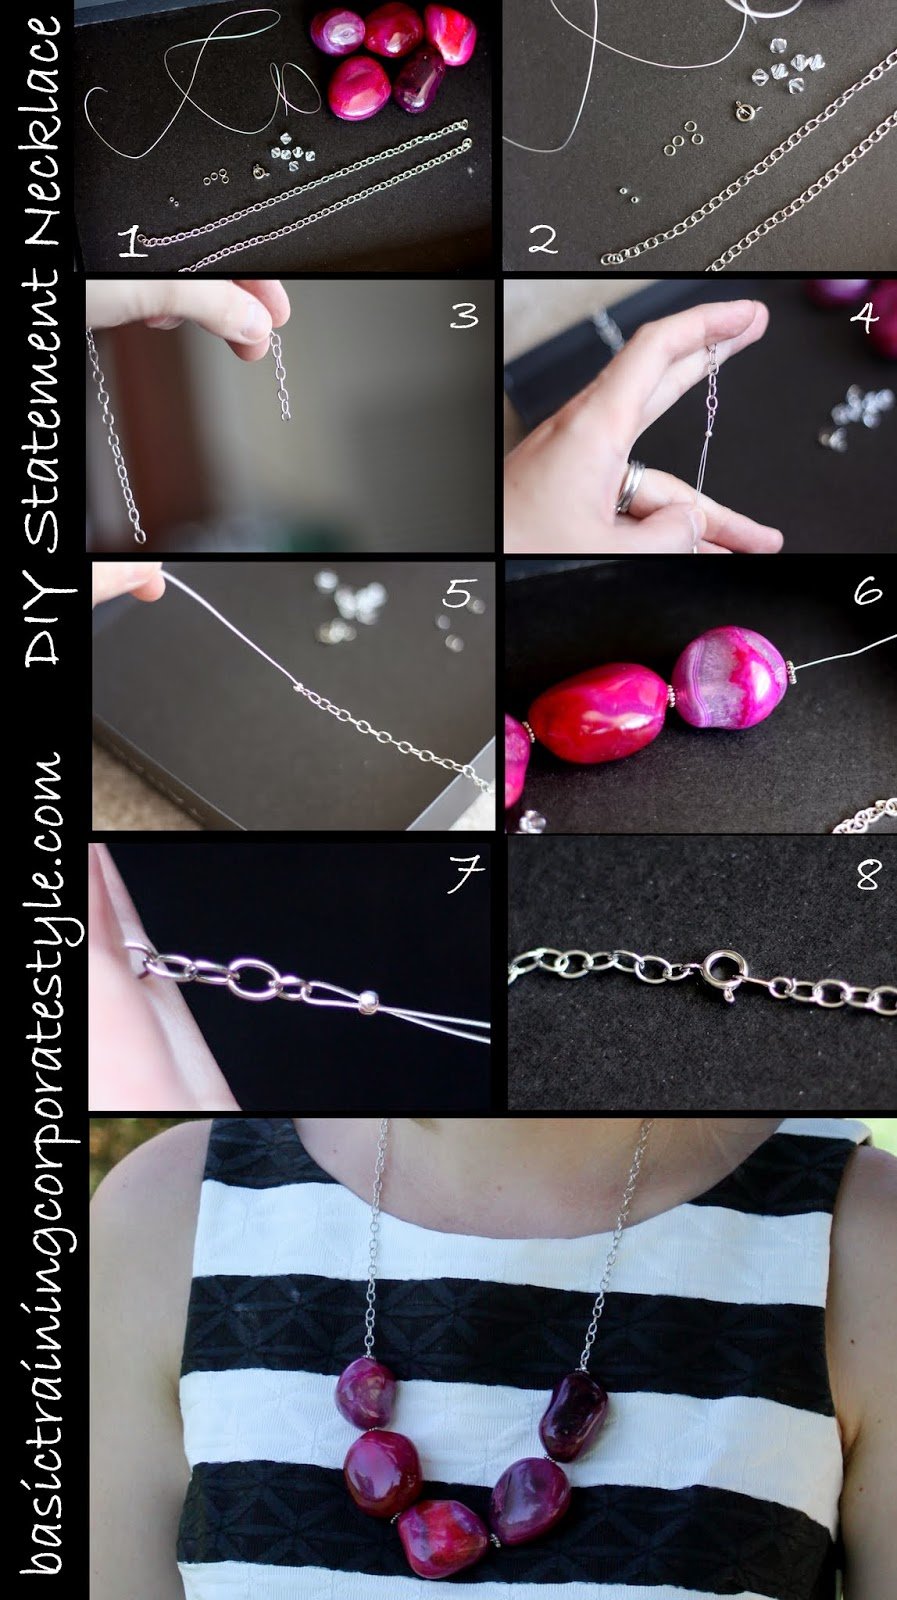
I threw together a little photo guide above, but here are some more detailed instructions follow.
1. Compile your pieces ~ I used flexible beading wire, large stones or beads of your preference to be the focal point, a clasp, 6 spacers, 4 jump rings, 2 crimp beads, 2 8-inch strands of chain, and a partridge in a pear tree. (Just kidding, no partridge, obviously ~ add to my laundry list of lame joke offenses.)
2. Just a closer picture of the small pieces I used. (Note: During construction, I decided I liked flat, silver spacers better than the clear Swarovski crystals, so that part of the photo may be guilty of false advertising. But the crystals could certainly work if you like.)
3. I added a jump ring to the end of my chain in order to connect the wire to the chain. I am no jewelry-making expert, so bear with my basic babbling, but I didn’t understand (after the fact) why I needed this jump ring. But I used it, and if you do the same, be sure to open the jump ring sideways or it won’t likely return to its original shape.
4. Pinch the jump ring back together and thread one end of the wire through a crimp bead, then the jump ring, and then back through the crimp bead. Squish the heck out of the crimp bead so it’s flat and holds the wire tightly. (Confession: Up close, my jump ring re-closure might have been a little barbaric, and they may have turned out more like raindrops. But no one can tell as I wear it around my neck. So as long as you don’t plan to start an Etsy shop with this tutorial, which I would ardently not recommend, excuse any beginner mistakes that no one will notice. They’re inevitable and not worth the stress.)
5. Trim one end of the wire right up next to the crimp bead, so you have just a single thread of wire on which to thread the beads.
6. Thread those pretty beads, alternating with the spacers, that are the whole reason for all these other annoying steps!
7. Repeat steps 3 – 5 with the other end of the wire and the other piece of chain.
8. Attach each side of the clasp, using a jump ring, to one of the open ends of each of the chains.
And you’re done! Now, like me, you can use it to spice up some semi-formal wear or add a kick to your burger thief jumpsuit. Gotta run. The 1989 Golden Arches are calling…